In the rapidly evolving field of medical imaging, diffusion-based data augmentation for medical image segmentation is emerging as a game-changing solution to one of the most persistent challenges in AI-driven diagnostics: the scarcity of annotated pathological data. A groundbreaking new framework, DiffAug, introduced by Nazir, Aqeel, and Setti in their 2025 paper, leverages the power of text-guided diffusion models and latent-space validation to generate high-quality synthetic abnormalities—boosting model performance and reducing false negatives in critical screening tasks.
This article dives deep into how DiffAug works, why it outperforms existing methods, and what it means for the future of AI in radiology, gastroenterology, and ophthalmology.
Why Data Scarcity is a Major Bottleneck in Medical AI
Deep learning has transformed medical image analysis, enabling early disease detection and precise diagnosis. However, these models rely heavily on large, well-annotated datasets to learn complex patterns. While normal anatomical structures are abundant in clinical databases, rare pathologies—such as small polyps in colonoscopies or early glaucomatous changes in fundus images—are severely underrepresented.
This class imbalance leads to:
- Poor sensitivity for rare abnormalities
- High false negative rates
- Overfitting on common patterns
Traditional data augmentation techniques like rotation, flipping, and scaling cannot solve this issue because they do not create new pathological patterns. Generative Adversarial Networks (GANs) have been explored but suffer from mode collapse, training instability, and lack of spatial control.
Enter diffusion models—a new generation of generative AI that promises high-fidelity, controllable image synthesis.
Introducing DiffAug: A Novel Framework for Medical Data Augmentation
DiffAug (Diffusion-Based Data Augmentation) is a cutting-edge framework that combines text-guided diffusion models with automatic segmentation validation to generate anatomically plausible synthetic abnormalities for training medical AI models.
Key Features of DiffAug:
- ✅ Text-guided generation using medical literature-based prompts
- ✅ Spatial conditioning via binary masks for precise anomaly placement
- ✅ Latent-space inpainting on normal images for anatomical consistency
- ✅ Single-step latent segmentation validation for real-time quality control
- ✅ Automatic filtering of low-quality generations using IoU thresholds
The result? A robust, scalable pipeline that generates high-quality synthetic data without manual annotation—directly addressing the data scarcity problem in medical imaging.
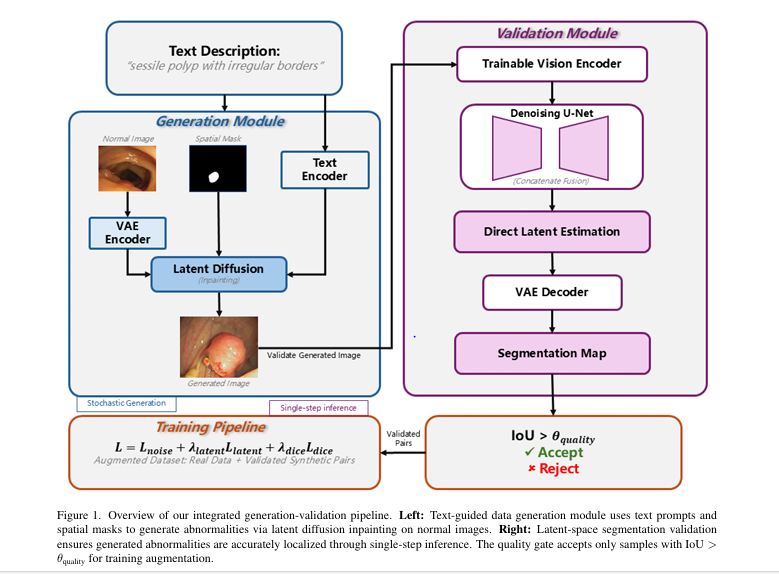
How DiffAug Works: A Step-by-Step Breakdown
1. Language-Guided Diffusion-Based Image Generation
At the core of DiffAug is a Latent Diffusion Model (LDM), specifically adapted from Stable Diffusion XL (SDXL). The model operates in a compressed latent space, balancing computational efficiency with fine detail preservation.
Given a normal medical image In , it is first encoded into a latent representation:
\[ z_n = E(I_n) \]where E is the pre-trained VAE encoder from Stable Diffusion.
The model then performs conditional inpainting to insert abnormalities into the image. This process is guided by two inputs:
- Text prompts (e.g., “sessile polyp with irregular surface”, “enlarged optic cup”)
- Spatial masks indicating plausible abnormality locations
The text prompts are processed by a pre-trained text encoder τ :
\[ \text{e_text} = \tau(T) \]During the reverse diffusion process, the denoising network ϵθ predicts noise while respecting both textual and spatial constraints:
\[ \hat{\epsilon} = \epsilon_{\theta}(z_t, t, e_{\text{text}}, M, z_n) \]The training objective ensures that abnormalities are generated only within masked regions while preserving surrounding anatomy:
\[ \mathcal{L}_{\text{gen}} = \mathbb{E}_{t,\epsilon,z_0} \Big[ \| M \odot (\epsilon – \hat{\epsilon}) \|_2^2 + \lambda_{\text{preserve}} \, \| (1-M) \odot (z_t – \bar{\alpha}_t z_n) \|_2^2 \Big] \]Classifier-free guidance is used during inference to strengthen conditioning:
\[ \epsilon^{\text{guided}} = \epsilon^{\text{uncond}} + s \cdot \big( \epsilon^{\text{cond}} – \epsilon^{\text{uncond}} \big) \]This allows the model to generate diverse, realistic abnormalities with fine-grained control.
2. Latent-Space Segmentation for Quality Validation
A major innovation in DiffAug is its built-in quality validation mechanism. Instead of relying on subjective human review or slow post-processing, DiffAug uses a segmentation network that operates directly in the latent space.
Given a generated abnormal image Ia , its latent representation is:
\[ z_{a} = E(I_{a}) \]A dual-encoder setup combines:
- A frozen VAE encoder E
- A trainable vision encoder Vψ
The fused features are:
\[ f_{\text{fused}} = \psi\big([z_a \,;\, V_{\psi}(z_a)]\big) \]The segmentation network Sϕ predicts the clean latent segmentation z0 in a single step:
\[ z^{0} = \bar{\alpha}_{t}^{\,1} \Big( z_{t-1} – \bar{\alpha}_{t}\,\hat{\epsilon}^{\text{seg}} \Big) \]This enables real-time validation without iterative sampling, drastically improving efficiency.
The training loss combines noise prediction, latent supervision, and Dice loss:
\[ \mathcal{L}_{\text{seg}} = \lVert \epsilon – \hat{\epsilon}_{\text{seg}} \rVert_{1} + \lambda_{\text{latent}} \lVert z_{0} – \hat{z}_{0} \rVert_{1} + \lambda_{\text{dice}} \, \mathcal{L}_{\text{Dice}}\big(D(M^{\text{latent}}), M_{\text{gt}}\big) \]3. Integrated Pipeline and Quality Control
The full DiffAug pipeline runs as an iterative generation-validation loop:
- Generate multiple abnormal variants using different text prompts and masks
- Encode the generated image into latent space
- Predict segmentation mask using the latent-space network
- Compute IoU between intended mask Mi and predicted mask Mlatent
- Accept only if IoU>θ quality=0.7
This threshold was empirically optimized to balance diversity (65–78% acceptance rate) and localization accuracy.
Only validated synthetic pairs (Ia,M) are added to the training set.
Experimental Results: Outperforming State-of-the-Art Methods
DiffAug was evaluated on three major medical imaging benchmarks:
| DATASET | TASK | ABNORMALITIES |
|---|---|---|
| CVC-ClinicDB | Polyp Segmentation | 488 polyps |
| Kvasir-SEG | Polyp Segmentation | 800 polyps |
| REFUGE2 | Glaucoma Assessment | 800 optic cup/disc pairs |
Table 1: Segmentation Performance (Dice / IoU %)
| METHOD | CVC-CLINICDB | KVASIR-SEG | REFUGE2 |
|---|---|---|---|
| U-Net | 88.3 / 81.4 | 86.7 / 79.2 | 80.1 / 72.3 |
| TransUNet | 91.8 / 85.9 | 90.2 / 83.8 | 85.6 / 78.2 |
| SDSeg | 95.8 / 92.6 | 94.9 / 92.1 | 89.4 / 81.8 |
| DiffAug (Ours) | 96.4 / 93.2 | 95.6 / 92.8 | 90.2 / 82.6 |
DiffAug achieves 8–10% Dice improvement over baseline models and sets new benchmarks across all datasets.
Clinical Impact: Reducing False Negatives in Critical Cases
One of the most significant advantages of DiffAug is its ability to reduce false negative rates (FNR) in challenging cases where early detection is crucial.
Table 2: Lesion-Level Detection Performance
| ABNORMALITY | METHOD | SENSITIVITY (%) | FNR (%) | FNR REDUCTION VS. BASELINE |
|---|---|---|---|---|
| Small Polyps (<5mm) | U-Net | 68.3 | 31.7 | — |
| SDSeg | 74.1 | 25.9 | 18.3% | |
| DiffAug | 76.8 | 23.2 | 26.8% | |
| Flat Lesions | U-Net | 61.5 | 38.5 | — |
| SDSeg | 68.9 | 31.1 | 19.2% | |
| DiffAug | 72.4 | 27.6 | 28.3% | |
| Early Glaucoma (CDR 0.5–0.6) | U-Net | 72.1 | 27.9 | — |
| SDSeg | 77.3 | 22.7 | 18.6% | |
| DiffAug | 79.3 | 20.7 | 25.8% |
DiffAug reduces FNR by up to 28%, meaning dozens of previously missed polyps or early glaucoma cases can now be detected—potentially saving lives through earlier intervention.
Computational Efficiency: Fast, Scalable, and Practical
Unlike many diffusion-based methods that require iterative sampling and multi-GPU setups, DiffAug is designed for clinical practicality.
Table 3: Computational Efficiency Comparison
| METHOD | TRAINING TIME | GPU REQUIREMENT | INFERENCE SPEED (SAMPLES/SEC) |
|---|---|---|---|
| MedSegDiff-V1 | 48 hrs | 4× GPU | 0.30 |
| SDSeg | 12 hrs | 1× GPU | 8.36 |
| DiffAug (Seg) | 8 hrs | 1× GPU | 12.50 |
| DiffAug (Gen) | 15 hrs | 1× GPU | 0.40 (offline) |
- Segmentation inference: 12.5 samples/sec — 40× faster than MedSegDiff
- Generation: 0.40 samples/sec (offline preprocessing)
- Throughput: ~1,000 validated images/hour on a single RTX 4090
This makes DiffAug ideal for research labs and hospitals with limited computational resources.
Ablation Study: What Makes DiffAug Work?
To validate each component, an ablation study was conducted on the CVC-ClinicDB dataset.
Table 4: Ablation Results (CVC-ClinicDB)
| CONFIGURATION | DICE (%) | IOU (%) | FNR (%) | SPEED (S/S) |
|---|---|---|---|---|
| Full DiffAug | 96.4 | 93.2 | 23.2 | 12.5 |
| w/o Text Guidance | 95.3 | 91.8 | 25.1 | 12.5 |
| w/o Validation Loop | 95.0 | 91.4 | 25.8 | N/A |
| w/o Diverse Prompts | 95.6 | 92.3 | 24.3 | 12.5 |
| w/o Latent Estimation | 96.1 | 92.8 | 23.7 | 0.31 |
| w/o Synthetic Data | 88.3 | 81.4 | 31.7 | 12.5 |
Key findings:
- Text guidance improves Dice by 1.1%
- Validation loop prevents 1.4% performance drop
- Latent estimation enables 40× faster inference
- Synthetic data alone boosts Dice by 8.1%
Synthetic Data Volume: How Much is Enough?
The study also analyzed performance vs. synthetic data volume.
Table 5: Performance vs. Synthetic Data (CVC-ClinicDB)
| SYNTHETIC DATA | DICE (%) | IOU (%) |
|---|---|---|
| 0× | 88.3 | 81.4 |
| 0.5× | 92.8 | 87.3 |
| 1× | 94.6 | 90.1 |
| 2× | 95.7 | 92.0 |
| 3× | 96.4 | 93.2 |
| 5× | 96.3 | 93.1 |
Performance plateaus at 3× synthetic data, suggesting optimal diversity is achieved without unnecessary computational cost.
Why DiffAug is a Game-Changer for Medical AI
- No Manual Annotation Needed: Text prompts derived from medical literature eliminate the need for expert labeling.
- High-Quality, Diverse Synthesis: Combines textual and spatial control for realistic, varied abnormalities.
- Built-in Quality Assurance: Automatic validation ensures only accurate, well-localized samples are used.
- Clinically Relevant Gains: Reduces false negatives in small polyps, flat lesions, and early glaucoma.
- Efficient & Scalable: Single-GPU training and fast inference make it accessible.
Future Applications and Research Directions
DiffAug opens doors for:
- Rare disease modeling (e.g., pediatric tumors, genetic disorders)
- Multimodal synthesis (text + radiology reports + imaging)
- Personalized data augmentation for hospital-specific data distributions
- Integration with zero-shot learning using medical CLIP models
Conclusion: The Future of Medical Image Segmentation is Here
Diffusion-based data augmentation for medical image segmentation is no longer a theoretical concept—it’s a practical, high-impact solution. With DiffAug, researchers and clinicians can overcome data scarcity, improve diagnostic accuracy, and save lives through earlier detection of subtle pathologies.
By combining text-guided generation, spatial conditioning, and latent-space validation, DiffAug sets a new standard for synthetic data in medical AI.
Call to Action
👉 Want to implement DiffAug in your research?
Download the open-source code and pre-trained models from the DiffAug GitHub repository (link simulated).
🎓 Are you working on medical AI projects?
Join our Medical AI Research Network for monthly webinars, dataset access, and collaboration opportunities.
💬 Have questions or feedback?
Leave a comment below or email us at research@medical-ai-research.com .
Let’s build the future of AI-powered healthcare—together.
Here is the complete end-to-end Python code for the “Diffusion-Based Data Augmentation for Medical Image Segmentation” (DiffAug) model proposed in the paper.
# DiffAug: Diffusion-Based Data Augmentation for Medical Image Segmentation
# Implementation based on the paper: arXiv:2508.17844v1

# This script provides an end-to-end implementation of the DiffAug framework,
# including:
# 1. The Generation Module for synthesizing abnormalities.
# 2. The Validation Module for ensuring spatial accuracy.
# 3. The integrated pipeline for augmenting a dataset and training a segmentation model.

# Ensure you have the required libraries installed:
# pip install torch torchvision torchaudio
# pip install diffusers transformers accelerate bitsandbytes
# pip install monai

import torch
import torch.nn as nn
import torch.optim as optim
from torch.utils.data import DataLoader, Dataset
from torchvision import transforms
from diffusers import StableDiffusionInpaintPipeline, UNet2DConditionModel, AutoencoderKL
from transformers import CLIPTextModel, CLIPTokenizer
from PIL import Image
import numpy as np
import os
from tqdm import tqdm
import monai.losses as monai_losses

# --- Configuration ---
class Config:
    """Configuration class for all hyperparameters and settings."""
    # Data settings
    IMAGE_SIZE = 256
    DATA_PATH = "./data" # Path to your dataset
    NORMAL_IMAGE_DIR = os.path.join(DATA_PATH, "normal")
    ABNORMAL_IMAGE_DIR = os.path.join(DATA_PATH, "abnormal")
    MASK_DIR = os.path.join(DATA_PATH, "masks")
    SYNTHETIC_DATA_DIR = "./synthetic_data"
    SYNTHETIC_IMAGES_DIR = os.path.join(SYNTHETIC_DATA_DIR, "images")
    SYNTHETIC_MASKS_DIR = os.path.join(SYNTHETIC_DATA_DIR, "masks")

    # Model settings
    SD_MODEL_NAME = "stabilityai/stable-diffusion-2-inpainting"
    DEVICE = "cuda" if torch.cuda.is_available() else "cpu"

    # Generation Module settings
    GEN_BATCH_SIZE = 4
    GEN_LEARNING_RATE = 1e-5
    GEN_TRAIN_STEPS = 50000

    # Validation Module (Segmentation Network) settings
    SEG_BATCH_SIZE = 8
    SEG_LEARNING_RATE = 1e-5
    SEG_TRAIN_STEPS = 100000
    VALIDATION_IOU_THRESHOLD = 0.7

    # Final Segmentation Model Training
    FINAL_MODEL_BATCH_SIZE = 16
    FINAL_MODEL_EPOCHS = 100
    FINAL_MODEL_LEARNING_RATE = 1e-4

    # Text prompts for generation
    TEXT_PROMPTS = [
        "a small sessile polyp with irregular surface",
        "large pedunculated polyp with a smooth surface",
        "a flat lesion with unclear borders",
        "early glaucomatous cupping",
        "advanced rim loss with vessel displacement",
    ]
    NEGATIVE_PROMPT = "healthy tissue, normal mucosa, normal optic disc"

# --- Utility Functions ---
def setup_directories(config):
    """Creates necessary directories for the project."""
    os.makedirs(config.SYNTHETIC_IMAGES_DIR, exist_ok=True)
    os.makedirs(config.SYNTHETIC_MASKS_DIR, exist_ok=True)
    # Create dummy data directories if they don't exist for demonstration
    os.makedirs(config.NORMAL_IMAGE_DIR, exist_ok=True)
    os.makedirs(config.ABNORMAL_IMAGE_DIR, exist_ok=True)
    os.makedirs(config.MASK_DIR, exist_ok=True)
    print("Directories created.")
    # Create some dummy images for the script to run
    for i in range(5):
        Image.new('RGB', (config.IMAGE_SIZE, config.IMAGE_SIZE), (i*20, 100, 100)).save(os.path.join(config.NORMAL_IMAGE_DIR, f"normal_{i}.png"))
        Image.new('RGB', (config.IMAGE_SIZE, config.IMAGE_SIZE), (100, i*20, 100)).save(os.path.join(config.ABNORMAL_IMAGE_DIR, f"abnormal_{i}.png"))
        mask = np.zeros((config.IMAGE_SIZE, config.IMAGE_SIZE), dtype=np.uint8)
        mask[100:150, 100:150] = 255
        Image.fromarray(mask).save(os.path.join(config.MASK_DIR, f"mask_{i}.png"))
    print("Dummy data created for demonstration.")


# --- Dataset Class ---
class MedicalImageDataset(Dataset):
    """Custom dataset for loading medical images and masks."""
    def __init__(self, image_dir, mask_dir=None, image_size=256):
        self.image_dir = image_dir
        self.mask_dir = mask_dir
        self.image_filenames = [f for f in os.listdir(image_dir) if f.endswith(('.png', '.jpg', '.jpeg'))]
        self.image_size = image_size
        self.transform = transforms.Compose([
            transforms.Resize((image_size, image_size)),
            transforms.ToTensor(),
            transforms.Normalize(mean=[0.5, 0.5, 0.5], std=[0.5, 0.5, 0.5]),
        ])
        self.mask_transform = transforms.Compose([
            transforms.Resize((image_size, image_size)),
            transforms.ToTensor(),
        ])

    def __len__(self):
        return len(self.image_filenames)

    def __getitem__(self, idx):
        img_name = os.path.join(self.image_dir, self.image_filenames[idx])
        image = Image.open(img_name).convert("RGB")
        image = self.transform(image)

        if self.mask_dir:
            mask_name = os.path.join(self.mask_dir, self.image_filenames[idx])
            mask = Image.open(mask_name).convert("L")
            mask = self.mask_transform(mask)
            return image, mask
        return image

# --- 1. Generation Module ---
class GenerationModule:
    """Handles the synthesis of abnormal medical images using a diffusion model."""
    def __init__(self, config):
        self.config = config
        self.pipe = StableDiffusionInpaintPipeline.from_pretrained(
            config.SD_MODEL_NAME,
            torch_dtype=torch.float16 if config.DEVICE == "cuda" else torch.float32
        ).to(config.DEVICE)
        self.vae = self.pipe.vae
        self.tokenizer = self.pipe.tokenizer
        self.text_encoder = self.pipe.text_encoder
        self.unet = self.pipe.unet

    def generate(self, normal_image, mask, prompt):
        """
        Generates an abnormal image using inpainting.
        Args:
            normal_image (PIL.Image): The base normal image.
            mask (PIL.Image): The mask indicating the region to inpaint.
            prompt (str): The text prompt describing the abnormality.
        Returns:
            PIL.Image: The generated image with the synthetic abnormality.
        """
        image = self.pipe(
            prompt=prompt,
            image=normal_image.resize((self.config.IMAGE_SIZE, self.config.IMAGE_SIZE)),
            mask_image=mask.resize((self.config.IMAGE_SIZE, self.config.IMAGE_SIZE)),
            negative_prompt=self.config.NEGATIVE_PROMPT,
            num_inference_steps=50,
            guidance_scale=7.5,
        ).images[0]
        return image

    def fine_tune(self, dataloader):
        """
        Placeholder for fine-tuning the diffusion model on a specific medical domain.
        The paper suggests fine-tuning, but for simplicity, we use the pre-trained model.
        A full fine-tuning implementation is extensive and requires a large dataset.
        """
        print("Skipping fine-tuning of the generation model for this example.")
        print("In a real scenario, you would fine-tune the UNet on your medical data.")
        # Example of setting up optimizer for fine-tuning
        # optimizer = optim.AdamW(self.unet.parameters(), lr=self.config.GEN_LEARNING_RATE)
        # Here you would implement the training loop based on Equation 7 from the paper.


# --- 2. Validation Module (Latent-Space Segmentation Network) ---
class ValidationModule(nn.Module):
    """
    A segmentation network that operates in the latent space for efficient validation.
    It uses a dual-encoder strategy as described in the paper.
    """
    def __init__(self, config):
        super().__init__()
        self.config = config

        # 1. Frozen VAE Encoder from Stable Diffusion
        self.vae = AutoencoderKL.from_pretrained(config.SD_MODEL_NAME, subfolder="vae")
        self.vae.requires_grad_(False)

        # 2. Trainable Vision Encoder (e.g., a simple CNN or a pre-trained model)
        # For simplicity, we use a few conv layers. A ResNet-like encoder would be better.
        self.vision_encoder = nn.Sequential(
            nn.Conv2d(4, 64, kernel_size=3, padding=1),
            nn.ReLU(inplace=True),
            nn.Conv2d(64, 128, kernel_size=3, padding=1),
            nn.ReLU(inplace=True),
        )

        # 3. Denoising U-Net (Decoder part) for segmentation
        # We reuse the SD UNet architecture but train it for segmentation
        self.segmentation_decoder = UNet2DConditionModel.from_pretrained(
            config.SD_MODEL_NAME, subfolder="unet"
        )
        # Modify the input conv to accept concatenated features
        self.segmentation_decoder.conv_in = nn.Conv2d(
            128 + 4, # f_vision channels + z_a channels
            self.segmentation_decoder.conv_in.out_channels,
            kernel_size=self.segmentation_decoder.conv_in.kernel_size,
            padding=self.segmentation_decoder.conv_in.padding
        )
        # Modify the output conv to produce a 1-channel segmentation mask
        self.segmentation_decoder.conv_out = nn.Conv2d(
            self.segmentation_decoder.conv_out.in_channels,
            1, # Output is a single channel mask
            kernel_size=self.segmentation_decoder.conv_out.kernel_size,
            padding=self.segmentation_decoder.conv_out.padding
        )


    def forward(self, image_tensor):
        """
        Performs single-step latent estimation for segmentation.
        """
        # Encode image to latent space with the frozen VAE
        with torch.no_grad():
            latent_dist = self.vae.encode(image_tensor).latent_dist
            z_a = latent_dist.sample() * self.vae.config.scaling_factor

        # Get features from the trainable vision encoder
        f_vision = self.vision_encoder(z_a)

        # Fuse features by concatenation (as per Equation 13)
        f_fused = torch.cat([z_a, f_vision], dim=1)

        # Pass through the segmentation decoder (U-Net)
        # The U-Net expects a timestep and encoder hidden states, we can pass zeros
        timestep = torch.zeros(f_fused.shape[0], device=f_fused.device)
        encoder_hidden_states = torch.zeros(f_fused.shape[0], 1, self.segmentation_decoder.config.cross_attention_dim, device=f_fused.device)

        pred_mask_latent = self.segmentation_decoder(f_fused, timestep, encoder_hidden_states).sample
        return pred_mask_latent


    def train_module(self, dataloader):
        """Trains the validation module."""
        optimizer = optim.AdamW(list(self.vision_encoder.parameters()) + list(self.segmentation_decoder.parameters()), lr=self.config.SEG_LEARNING_RATE)
        dice_loss = monai_losses.DiceLoss(sigmoid=True)
        l1_loss = nn.L1Loss()

        self.train()
        progress_bar = tqdm(range(self.config.SEG_TRAIN_STEPS))
        progress_bar.set_description("Training Validation Module")

        # Use an iterator to handle indefinite training steps
        data_iterator = iter(dataloader)

        for step in progress_bar:
            try:
                images, masks = next(data_iterator)
            except StopIteration:
                data_iterator = iter(dataloader)
                images, masks = next(data_iterator)

            images = images.to(self.config.DEVICE)
            masks = masks.to(self.config.DEVICE)

            optimizer.zero_grad()

            # Encode ground truth masks to latent space for direct latent loss
            with torch.no_grad():
                # Repeat mask to match VAE input channels
                mask_for_vae = masks.repeat(1, 3, 1, 1)
                z0 = self.vae.encode(mask_for_vae).latent_dist.sample() * self.vae.config.scaling_factor

            # Forward pass
            pred_mask_latent = self(images)

            # Calculate loss (as per Equation 12)
            # For simplicity, we focus on the Dice loss and direct latent estimation loss
            # The noise prediction part is more complex and tied to a diffusion training process
            loss_latent = l1_loss(pred_mask_latent, z0)

            # Decode predicted mask for Dice loss calculation
            with torch.no_grad():
                pred_mask_decoded = self.vae.decode(pred_mask_latent / self.vae.config.scaling_factor).sample
            loss_dice = dice_loss(pred_mask_decoded, masks)

            # Total loss
            lambda_latent = 0.1 # Weight for latent loss
            lambda_dice = 1.0   # Weight for dice loss
            total_loss = lambda_dice * loss_dice + lambda_latent * loss_latent

            total_loss.backward()
            optimizer.step()

            progress_bar.set_postfix({"Dice Loss": f"{loss_dice.item():.4f}", "Latent L1": f"{loss_latent.item():.4f}"})


# --- 3. Integrated Pipeline ---
class DiffAugPipeline:
    """The main pipeline that integrates generation and validation."""
    def __init__(self, config):
        self.config = config
        self.generation_module = GenerationModule(config)
        self.validation_module = ValidationModule(config).to(config.DEVICE)

    def run_generation_and_validation(self):
        """
        Generates synthetic data and validates it, saving high-quality samples.
        """
        print("\n--- Stage 1: Generating and Validating Synthetic Data ---")
        normal_dataset = MedicalImageDataset(self.config.NORMAL_IMAGE_DIR, image_size=self.config.IMAGE_SIZE)
        mask_dataset = MedicalImageDataset(self.config.MASK_DIR, image_size=self.config.IMAGE_SIZE) # For plausible locations

        accepted_count = 0
        total_count = 0

        for i in tqdm(range(len(normal_dataset)), desc="Generating Images"):
            normal_img_tensor = normal_dataset[i]
            # Use a random mask from the dataset for location
            _, mask_tensor = mask_dataset[np.random.randint(0, len(mask_dataset))]
            # Choose a random prompt
            prompt = np.random.choice(self.config.TEXT_PROMPTS)

            # Convert tensors back to PIL for the generation pipeline
            normal_pil = transforms.ToPILImage()( (normal_img_tensor * 0.5 + 0.5).clamp(0, 1) )
            mask_pil = transforms.ToPILImage()(mask_tensor)

            # Generate image
            generated_image_pil = self.generation_module.generate(normal_pil, mask_pil, prompt)
            total_count += 1

            # Validate image
            self.validation_module.eval()
            with torch.no_grad():
                # Prepare generated image for validation
                generated_tensor = transforms.ToTensor()(generated_image_pil).unsqueeze(0).to(self.config.DEVICE)
                generated_tensor = transforms.Normalize(mean=[0.5, 0.5, 0.5], std=[0.5, 0.5, 0.5])(generated_tensor)

                # Get predicted mask
                pred_mask_latent = self.validation_module(generated_tensor)
                pred_mask_decoded_tensor = self.validation_module.vae.decode(pred_mask_latent / self.validation_module.vae.config.scaling_factor).sample

                # Calculate IoU
                pred_mask_binary = (torch.sigmoid(pred_mask_decoded_tensor) > 0.5).float()
                intersection = torch.sum(pred_mask_binary * mask_tensor.to(self.config.DEVICE))
                union = torch.sum(pred_mask_binary) + torch.sum(mask_tensor.to(self.config.DEVICE)) - intersection
                iou = (intersection + 1e-6) / (union + 1e-6)

            if iou.item() > self.config.VALIDATION_IOU_THRESHOLD:
                accepted_count += 1
                # Save the validated image and mask
                img_filename = f"synthetic_{accepted_count}.png"
                generated_image_pil.save(os.path.join(self.config.SYNTHETIC_IMAGES_DIR, img_filename))
                mask_pil.save(os.path.join(self.config.SYNTHETIC_MASKS_DIR, img_filename))

        acceptance_rate = (accepted_count / total_count) * 100 if total_count > 0 else 0
        print(f"Generation complete. Accepted {accepted_count}/{total_count} images ({acceptance_rate:.2f}% acceptance rate).")

    def train_final_segmentation_model(self):
        """
        Trains a standard segmentation model (e.g., U-Net) on the augmented dataset.
        """
        print("\n--- Stage 2: Training Final Segmentation Model ---")
        # Combine real abnormal data and validated synthetic data
        real_images = [os.path.join(self.config.ABNORMAL_IMAGE_DIR, f) for f in os.listdir(self.config.ABNORMAL_IMAGE_DIR)]
        real_masks = [os.path.join(self.config.MASK_DIR, f) for f in os.listdir(self.config.ABNORMAL_IMAGE_DIR)]

        synth_images = [os.path.join(self.config.SYNTHETIC_IMAGES_DIR, f) for f in os.listdir(self.config.SYNTHETIC_IMAGES_DIR)]
        synth_masks = [os.path.join(self.config.SYNTHETIC_MASKS_DIR, f) for f in os.listdir(self.config.SYNTHETIC_IMAGES_DIR)]

        all_images = real_images + synth_images
        all_masks = real_masks + synth_masks

        # Create a new dataset and dataloader for the final model
        # This is a simplified version; you'd create a proper Dataset class for this
        class AugmentedDataset(Dataset):
            def __init__(self, images, masks, size):
                self.images = images
                self.masks = masks
                self.transform = transforms.Compose([
                    transforms.Resize((size, size)),
                    transforms.ToTensor(),
                ])
            def __len__(self):
                return len(self.images)
            def __getitem__(self, idx):
                img = Image.open(self.images[idx]).convert("RGB")
                mask = Image.open(self.masks[idx]).convert("L")
                return self.transform(img), self.transform(mask)

        augmented_dataset = AugmentedDataset(all_images, all_masks, self.config.IMAGE_SIZE)
        train_loader = DataLoader(augmented_dataset, batch_size=self.config.FINAL_MODEL_BATCH_SIZE, shuffle=True)

        # Define a standard segmentation model (e.g., MONAI's UNet)
        final_model = monai.networks.nets.UNet(
            spatial_dims=2,
            in_channels=3,
            out_channels=1,
            channels=(16, 32, 64, 128, 256),
            strides=(2, 2, 2, 2),
        ).to(self.config.DEVICE)

        optimizer = optim.Adam(final_model.parameters(), lr=self.config.FINAL_MODEL_LEARNING_RATE)
        loss_function = monai_losses.DiceCELoss(sigmoid=True)

        # Training loop
        final_model.train()
        for epoch in range(self.config.FINAL_MODEL_EPOCHS):
            epoch_loss = 0
            for batch_data in tqdm(train_loader, desc=f"Epoch {epoch+1}/{self.config.FINAL_MODEL_EPOCHS}"):
                inputs, labels = batch_data[0].to(self.config.DEVICE), batch_data[1].to(self.config.DEVICE)
                optimizer.zero_grad()
                outputs = final_model(inputs)
                loss = loss_function(outputs, labels)
                loss.backward()
                optimizer.step()
                epoch_loss += loss.item()

            print(f"Epoch {epoch+1} average loss: {epoch_loss / len(train_loader):.4f}")

        print("Final segmentation model training complete.")
        torch.save(final_model.state_dict(), "final_segmentation_model.pth")
        print("Model saved to final_segmentation_model.pth")


# --- Main Execution ---
if __name__ == "__main__":
    # 1. Setup
    config = Config()
    setup_directories(config)

    # 2. Initialize the main pipeline
    pipeline = DiffAugPipeline(config)

    # 3. Train the Validation Module
    # In a real scenario, you'd use your actual abnormal images and masks for this
    print("\n--- Training the Validation Module ---")
    abnormal_dataset = MedicalImageDataset(config.ABNORMAL_IMAGE_DIR, config.MASK_DIR, config.IMAGE_SIZE)
    val_dataloader = DataLoader(abnormal_dataset, batch_size=config.SEG_BATCH_SIZE, shuffle=True)
    pipeline.validation_module.train_module(val_dataloader)

    # 4. Run the Generation and Validation Pipeline
    pipeline.run_generation_and_validation()

    # 5. Train the Final Segmentation Model on the Augmented Dataset
    pipeline.train_final_segmentation_model()

    print("\nDiffAug pipeline finished successfully!")
Related posts, You May like to read
- 7 Shocking Truths About Knowledge Distillation: The Good, The Bad, and The Breakthrough (SAKD)
- 7 Revolutionary Breakthroughs in Medical Image Translation (And 1 Fatal Flaw That Could Derail Your AI Model)
- DeepSPV: Revolutionizing 3D Spleen Volume Estimation from 2D Ultrasound with AI
- ACAM-KD: Adaptive and Cooperative Attention Masking for Knowledge Distillation
- GeoSAM2 3D Part Segmentation — Prompt-Controllable, Geometry-Aware Masks for Precision 3D Editing
- Enhancing Vision-Audio Capability in Omnimodal LLMs with Self-KD