Claude Code • CLI • Complete Developer Guide 2026
Claude Code CLI: Complete 2026 Developer Guide
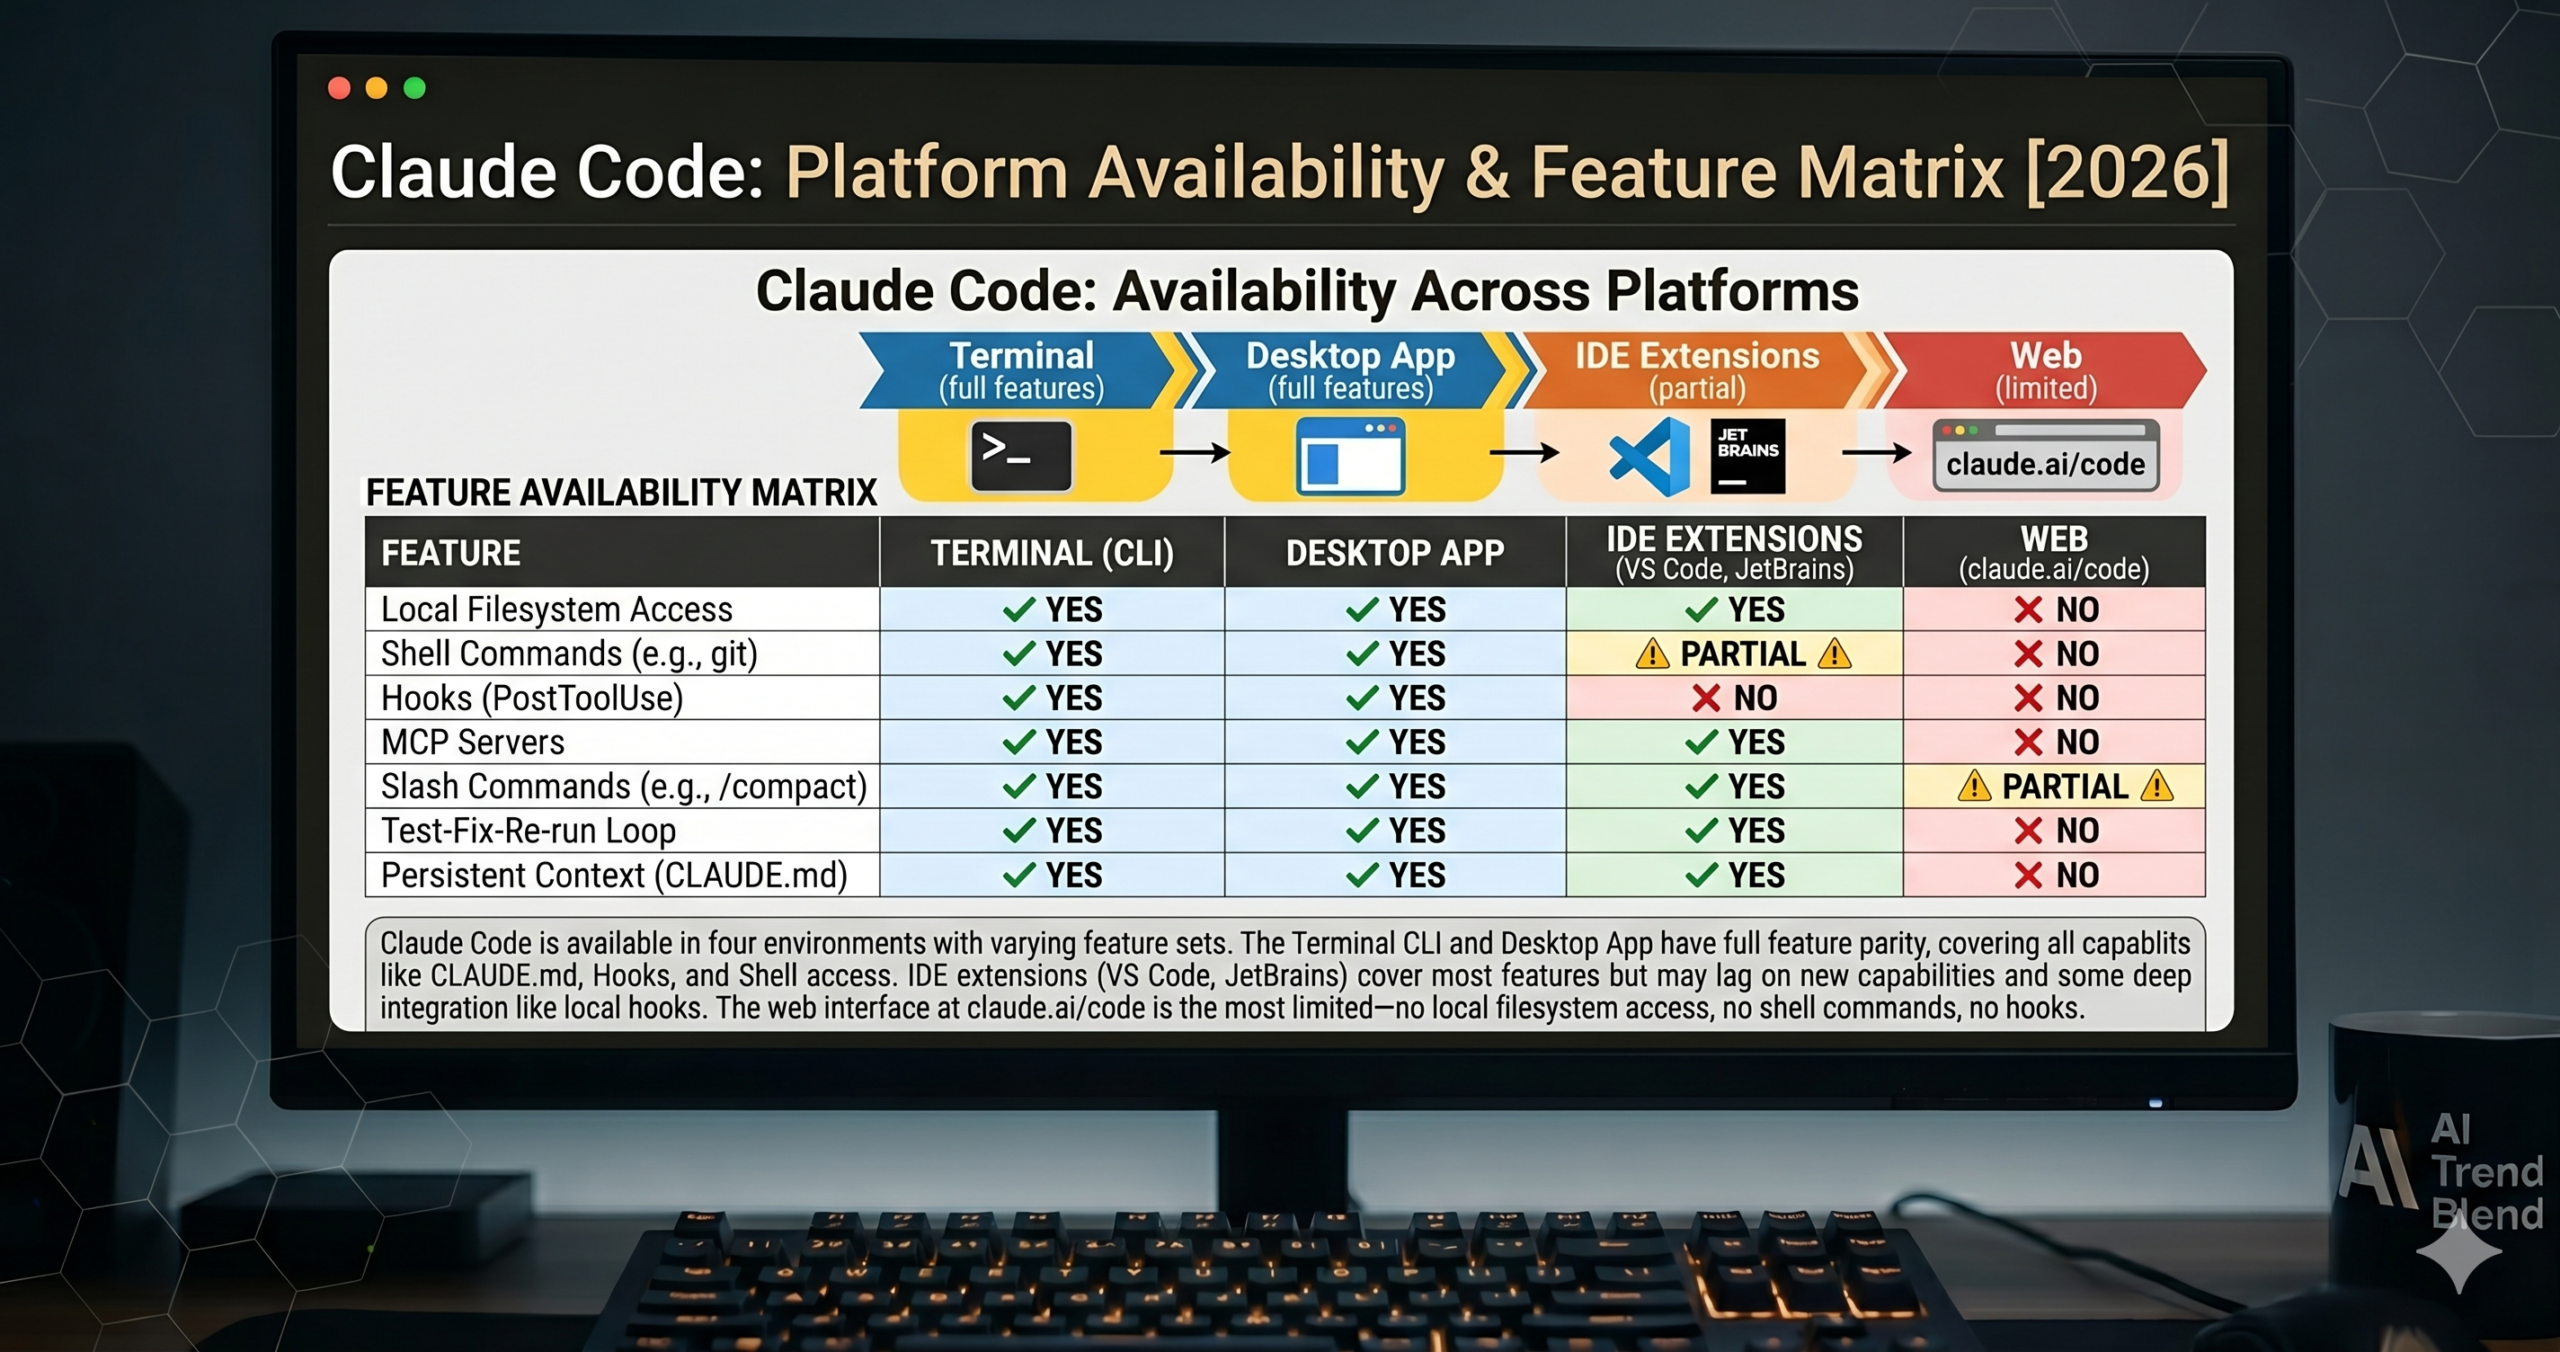
Claude Code is Anthropic’s official CLI tool — a terminal-based agent that connects Claude’s reasoning to your actual development environment. It can read your files, write and edit code, run shell commands, search your codebase, execute tests, and manage git — all from a single conversational interface in your terminal. The CLI is also available as a VS Code and JetBrains IDE extension, and as a web interface at claude.ai/code, but the terminal version gives you the full capability surface without the constraints of an editor integration layer.
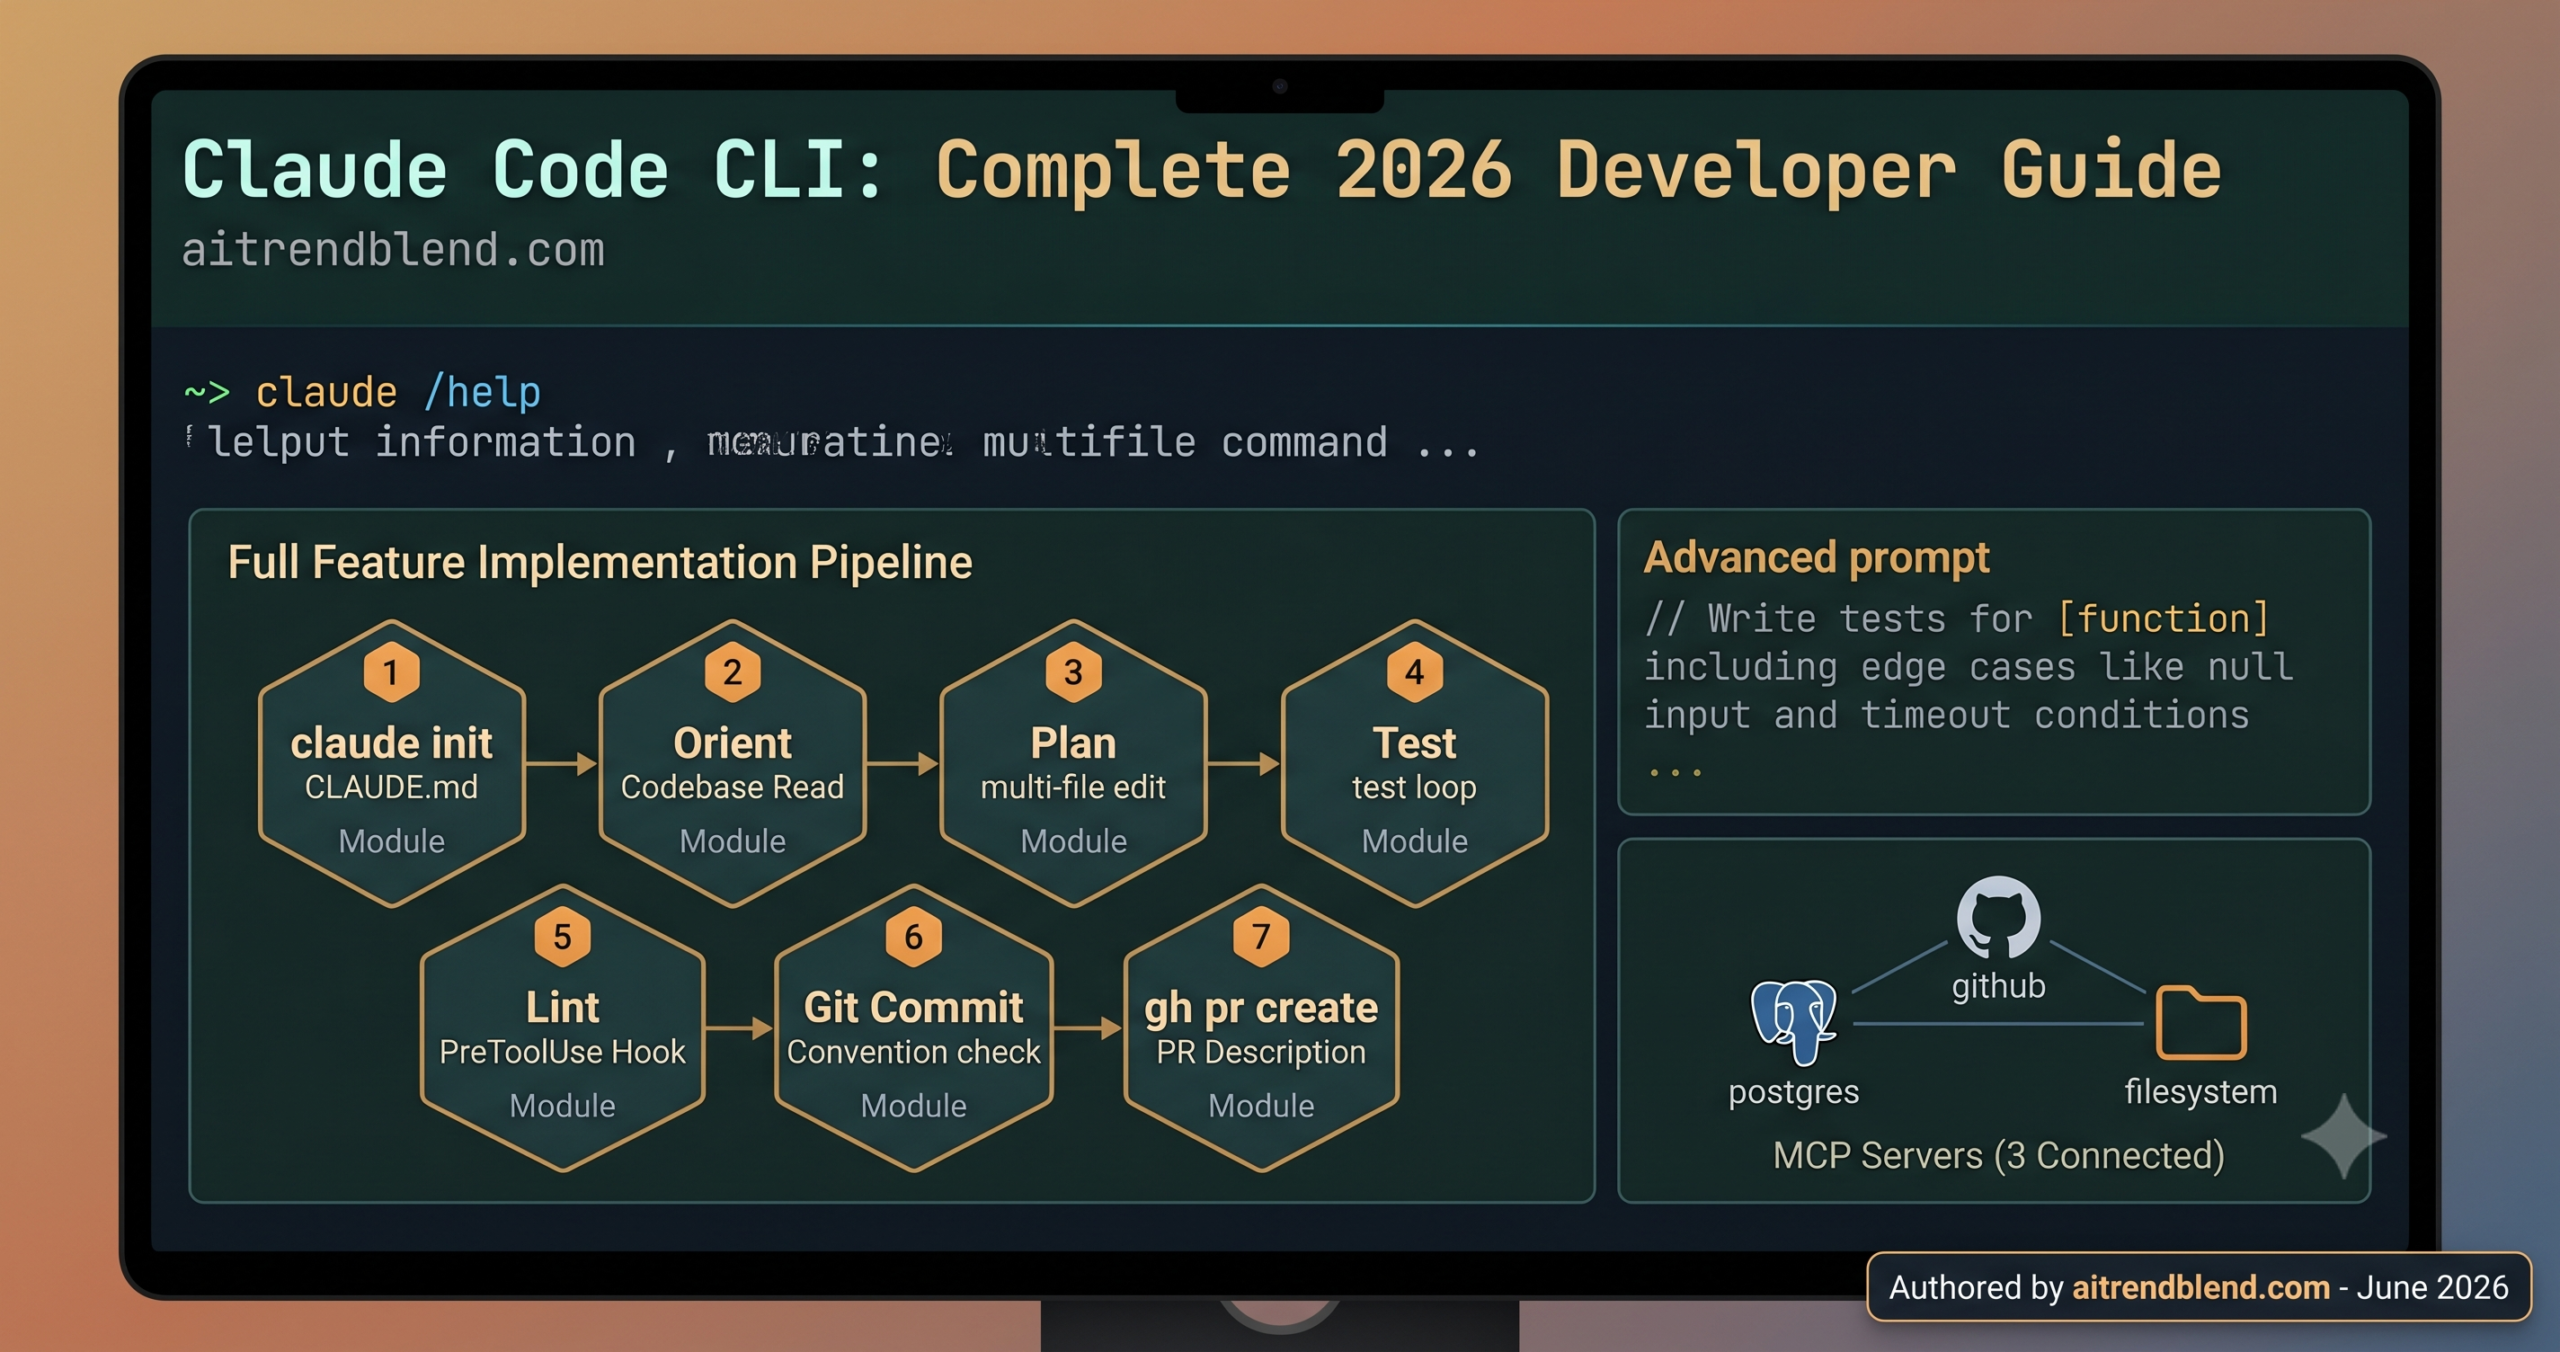
This guide covers every major Claude Code capability in 2026 — ten practical workflows from first installation to building a fully automated development pipeline. Workflows 1–3 cover setup, navigation, and your first edits. Workflows 4–6 address git integration, testing loops, and the CLAUDE.md persistent context system. Workflows 7–9 go into MCP servers, hooks, and advanced prompt patterns. Workflow 10 is the complete production development pipeline that brings all of it together.
Why Claude Code Handles Development Differently Than Chat-Based AI
The structural difference between Claude Code and a browser-based AI assistant is not a UI preference — it is an architectural one. Chat-based AI tools operate in an isolated context: you paste code in, the model responds with suggestions, and you manually apply those suggestions to your actual codebase. Claude Code operates directly in your development environment: it reads your real files, understands your project structure, runs your real tests, and makes actual changes through the same tools a developer would use. There is no copy-paste gap between the AI’s suggestions and your codebase.
That gap matters more than it sounds. When Claude Code reads the file before making a change, it reads the current state of that file — not a version you pasted ten minutes ago with differences you may have forgotten to include. When it runs your tests, it runs them in your actual environment against your actual dependencies. When it finds a test failure, it reads the actual error message rather than working from a description you typed. The feedback loops are tighter by several orders of magnitude, and tighter feedback loops mean fewer compounding errors across a session.
Compared to GitHub Copilot’s inline autocomplete, Cursor’s AI editing layer, and standard Claude.ai for code tasks, Claude Code operates at a higher level of autonomy. Copilot and Cursor suggest completions and edits that you accept or reject. Claude Code takes sequences of actions across multiple files and multiple tool calls to accomplish tasks. The appropriate mental model is not “better autocomplete” — it is closer to “junior developer who knows your codebase.” The output quality of that developer depends heavily on how well you have set up their working context, which is what most of this guide addresses.
Claude Code’s core advantage over chat-based AI coding is direct environment access — it reads the actual current state of your files and runs your actual tests. The gap between AI suggestion and applied change is eliminated, which means errors surface and get corrected faster within a single session.
Before You Start: Installation and Environment Setup
Claude Code requires Node.js 18 or higher. Install it globally via npm and authenticate with your Anthropic account — or with an API key if you are using it programmatically. The claude doctor command runs a diagnostic that checks your Node version, authentication status, and environment configuration, which is the fastest way to confirm your setup is correct before you begin.
Claude Code has three availability channels beyond the terminal: the desktop app for Mac and Windows (all features identical to the terminal), VS Code and JetBrains IDE extensions (Claude available in a side panel within the editor), and the web interface at claude.ai/code (browser-based, no local file access). The terminal version is the reference implementation — all features covered in this guide are available there. IDE extensions may have a subset of features depending on version. The web interface has the most constrained feature set.
10 Claude Code Workflows Every Developer Should Know
Workflow 1: Slash Commands and Keyboard Shortcuts — The Full Reference
Most developers who pick up Claude Code discover its most useful features by accident, six months in. Slash commands are typed at the prompt and give you direct control over session behaviour, model selection, memory management, and multi-agent operations. Keyboard shortcuts handle the micro-interactions — clearing context, switching to fast mode, escaping a running task — that separate a fluid session from a frustrating one. Learning these upfront turns a capable tool into one that feels specifically designed for your workflow.
The most consequential command most people do not find for weeks is /compact. As a session grows long, Claude Code’s context window fills with the full conversation history. /compact summarises the conversation into a compressed representation, freeing up context window space while preserving the working understanding of the project. Running it before a long session goes stale is the single most effective way to extend productive working time per session.
Keyboard shortcuts handle the fast interactions that do not warrant typing a full command. These are among the most useful and least documented:
Esc to interrupt is the most important shortcut to internalise. When Claude Code starts down the wrong path — reads the wrong files, misunderstands the task, begins making unwanted changes — a single Esc stops it before damage compounds. The interrupted state is recoverable: you can clarify the task and continue from where the session was, rather than starting fresh or undoing incorrect changes manually.
Use ! <command> to pipe shell output directly into Claude’s context. Running ! git log --oneline -20 before asking Claude to write a commit message means it reads the actual recent commit history rather than guessing at your conventions. The ! prefix is the fastest way to give Claude live environment context without switching windows.
Workflow 2: Reading and Understanding an Unfamiliar Codebase
The problem most people run into when using Claude Code on an existing project for the first time is giving it tasks that are too specific before Claude has built up enough project context to execute them correctly. Claude Code builds its understanding of a codebase through the files it reads — it does not have omniscient knowledge of your project until it has read the relevant parts. Starting with orientation tasks before diving into implementation gets you significantly better results on the first attempt.
Orientation tasks — “describe the overall architecture,” “list all API endpoints,” “explain the authentication flow” — force Claude to read broadly across the project before you ask it to change anything specific. The mental model it builds from that reading makes subsequent targeted requests more accurate because it already knows where the relevant code lives, what the naming conventions are, and how the components relate to each other.
“Do not edit anything yet” is more than a safety instruction — it changes the model’s behaviour during the reading phase. Without the constraint, Claude Code reads just enough to start making changes. With it, the reading is thorough because editing is explicitly off the table. You get a better mental model built from that reading, which produces more accurate edits when you do ask for them.
For large codebases where full orientation takes too many tokens, use the Explore subagent. Type / to access subagent spawning, or frame your prompt as: “Search the codebase for all files that handle authentication and summarise them — do not read them all, just find and list them.” The Explore agent uses file pattern matching and targeted grep rather than reading every file, keeping orientation within a reasonable token budget.
Workflow 3: Writing, Editing, and Multi-File Changes Reliably
Think about what a correct code edit actually requires. The model needs to read the current file state (not its training data version), understand what needs to change and why, make a minimal edit that achieves the goal without introducing unintended side effects, and verify that the change is consistent with how related code in other files works. Every one of those steps can go wrong when the task is underspecified. The prompt patterns below are designed to prevent each failure mode specifically.
The most common Claude Code editing mistake is making the request too broad. “Refactor the authentication module” is an instruction with enormous scope — and Claude Code will fill that scope with its own interpretation of what “refactor” means, which may not match yours. Narrow, specific tasks produce reliable edits. Broad tasks produce changes that require significant review before you know whether they are correct.
“Do not modify any existing functions” is the single most reliable guardrail against Claude Code over-editing. Without it, Claude may “helpfully” refactor adjacent code while making your requested change — introducing unreviewed changes that may break things you were not working on. Explicit scope constraints are not distrust; they are how you keep a capable tool from doing more than the task requires.
Workflow 4: Git Integration — Commits, Diffs, Branch Management, and PRs
Claude Code has full git access through the Bash tool, which means every git operation available on the command line is available to Claude — and Claude can reason about git history to make better decisions about changes. The git workflows below are particularly useful because Claude Code can read your commit history to infer your team’s commit message conventions, check the diff before committing to ensure nothing unintended is staged, and write PR descriptions that accurately reflect all the commits on the branch rather than just the last one.
Here is where it gets interesting with PR creation. Most AI tools generate PR descriptions from the current staged changes. Claude Code generates PR descriptions from the full branch diff against the base branch — meaning it accounts for every commit on the branch, including intermediate work and fixups that are invisible to tools that only look at the final state. The resulting PR descriptions are more complete and accurate, and require less manual editing before submission.
Asking Claude Code to review the diff before committing catches the most common commit mistake: accidentally staging unrelated changes. When Claude reads the diff and reports back, you have a human-readable summary of exactly what is going into the commit — the same review you would do yourself, but faster and with less mental overhead. The cost of this step is one extra tool call. The benefit is catching “wait, why is that file in there” before it is in git history.
For projects with commit message linting (Conventional Commits, a custom pattern enforced by a pre-commit hook), include the convention as a rule in your CLAUDE.md file (see Workflow 7). Claude Code reads CLAUDE.md at session start and applies those rules automatically to every commit request without needing them in the prompt each time.
Workflow 5: The Test-Fix-Re-Run Loop — Debugging with Claude Code
The test-fix-re-run loop is where Claude Code’s direct environment access compounds most visibly. The cycle is: run tests, read failures, identify the cause, fix the code, re-run tests, repeat. In a chat-based workflow, each iteration requires you to copy the test output to the chat, wait for the model to suggest a fix, manually apply it, and re-run manually. In Claude Code, the entire loop runs in the same session — Claude runs the tests, reads the real error output, makes the fix, and re-runs without you touching the keyboard between iterations.
The prompt framing matters for how many iterations Claude attempts before stopping to check in. Left unconstrained, Claude Code will iterate on test failures until it either fixes them or runs out of ideas — which can result in a long autonomous session that you cannot observe meaningfully. Framing the task with a check-in point lets you stay informed at the right granularity without micromanaging every step.
The diagnostic prompt pattern — “Do NOT run tests yet. First, read the code path and hypothesise what is causing this” — prevents the most common Claude Code debugging mistake: running tests repeatedly with different small fixes until something works, without understanding why. Forced hypothesis-before-action produces a fix that addresses the root cause rather than the symptom, which means it does not break again under slightly different conditions.
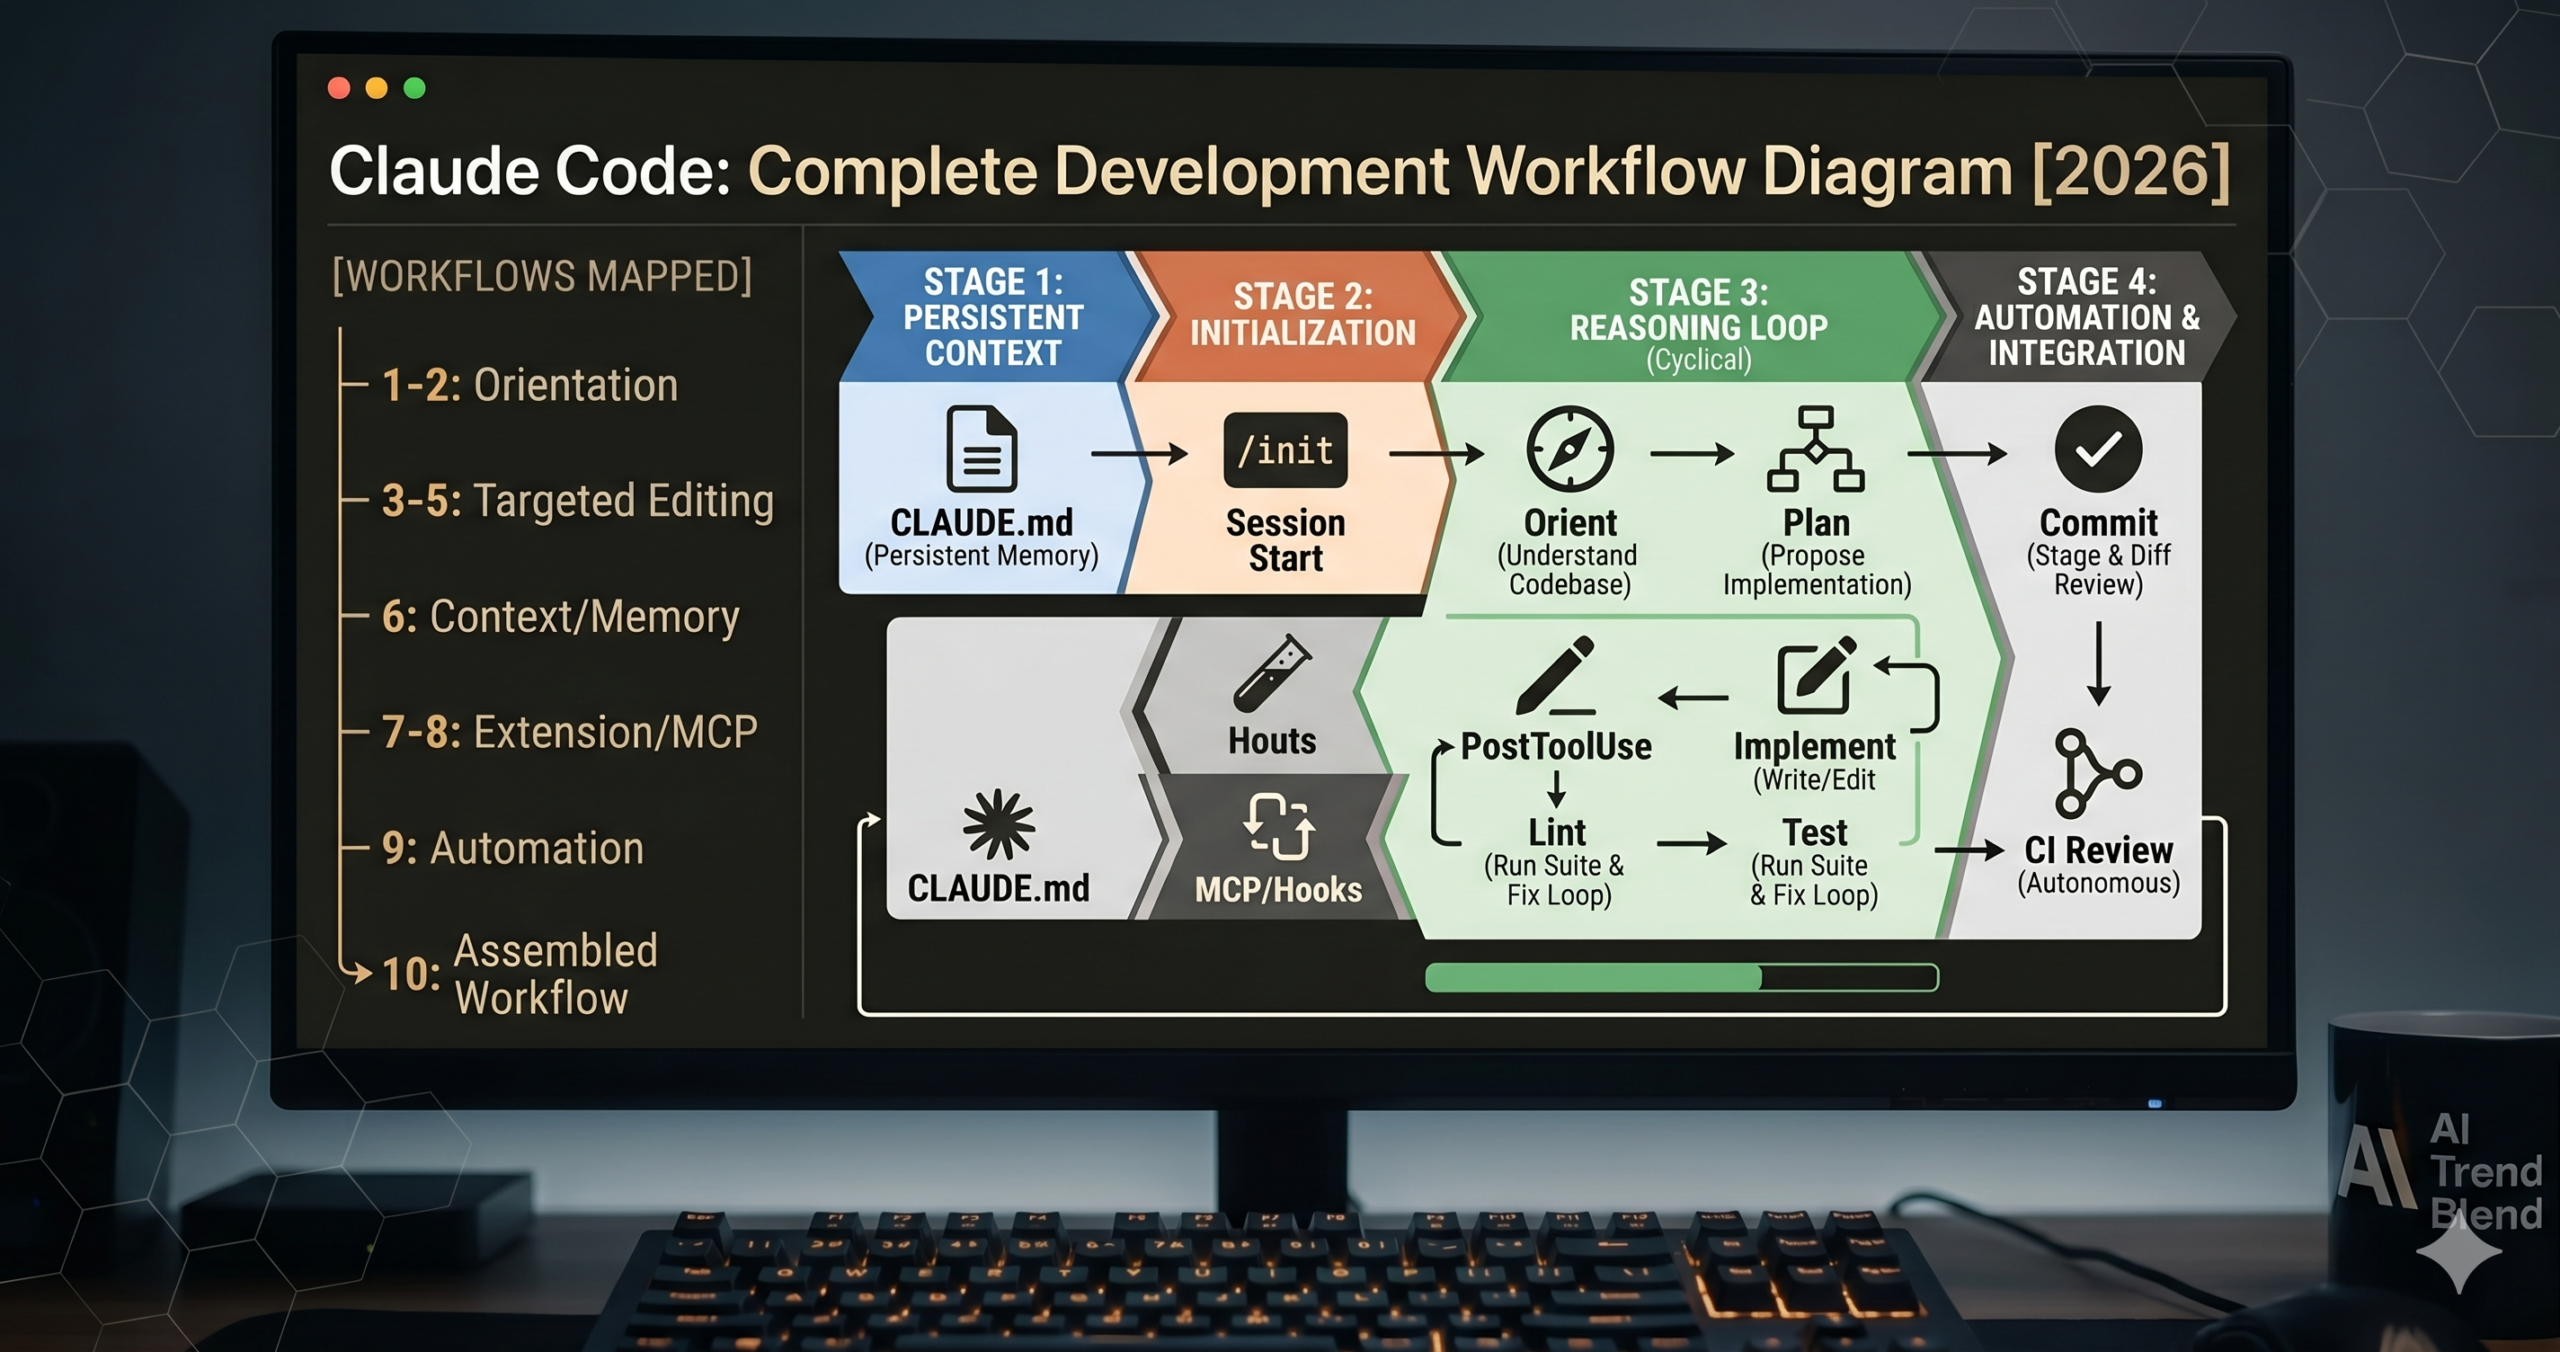
Workflow 6: CLAUDE.md — Persistent Project Context That Survives Sessions
Every new Claude Code session starts cold. The model reads CLAUDE.md before reading anything else — making it the single most leveraged file in your project for AI-assisted development. Whatever you put in CLAUDE.md becomes the default context for every session in that project: coding conventions, architecture decisions, testing requirements, commit message format, files to avoid editing, commands to run before making changes. You write it once; it applies to every session automatically.
Most tutorials skip this part entirely. CLAUDE.md is typically described as an optional file for “project notes” — which undersells what it actually does. A well-written CLAUDE.md eliminates the need to re-establish context at the start of every session, prevents recurring mistakes caused by Claude not knowing your conventions, and encodes the “invisible rules” of your project that no amount of clever prompting will surface if they are not written down.
The “Files — Do Not Modify Without Asking” section is the most immediately useful addition for teams. Without it, Claude Code may confidently edit production config files, migration files, or auto-generated files that should never be touched manually — because those files look like any other source file without the context that they are protected. One line in CLAUDE.md prevents an entire category of risky autonomous edits.
Use /memory at any point in a session to open CLAUDE.md for editing. Claude Code re-reads the file at the start of each session — updates you make mid-project apply from the next session onward. Keep the file under 200 lines to avoid it consuming too much of the context window. Treat the “Known Issues” section as a living document: whenever you hit a surprising limitation or behaviour in your project, add a one-line note so future sessions start with that knowledge.
Workflow 7: MCP Servers — Extending Claude Code with Custom Tools
The Model Context Protocol (MCP) is the standard for extending Claude Code with external tools and data sources. An MCP server exposes capabilities — database queries, API calls, file system operations, custom business logic — that Claude Code can call the same way it calls built-in tools like Read, Bash, and Edit. The practical implication: you can give Claude Code access to your production database (read-only), your internal API, your company’s design system, or any other system that can be wrapped in a simple server, without writing any special Claude integration code.
This is not a small distinction from standard tool use via the API. MCP servers run persistently alongside your Claude Code session, maintain connection state, and can expose complex multi-operation capabilities without you specifying tool schemas in every session. Configure an MCP server once in Claude Code’s settings, and it is available in every session from that point forward — including sessions started by other developers on your team who share the same config.
The filesystem MCP server is the most immediately useful for most teams — it gives Claude Code access to directories outside your current project root (documentation repos, shared component libraries, internal tooling) without needing to navigate there manually. Configured once, Claude Code can reference your shared design system from any project session without any special prompt to locate it.
For team setups, commit a .claude/settings.json to the project repository with the MCP server configuration for project-specific servers (database access, internal APIs). Use environment variable references for secrets — "$DATABASE_URL" in the config, actual value in the developer’s shell environment — so the config file is safe to commit without exposing credentials.
Workflow 8: Hooks — Automating Actions on Tool Events
Hooks are shell commands that Claude Code runs in response to specific tool events — before a file edit, after a bash command, when a new session starts, when the session ends. They are defined in your settings and run automatically without appearing in the conversation. The use cases range from lightweight (running a linter after every file edit so Claude sees lint errors immediately) to substantial (posting a Slack notification when an autonomous session completes, or logging every bash command to an audit trail).
Most developers who learn about hooks for the first time think of them as an advanced edge case. The auto-lint-on-edit hook is not an edge case — it is the single most useful three-line hooks configuration for any project with a linter, and it meaningfully improves first-attempt code quality by making lint compliance part of every edit cycle rather than a separate pass at the end.
The PostToolUse linter hook changes the edit-test-lint cycle in a fundamental way. Without it, linting happens after changes are made — often after several edits have accumulated lint debt. With it, lint runs after every single edit and Claude Code reads the output immediately. Lint failures surface while the edit context is still active, and Claude fixes them before moving to the next task rather than discovering them at the end of a long session.
The safety guardrail hook pattern — blocking dangerous command patterns with a PreToolUse hook that exits non-zero — is useful for team deployments where junior developers are using Claude Code with elevated permission settings. Exit code 1 from a PreToolUse hook blocks the tool call and shows the hook output in the session. The hook output is visible to Claude, so it reads the block reason and explains it to the user rather than silently failing.
Workflow 9: Non-Interactive Mode and CI/CD Integration
Claude Code runs interactively by default — it expects you to be at the terminal, reading responses and approving or denying tool calls. The --print flag switches to non-interactive mode: the task runs, Claude produces a single response, and the process exits. This makes Claude Code scriptable — it can run in CI pipelines, cron jobs, pre-commit hooks, or any automation context where interactive prompting is not possible.
The security consideration in non-interactive mode is real: without a human in the loop to approve tool calls, Claude Code must be configured with appropriate permission levels before running autonomously. The --dangerously-skip-permissions flag removes all permission prompts — only use it in sandboxed environments (a Docker container with no credentials, a read-only filesystem, a purpose-built CI job) where the blast radius of an unintended action is controlled.
The pre-commit hook pattern — where Claude reviews the staged diff and only blocks on real issues — adds AI code review to every developer’s commit workflow without requiring any process change. The key design choice is the exit condition: grep -q "^OK" means the commit proceeds unless Claude explicitly flags something. False positives are not a concern because the commit is only blocked by explicit issues, not by any ambiguity in Claude’s response.
Workflow 10: The Complete AI-Augmented Development Pipeline
Everything in Workflows 1–9 compounds when assembled into a coherent development pipeline. CLAUDE.md encodes the project’s conventions. MCP servers extend Claude Code’s reach into the database and external APIs. Hooks run the linter and test suite automatically on every edit. Non-interactive CI jobs catch security issues before they reach review. The interactive session on top of that infrastructure is used for what it is uniquely good at: reasoning through ambiguous problems, navigating complex multi-file changes, and making architectural decisions that require context no automated tool can provide.
The developer’s role in this pipeline shifts from code producer to code reviewer and decision-maker. You define the task, specify the constraints, evaluate the output, and guide the next step. Claude Code handles the mechanical production: reading files, writing edits, running tests, committing changes. The total time spent on routine tasks — boilerplate, test writing, documentation, small bug fixes — drops significantly. The time spent on genuinely hard problems — system design, performance optimisation, security architecture — stays constant, and may increase because you have more time for it.
“Do not write any code until I approve the plan” is the highest-leverage instruction in the entire master workflow. The planning step surfaces misunderstandings about scope, dependencies, and approach before any code is written — not after several files have been changed in a direction you did not intend. Reviewing a 6-bullet plan takes thirty seconds. Reverting and redirecting a five-file implementation takes considerably longer.
For teams, adapt the CLAUDE.md to include a team-specific “Implementation Checklist” section — the set of questions Claude should answer before starting any feature work: Is there an existing pattern for this type of change? Which team member owns this area? Is there a Jira/Linear ticket number to reference in the commit? The checklist runs automatically at the start of every session that reads CLAUDE.md, without needing to be in the prompt.
Common Mistakes and How to Fix Them
Mistake 1 — Giving Claude Code tasks without context, then wondering why the result is wrong. Claude Code is as capable as the context it has. “Fix the bug” is not a task — it is a guess that Claude has to fill in. “In src/auth/session.ts:147, the validateToken function returns true for expired tokens when the expiry timestamp is exactly equal to the current timestamp. Fix the boundary condition.” is a task. Specific context produces reliable results; vague requests produce guesses that may or may not match your intention.
Mistake 2 — Not using CLAUDE.md. Every developer who runs sessions without CLAUDE.md spends the first few minutes of each session re-establishing context that should be persistent. Fifteen minutes spent writing a good CLAUDE.md saves two to five minutes of every future session for the life of the project — and prevents the recurring mistakes that happen when Claude does not know your conventions.
Mistake 3 — Letting sessions run too long without /compact. As a session grows, the context window fills with the full conversation history. Eventually the model’s attention is spread thin across the entire history and recent instructions get less weight than earlier ones. Running /compact when the session is productive but the responses are starting to feel less focused resets the context efficiently without losing the working understanding of the task.
Mistake 4 — Approving all tool calls without reading them. Claude Code asks for permission before risky tool calls when running in the default permission mode. These prompts are not bureaucratic interruptions — they are the last checkpoint before an action is taken. A bash command you do not recognise, a file edit in a directory you did not expect, a git operation on the wrong branch — all of these are catchable at the permission prompt. Reading tool calls before approving them takes three seconds and prevents the most common categories of unintended change.
| Mistake | What It Causes | Correct Approach |
|---|---|---|
| Vague task requests | Claude guesses at scope — makes changes you did not intend | Specify file, line number, exact wrong behaviour, expected correct behaviour |
| No CLAUDE.md | Recurring mistakes from unknown conventions; wasted context re-establishment | Run /init, write conventions, protected files, dev commands, commit format |
| Sessions run indefinitely | Context window fills; older instructions carry more weight than recent ones | Run /compact when responses start drifting; /clear for a genuinely fresh start |
| Auto-approving all tool calls | Unintended edits, wrong-branch commits, or unexpected shell commands land unreviewed | Read every tool call before approving — takes 3 seconds, prevents most unintended actions |
| No hooks configured | Lint errors and test failures accumulate across edits, discovered only at the end | Configure PostToolUse linter hook — lint runs after every edit and Claude corrects immediately |
What Claude Code Still Gets Wrong in 2026
Large-scale refactoring across dozens of files is still unreliable when the full scope of the change is not specified upfront. Claude Code can refactor one module reliably. Ask it to “refactor the entire codebase to use the new authentication system” and the result will be partially correct, internally inconsistent, and require more review effort than doing the refactor manually with good tooling. For large-scale structural changes, the correct workflow is breaking the change into individually specified sub-tasks and doing each one with a separate, focused prompt — not delegating the decomposition to Claude.
Correctness on tasks that require deep domain expertise remains contingent on what information Claude has been given. Claude Code can write syntactically correct SQL, but whether the query produces the right result on your specific schema depends on whether it has read and understood your schema correctly. It can implement a cryptographic operation, but whether the implementation is secure against your specific threat model requires human expert review. The model’s confidence in these domains can exceed its actual accuracy — reading authoritative on a topic is not the same as being correct on it. Domain-critical code should always get a human expert review pass regardless of Claude’s apparent confidence.
Long autonomous sessions that involve many sequential tool calls accumulate drift over time. The model’s earlier decisions in a session influence later ones in ways that are not always visible from the conversation. Checking in after every 10–15 tool calls — even just “does your current approach still match what we agreed at the start?” — catches this drift before it compounds into a result that requires significant unwinding. The autonomous capability is real; the limitations on sustained autonomous quality over very long sessions are also real.
Building a Development Practice Around Claude Code
Working through these ten workflows, the consistent pattern is this: Claude Code’s value compounds with setup investment. A developer who spends two hours writing a thorough CLAUDE.md, configuring the right MCP servers, and setting up three hooks will get dramatically better results than one who opens a fresh session with no context and types vague requests. The tool is only as capable as the context you give it — and the infrastructure you build around it determines whether that context is rich and reliable or thin and inconsistent.
There is a broader principle visible in how Claude Code changes daily development work that is worth naming. The tasks that consume the most time in a typical development day are rarely the hardest ones. They are the routine ones — writing boilerplate, chasing down a bug introduced by a dependency update, writing tests for code that already exists, updating documentation. Claude Code handles those tasks reliably when they are specified clearly. The time freed up accumulates toward the genuinely hard problems — system design, performance analysis, security review — that most developers do not have enough time for in a day dominated by routine work.
Human judgment remains essential at the task specification and output review layer. Claude Code executes specified tasks with increasing reliability. It does not determine whether the tasks are worth doing, whether the approach is the right one for your specific constraints, or whether the output is not just correct but good. Those decisions require context, experience, and accountability that cannot be delegated to an AI system at the current state of the technology. The best use of Claude Code is as an expert executor of well-specified tasks — not as a replacement for the developer who specifies and reviews them.
The forward trajectory of Claude Code development in 2026 points toward improved multi-agent coordination — multiple Claude instances working in parallel on different parts of a large task, coordinated by an orchestrating agent. The architectural patterns in Workflows 7–9 (MCP servers, hooks, non-interactive mode) are the building blocks of those multi-agent systems. Developing fluency with them now positions you for the next significant capability jump without requiring a complete change in how you work.
Start Using Claude Code Today
Install with npm install -g @anthropic-ai/claude-code, run claude init in your project, and write your first CLAUDE.md. The difference between your first session and your tenth compounds quickly once the context infrastructure is in place.