
Workflow Guide
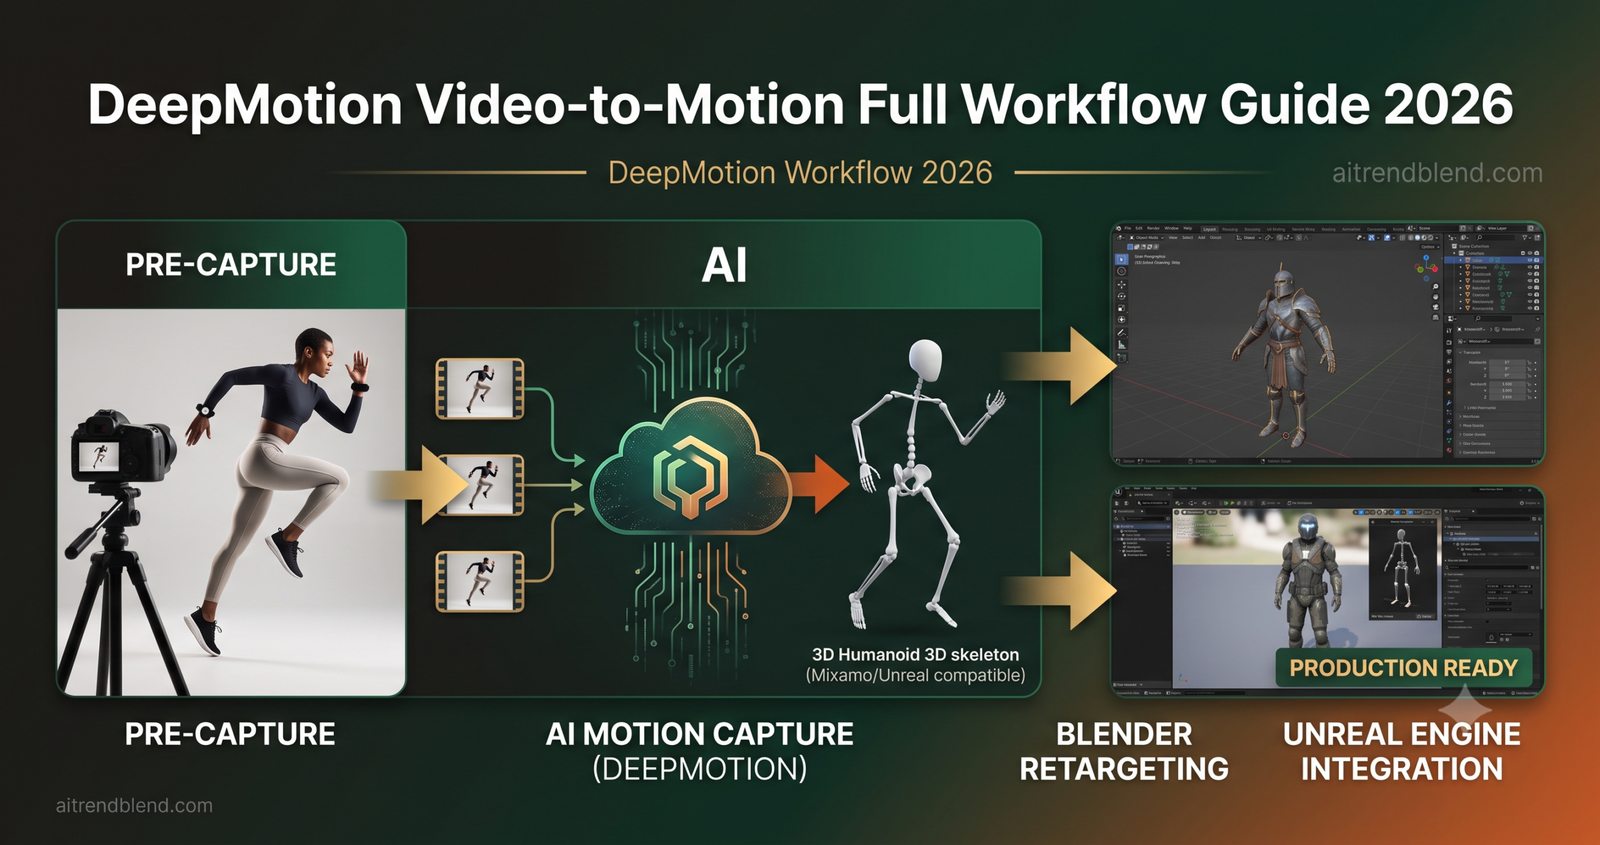
DeepMotion’s pitch is straightforward. You film a person moving, upload the video, and receive a 3D animation file that captures that movement on a standard humanoid skeleton. What the pitch does not explain is that the difference between output you use directly and output you spend two hours cleaning up comes almost entirely from decisions you make before you ever open the DeepMotion interface. The filming setup, the clothing choice, the camera angle, the pace of the movement — all of these shape the quality of what the AI extracts, and none of them are obvious to someone encountering the tool for the first time.
We have been using DeepMotion in production workflows for the past year across game prototypes, cinematic sequences, and motion reference libraries. What you will find in this guide is everything we learned the hard way, organized into a ten-step workflow that takes you from setting up a capture session through final integration in your 3D application of choice. Each step explains not just what to do but why the decision matters for the AI extraction that follows.
By the end of this guide you will understand how to film footage that gives DeepMotion the information it needs, how to configure the extraction correctly for different motion types, how to use DeepMotion’s editing tools to fix the problems that almost always appear in complex motion, and how to bring the resulting animation into Blender, Maya, or Unreal Engine with a retargeting setup that actually works on the first try.
Why DeepMotion Handles Video-to-Motion Differently from Other Tools
DeepMotion’s approach to motion extraction sits between two older paradigms. Traditional optical motion capture uses reflective markers on a performer’s body and multiple synchronized cameras to track precise 3D positions. The data quality is excellent but the hardware cost, setup time, and studio requirement make it inaccessible for most small teams. Pure inertial systems use sensors worn on the body to measure acceleration and rotation without needing cameras at all, but they accumulate drift over time and struggle with absolute position tracking.
DeepMotion takes a single video — or multiple videos from different angles if you provide them — and uses a physics-informed pose estimation model to reconstruct 3D joint positions from 2D image information. The physics-informed part is what distinguishes it from simple pose estimation tools. The model does not only ask where the joints appear to be in the frame. It also asks whether the resulting pose is physically plausible given the previous and subsequent frames, what the ground contact conditions imply about weight distribution, and how momentum should carry the body through transitions. The output is smoother and more physically believable than raw pose estimation because the physics model acts as a continuous constraint on the solution space.
The practical result is that DeepMotion’s output tends to look like motion rather than a series of disconnected poses, which is the minimum requirement for animation that a viewer does not consciously notice as wrong. Where it still struggles is in situations where the physics assumptions break down — fast contact sports, extreme poses outside the training distribution, and interactions with objects that the model cannot see. Understanding those limits helps you plan your capture sessions to avoid them.
Key Takeaway
DeepMotion produces better output from footage shot with its specific requirements in mind than from general-purpose video. The single biggest quality lever in the entire pipeline is not a setting inside DeepMotion — it is how you film the performer. Investing thirty minutes in proper capture setup saves two hours of cleanup downstream.
Before You Start — Setting Up for Success
The decisions you make before filming have more impact on final output quality than any parameter inside DeepMotion itself. Most guides rush past this section to get to the interface screenshots. This one will not.
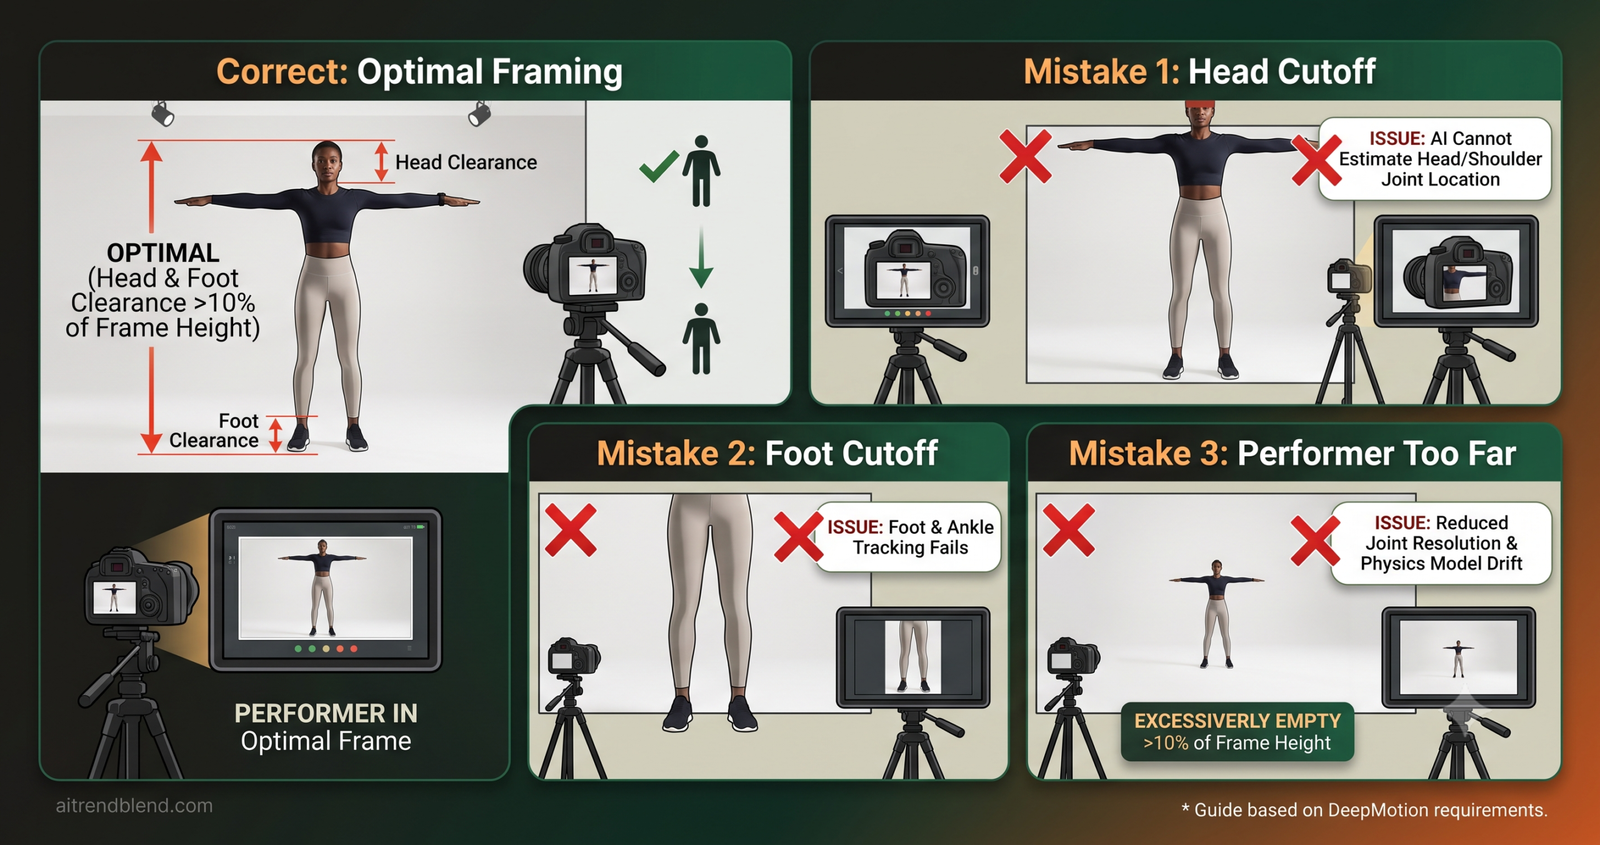
Your camera should be positioned so the performer’s full body is visible throughout the entire capture. This sounds obvious but it has specific implications. If the motion involves the performer moving across the room, the camera needs to either be far enough back that they stay in frame, or you need to pan smoothly with them while keeping their feet and head in the frame simultaneously. DeepMotion degrades noticeably when limbs exit the frame — not because the tool is poorly designed, but because it cannot estimate the position of joints it cannot see.
Lighting should be even and consistent across the capture space. Shadows that cross the performer’s body at different points in the motion create inconsistent contrast information that confuses the pose estimator’s clothing-to-background separation. Overcast daylight, softbox lighting, or a well-lit indoor environment with no single strong directional light source all work better than a bright window on one side of an otherwise dim room.
The 10-Step DeepMotion Video-to-Motion Workflow
The single most overlooked factor in video-to-motion quality is what the performer wears. DeepMotion’s pose estimation model needs to clearly distinguish the performer’s body segments from each other and from the background. Clothing choices directly determine how easy or difficult that separation is.
Wear fitted clothing in solid, high-contrast colors. A fitted long-sleeve shirt and fitted trousers in two contrasting colors — dark top with light trousers or vice versa — give the model clear boundary information between torso and legs at every frame. Avoid loose clothing like hoodies or wide-leg trousers because the fabric movement creates false contours that the model interprets as limb movement. Avoid patterns, especially stripes, which create visual noise that makes body segment identification harder.
Fitted athletic wear in two solid contrasting colors works best. A dark compression top with light-colored fitted trousers, or the reverse. Avoid white if the background is light-colored. Avoid black if the capture space has dark walls. The goal is maximum contrast between the performer and the environment at every angle of motion.
Add a contrasting colored wristband or tape mark at the wrist joint on both arms. The wrist is the joint DeepMotion most frequently estimates incorrectly on its own — a visible marker at that location significantly improves wrist and hand tracking accuracy.
Camera placement follows a specific logic based on the type of motion you are capturing. For locomotion — walking, running, jumping — a camera positioned roughly perpendicular to the direction of travel at approximately chest height gives the clearest view of limb swing and foot contact. For upper body acting and gestures, a slight elevation angle looking slightly down toward the performer helps the model correctly distinguish arm positions from the torso in frames where they overlap.
Frame rate matters more than resolution for motion quality. A 60fps capture at 1080p gives DeepMotion far more motion data to work with than a 4K capture at 24fps. Fast motion — quick gestures, combat moves, any action where a limb travels a significant distance between frames — benefits the most from higher frame rates. Slow, controlled motion like walking or acting can produce good results at 30fps. When in doubt, capture at 60fps and let DeepMotion sample at whatever output frame rate your animation requires.
Resolution: 1080p minimum — Frame rate: 60fps for action, 30fps acceptable for slow motion — Shutter speed: twice the frame rate (1/120 at 60fps) to minimize motion blur — Autofocus: OFF (focus pull creates apparent size changes that confuse depth estimation).
Lock your camera on a tripod for all captures. Even subtle camera shake introduces apparent motion into every joint position that DeepMotion must then separate from actual performer motion. Handheld footage can work, but it adds a cleanup step that a tripod eliminates entirely.
Before capturing any performance, have your performer hold a clean T-pose for three to five seconds at the beginning of the recording. Arms extended straight out from the sides, feet shoulder-width apart, looking directly forward. This gives DeepMotion a reference frame for the performer’s proportions — the relative length of limbs, the shoulder width, the torso height — that it uses to calibrate the skeleton it builds for the rest of the clip.
Skipping the T-pose does not prevent DeepMotion from processing your video. What it means is that the tool will estimate those proportions from the motion frames themselves, which is less accurate and can result in a skeleton that is slightly wrong in ways that manifest as subtle swimming or instability in the final animation. A five-second T-pose at the start of every session costs almost nothing and improves the baseline accuracy of everything that follows.
Have the performer hold a clean T-pose for 3 to 5 seconds at the very start of the recording. Then have them perform a slow walk back to a neutral standing position before starting the actual motion you want to capture. This gives DeepMotion a clean transition from calibration to performance rather than an abrupt cut.
Film separate T-pose clips for different performers rather than combining them into one long video with multiple performers. DeepMotion processes one performer per video — mixing performers in the same clip requires manual segmentation before upload.
Inside DeepMotion’s Animate 3D interface, the upload process presents a set of configuration options that most first-time users accept without reading. These options meaningfully affect output quality and deserve attention for every project type.
The skeleton type selection should match your intended target rig. DeepMotion supports several skeleton configurations — Mixamo-compatible, Unreal Mannequin-compatible, and a custom hierarchy option. Choosing the wrong skeleton here does not prevent you from retargeting later, but it adds a retargeting step that the correct choice eliminates. Know your target rig before you upload.
The physics simulation toggle should almost always be on. This is the feature that makes DeepMotion’s output feel like motion rather than poses, as described earlier. The only situation where turning it off makes sense is for very slow, controlled movement where the physics correction sometimes over-smooths subtle weight shifts that you want to preserve.
Skeleton type: match your target application — Physics simulation: ON for most motion types — Smoothing level: medium as starting point, reduce for fast action — Root motion: ON if the character travels through space, OFF for in-place animations that will be driven by engine locomotion systems.
Run a short test clip through before processing your full capture session. A ten-second clip with the same settings gives you a quality preview in a few minutes rather than waiting for the full session to process only to discover a settings issue.
When DeepMotion’s processing finishes, your first task before doing anything else is a systematic review of the output in the web viewer. Watch the full animation at least twice — once at normal speed to assess the overall feel, once at half speed or slower to catch specific problem frames.
There are four things to look for in this review. Foot sliding is the most common problem and shows as the feet moving laterally across the ground during stance phases when they should be locked. Wrist and hand estimation is frequently the least accurate part of the output, particularly when hands approach or overlap the body. Hip and pelvis oscillation that looks mechanical rather than organic often indicates that the physics model overcorrected on a transition. Shoulder rotation errors appear most often during reaching or overhead motions where one arm obscures part of the torso from the camera.
Mark the timecodes of each problem area before opening the editor. Going into cleanup with a specific list of what needs fixing is faster than discovering issues while you edit.
Watch for: foot sliding during stance — wrist/hand position errors — mechanical hip oscillation — shoulder flipping during reach — spine hyperextension on impacts. Note timecodes for each issue before editing.
If more than thirty percent of the motion requires significant correction, it is usually faster to reshoot with better filming conditions than to fix the existing output. The review step is also a diagnostic for what went wrong in capture — foot sliding often indicates camera angle problems while shoulder errors often indicate occlusion.
DeepMotion’s built-in motion editor handles the most common cleanup tasks without requiring you to export and re-import into an external application. For minor corrections — isolated frames where a joint position jumped unexpectedly, brief sections of foot sliding, shoulder orientation errors on a specific keyframe — the in-browser editor is faster than leaving the platform.
The foot locking tool is the most used feature for most projects. Select a foot joint, define the frames during which that foot should be in contact with the ground, and the tool applies an IK constraint that pins the foot in world space during those frames. The resulting correction is propagated up the kinematic chain to the hip, which means activating foot locking on both feet simultaneously during a standing phase will also correct any hip drift from the same frames.
For more substantial corrections — replacing a full section of bad motion, adjusting joint rotation ranges, or modifying the overall root path — the editor reaches its limits and the work belongs in your 3D application. Knowing where that boundary is prevents you from fighting the in-browser tools for corrections they were not designed to make.
Fix in this sequence for efficiency: 1. Root path correction — 2. Foot contact locking — 3. Hip stabilization — 4. Spine corrections — 5. Shoulder and arm corrections — 6. Wrist cleanup last. Working from center outward prevents upstream changes from invalidating downstream fixes.
Save a copy of the unedited output before making any corrections. DeepMotion’s undo history is limited and does not persist across sessions. Having the original extraction lets you start over from a clean state if an editing session goes in the wrong direction.
DeepMotion supports BVH, FBX, and GLB export formats, and the right choice depends entirely on where the animation is going next. They are not interchangeable and choosing the wrong one adds friction to every step that follows.
BVH is the universal motion capture format. It contains pure skeletal animation data with no mesh, no materials, and no scene information — just joint positions and rotations over time. Use BVH when you are bringing the motion into Blender for retargeting onto an existing character rig, when you are building a motion library that will be retargeted to multiple different characters, or when you want the smallest possible file for the motion data alone. Every major 3D application reads BVH without requiring additional plugins.
FBX is the right choice when you need the skeleton and the animation in the same file, particularly for Unreal Engine’s import pipeline which handles FBX skeletal animation most cleanly. The FBX from DeepMotion includes the skeleton hierarchy alongside the motion data, which means Unreal can directly match joints during the retargeting setup rather than requiring you to manually specify the hierarchy.
GLB is useful for web-based 3D applications and Three.js workflows but is rarely the right choice for offline 3D production pipelines. If your target is a game engine or a desktop 3D application, skip GLB entirely.
Blender retargeting: BVH — Unreal Engine: FBX with skeleton — Unity: FBX — Motion library building: BVH — Maya: FBX or BVH both work — Web or Three.js: GLB.
Export both BVH and FBX for any animation you intend to keep. Storage is cheap and having both formats available means you never need to log back into DeepMotion to re-export when you change your downstream application.
Retargeting in Blender means taking the motion data on DeepMotion’s skeleton and applying it to a different character’s skeleton that has different proportions and potentially different bone naming conventions. The process is more reliable than most tutorials suggest, as long as you follow a specific setup order.
Import your BVH file into Blender and position it in the scene. Import your character’s armature separately. With both armatures in the scene, select your character’s armature, go to the Object Constraints panel, and add a Copy Rotation constraint for each bone that has a corresponding bone in the DeepMotion skeleton. The Rigify automate retargeting add-on and the free BVH Retargeter add-on both automate the bone mapping process and are worth installing before you start — manual bone mapping for a full humanoid skeleton is tedious and error-prone.
After the constraints are set up, bake the constrained animation to keyframes on your character’s armature using the NLA editor bake action function. This converts the live constraint-driven motion into actual keyframes that you can edit, blend, and export independently of the source BVH.
1. Import BVH — 2. Import character armature — 3. Install BVH Retargeter add-on if not present — 4. Run auto bone mapping — 5. Review and correct any mismatched bones manually — 6. Bake action to keyframes on character armature — 7. Delete BVH armature — 8. Clean up and trim keyframe range.
After baking, apply a smoothing pass to the hip bone animation curves specifically. Hip motion from video-based capture almost always has more high-frequency noise than a hand-animated equivalent, and a light smoothing pass on the hip curves significantly improves how the overall motion feels without altering the broad movement path.
Unreal Engine’s IK Retargeter, introduced in UE5 and significantly improved through subsequent updates, handles DeepMotion FBX imports more cleanly than any previous Unreal retargeting approach. The workflow requires creating an IK Rig asset for your source skeleton and a separate IK Rig asset for your target character’s skeleton, then connecting them in an IK Retargeter asset that handles the bone chain mapping.
Import your DeepMotion FBX as a skeletal mesh with animation. In the import dialog, enable Import Animations and set the skeleton to create a new skeleton rather than trying to match it to an existing one — this avoids bone hierarchy conflicts that create hard-to-debug retargeting errors. Create an IK Rig asset for the imported DeepMotion skeleton, define the retarget root as the pelvis bone, and add IK chains for the spine, each leg, and each arm.
Repeat the IK Rig setup for your target character. Then create an IK Retargeter asset pointing from the DeepMotion IK Rig to your character’s IK Rig. The auto-mapping feature will handle most bone assignments but will almost always get the spine chain wrong — DeepMotion uses a five-bone spine chain and most game character skeletons use three or four bones, so manual correction of the spine mapping is expected rather than exceptional.
1. Import FBX with new skeleton — 2. Create IK Rig for DeepMotion skeleton — 3. Create IK Rig for target character — 4. Create IK Retargeter asset — 5. Run auto-map chains — 6. Manually correct spine chain mapping — 7. Preview and adjust chain offsets — 8. Export retargeted animation as new asset.
Enable the IK Retargeter’s stride warping option if your character has different leg proportions than the DeepMotion skeleton. Stride warping adjusts foot placement to match your character’s actual leg length, which eliminates the subtle floating or ground-penetration that appears when proportions differ significantly.
After retargeting, almost every animation needs at least one pass of cleanup before it is genuinely production-ready. The degree of cleanup varies significantly by motion type and intended use, but there are consistent areas where video-derived motion benefits from human refinement regardless of how clean the extraction was.
Foot contact with terrain is the most important final pass. DeepMotion captures motion performed on a flat floor, but your game or scene may have terrain at different heights. Engine-side foot IK systems handle this procedurally at runtime and should be set up for any character that will walk on non-flat surfaces. For cinematic animation where the terrain is fixed, a pass of hand-adjusted foot placement keyframes ensures clean contact.
Secondary motion is the other major addition that video capture cannot provide. Hair, cloth, accessories, and armor elements that should react to character movement need simulation or hand-keyed secondary animation added after retargeting. This is a manual step with no AI shortcut in the current generation of tools — but it is also the step that most significantly elevates the perceived quality of the final animation from technically correct to visually alive. Allocate time for it rather than treating it as optional.
Foot contact — verify or set up engine-side foot IK — Hand poses — check finger positions on any frame where hands are visible — Facial animation — add separately if needed (DeepMotion does not capture face) — Secondary motion — simulate or key cloth, hair, accessories — Blend in and out — add transition frames at animation start and end for clean blending in engine.
Build a small motion library of common transitions — standing to walk, walk to run, run to stop — captured and cleaned with this workflow. Having clean transition animations available removes one of the most common integration problems in game animation and reuses the same capture investment across every character in the project.
“The capture session is where the animation is made or broken. DeepMotion is sophisticated enough to extract good motion from good footage. It is not sophisticated enough to compensate for footage that did not give it what it needs.”
— aitrendblend editorial, 2026 DeepMotion workflow testing
Common Mistakes and How to Fix Them
| Mistake | Wrong Approach | Right Approach |
|---|---|---|
| Loose clothing | Performer wears a hoodie and wide trousers — fabric creates false body contours | Fitted athletic wear in contrasting solid colors — clear body segment boundaries throughout |
| Wrong frame rate | 4K 24fps — high resolution but not enough frames for fast motion | 1080p 60fps — adequate resolution with enough temporal data for clean fast motion |
| No T-pose calibration | Performer starts moving immediately — DeepMotion estimates proportions from motion | Five-second clean T-pose at start — explicit proportion reference improves full-session accuracy |
| Root motion on in-place animation | Root motion ON for a walk cycle — character drifts when the engine drives locomotion | Root motion OFF for any animation that will be driven by engine locomotion system |
| Skipping the review step | Export immediately after processing — discover cleanup issues after retargeting | Full output review before export — fix in DeepMotion’s editor while still in the platform |
What DeepMotion Still Struggles With in 2026
DeepMotion has genuine limitations and acknowledging them is more useful than pretending they do not exist. Knowing where the tool breaks down helps you plan around those limitations rather than discovering them in the middle of a production crunch.
Fast contact sports and martial arts remain genuinely difficult. The physics model that makes DeepMotion’s output smooth on natural locomotion sometimes over-dampens the rapid impacts and weight transfers that characterize punching, kicking, and grappling. A kick that should show sharp acceleration into the impact and immediate deceleration after contact often comes out with both phases smoothed into a more gradual curve that reads as weak rather than powerful. For these motion types, using DeepMotion output as a starting reference and then hand-refining the key impact frames in your 3D application produces significantly better results than expecting clean output directly.
Two-person interactions are outside what DeepMotion currently handles as a single extraction. A fight scene, a dance duet, or any motion where two performers physically interact must be captured as separate single-performer clips and then assembled manually. The occlusion between performers — one body blocking visibility of the other — causes extraction quality to degrade on both performers simultaneously during contact moments.
Finger animation is effectively not a DeepMotion output in the current version. The tool estimates wrist position and general hand orientation but does not produce reliable individual finger tracking from standard video. If your animation requires distinct finger poses — a character playing an instrument, signing, or performing fine manipulation tasks — those poses need to be added manually after retargeting. Plan that time into your project schedule rather than assuming it will come out of the extraction.
The gap between what DeepMotion can extract from good footage and what a skilled animator creates by hand is still measurable on close scrutiny. The best video-derived motion captures what a body did. A skilled animator captures what a character feels. Weight, attitude, emotional subtext — these are things that happen in the timing and spacing of keyframes, not in the physical joint positions that a camera can observe. DeepMotion is a tool for the first problem, not the second, and understanding that distinction determines whether it belongs in your pipeline and for what specific tasks.
What is coming over the next year will likely include better multi-person extraction, improved hand tracking using depth-supplemented estimation, and tighter integration with game engine animation blueprints that reduce the retargeting friction that currently makes the final steps of this workflow the most time-consuming. The core extraction quality has improved measurably every six months for the past two years and there is no reason to expect that trajectory to level off soon.
The workflow described in this guide represents the current best practice for getting production-quality output from DeepMotion. Follow it from step one rather than jumping to the upload interface, and the difference in what comes out the other end will be evident in the first comparison between footage captured with care and footage captured carelessly. The tool is capable. The preparation is what unlocks that capability.
Start Your First DeepMotion Capture Today
DeepMotion offers a free tier with enough monthly credits to test this full workflow on a real project. Set up a capture session using the steps in this guide and compare the output to anything you generated before reading it.
This workflow guide was developed through independent testing by the aitrendblend editorial team using DeepMotion as it existed between April and June 2026. Tool interfaces, settings, and capabilities may have changed since publication. All recommended settings reflect our testing experience and may need adjustment for specific capture conditions or project requirements. This is independent editorial content. We are not affiliated with DeepMotion or any company mentioned in this guide.
Frequently Asked Questions
What video format works best for DeepMotion motion capture?
DeepMotion processes standard video files including MP4 and MOV. For best results, film at 1080p and 60fps rather than 4K at 24fps. The higher frame rate gives the AI more temporal data for clean fast motion, while 1080p resolution is adequate for body tracking without unnecessary file size.
How accurate is DeepMotion compared to traditional motion capture suits?
DeepMotion produces output that is usable in production for natural locomotion like walking, running, and common gesture motion, but it does not match professional optical mocap for precision. Fast impacts, fine finger detail, and multi-person interactions are areas where the gap is most noticeable. The practical question is whether your project needs suit accuracy or whether DeepMotion quality is sufficient for your specific animation types.
Can DeepMotion process two performers moving together in the same frame?
No, not reliably in the 2026 version. Multi-person extraction degrades on both performers when their bodies physically intersect or occlude each other. The correct workflow is to capture each performer separately and composite the resulting animations in your 3D application afterward.
What clothing should performers wear for DeepMotion capture?
Fitted athletic wear in solid contrasting colors gives the AI the clearest body segment boundaries. Loose or baggy clothing creates false body contours because fabric movement gets interpreted as limb movement. Dark solid pants with a light solid shirt, or a similar high contrast combination, consistently produces cleaner extraction than any other clothing choice.
How do I export DeepMotion animation for use in Unity or Unreal Engine?
Export in FBX format from DeepMotion and use the retargeting workflow in your target engine. For Unity, use the Humanoid rig mapping in the Animator component. For Unreal, use the IK Retargeter in the animation toolset. The DeepMotion export uses a standard human skeleton that maps cleanly to both engine retargeting systems with minimal adjustment required.
Does DeepMotion support facial and finger animation tracking?
Finger animation is effectively not available in the current version. DeepMotion estimates general hand orientation but does not produce reliable individual finger tracking from standard video. Facial animation is also not extracted from the standard video input pipeline. Both require manual keyframing or a dedicated facial capture solution applied after retargeting.