Game Dev Workflow
Key Points
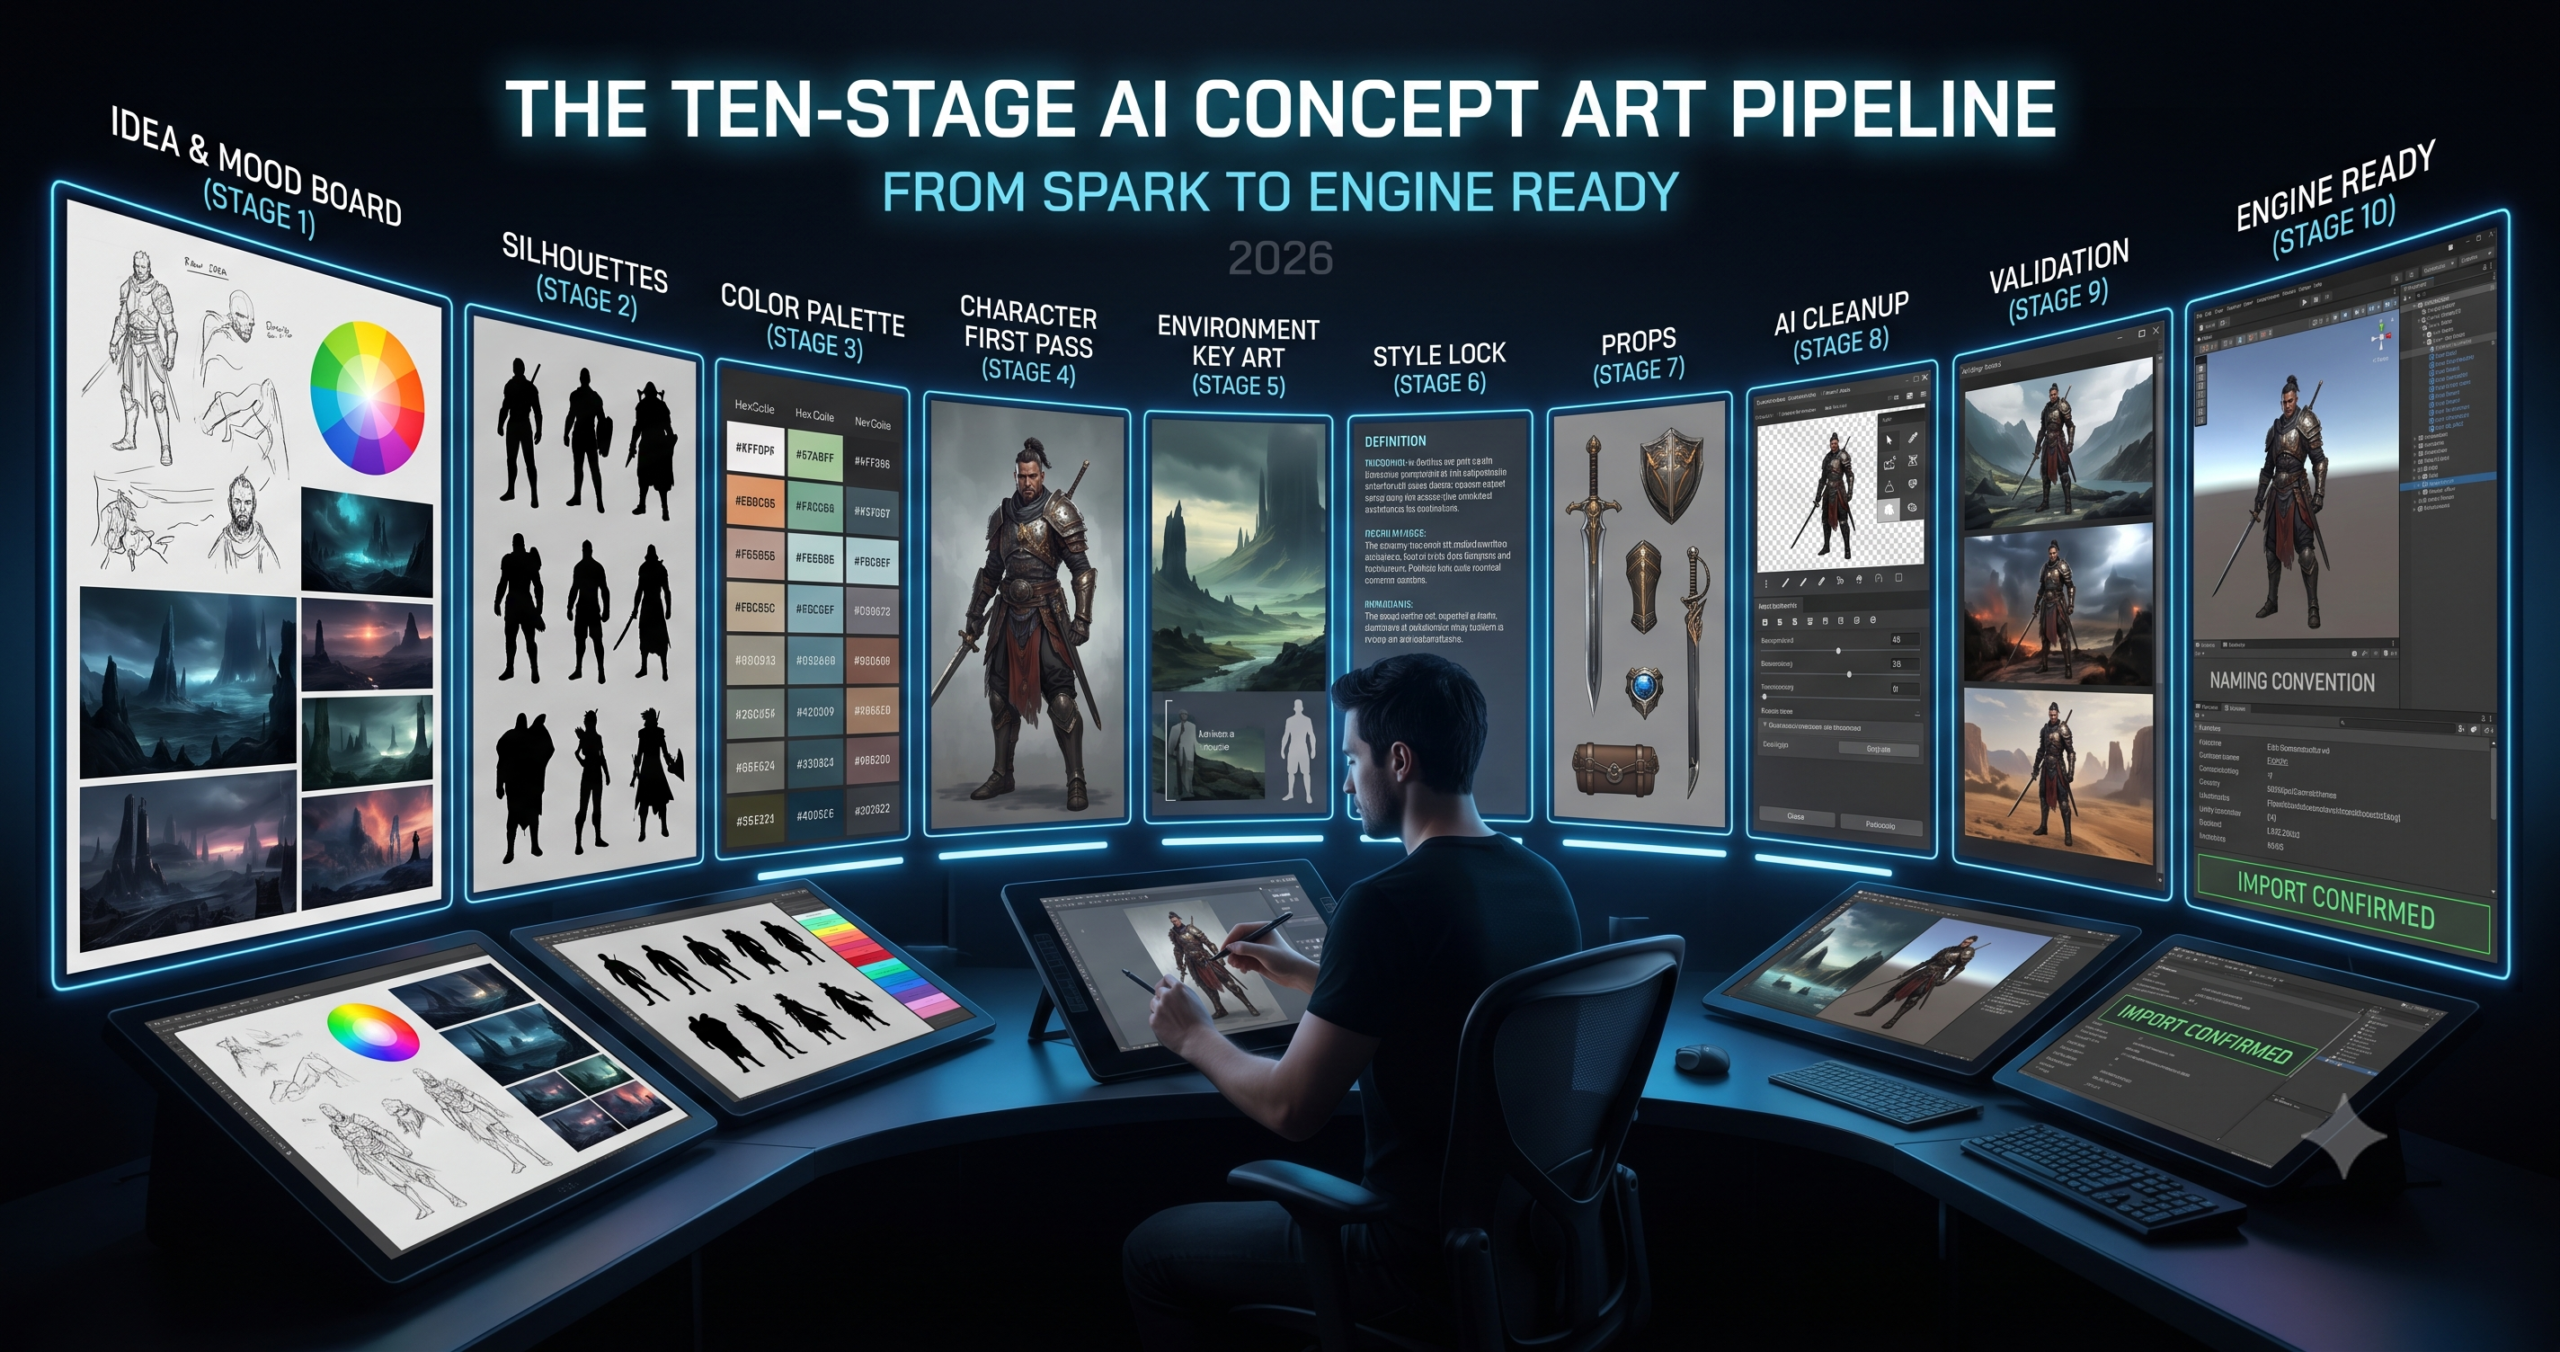
- A ten stage pipeline takes a game concept from mood board to an asset your engine can actually import.
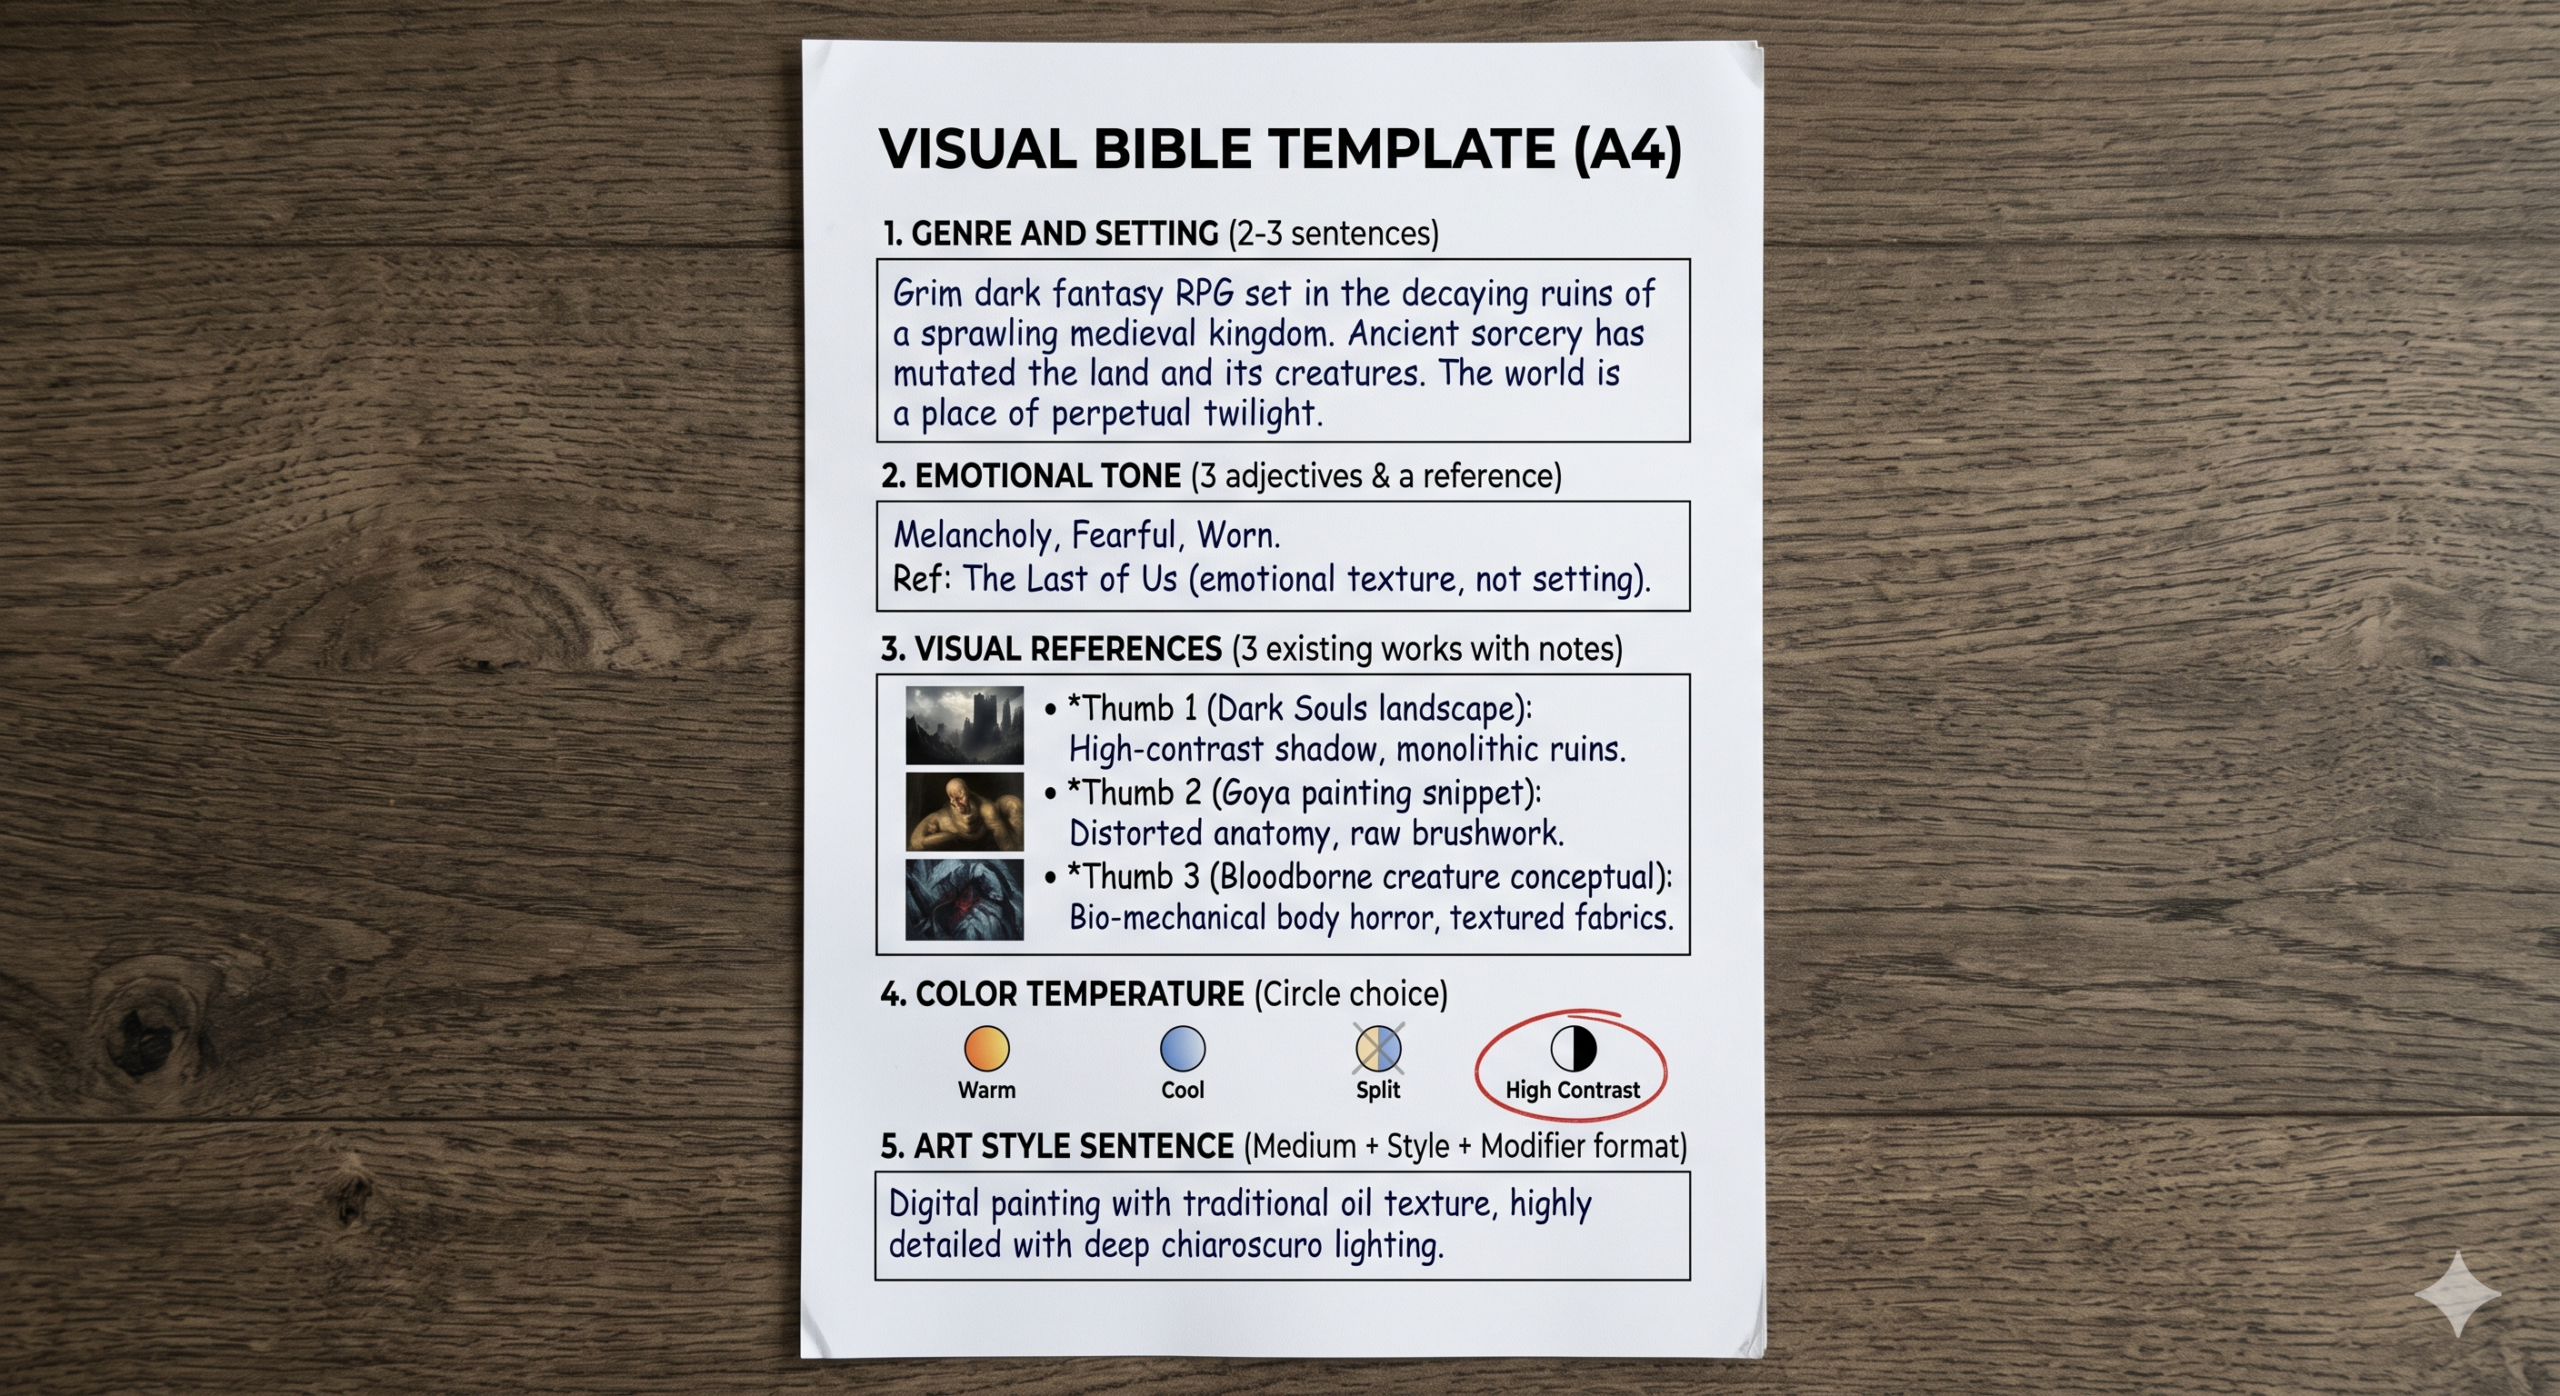
- Write a one page visual bible before opening any AI art tool, it is the document that makes every later prompt accurate.
- Locking a master style string at Stage 6 is the single decision that prevents style drift across fifty or more assets.
- Background removal, generative fill cleanup, and upscaling at Stage 8 are what turn a generated image into a usable asset.
- Validate every asset at actual in game display size before it enters production, problems that are invisible in a browser tab show up at game resolution.
- AI handles visual execution, the creative decisions about tone, palette, and style still belong to a human.
The tool was not broken. The workflow was missing. That is the gap this guide fills, not which AI art tools to use, but how to move through a production pipeline that takes a raw creative idea and outputs assets your game engine can actually work with. There is a real sequence to this, and skipping steps in that sequence is why most developers end up with folders of gorgeous AI images that they cannot actually use in their game.
This guide breaks the AI concept art pipeline into ten stages. Each stage has a specific purpose, a recommended tool, and a working prompt. Some stages take ten minutes. Others take a full day. The difference between a developer who ships a visually coherent game and one who ships something that looks like four different artists worked on it in isolation, without communicating, is usually that the first developer followed something like this pipeline, whether they called it that or not.
You will walk away with a complete understanding of how to go from a verbal description of a game’s world to a set of assets that are consistently styled, appropriately formatted, and ready to drop into Unity, Unreal, or Godot. That is the actual destination. Every stage below exists to move you closer to it.
Why AI Has Changed the Concept Art Pipeline and What It Has Not
The old concept art pipeline for a small game studio looked like this. A creative director describes a world in a design document, an art director translates that into a visual style guide, concept artists produce reference art for each element, and production artists build final assets from those references. The whole thing takes months and costs significant money even for a small team. AI has not eliminated any of these steps, but it has collapsed the time each step takes from weeks to hours, and the cost from art director salaries to API tokens.
Here is where it gets interesting. AI art tools are genuinely good at two specific phases of the concept art pipeline, rapid visual exploration and reference generation. They are significantly weaker at the phases that require taste, context, and knowledge specific to the game, deciding which visual direction actually serves the game’s emotional goals, understanding what will and will not read at game resolution, and knowing when a generated image is good enough versus when it will create production problems later. Those phases still require a human making informed decisions.
What this means practically is that an AI assisted concept art workflow is not a process of generating images until something looks good. It is a structured sequence where human creative decisions define the direction at each stage, and AI handles the visual execution of those decisions quickly and cheaply. The developers who get great results from these tools are the ones who understand clearly what they want before they open the generation interface. The ones who struggle are hoping the tool will make the creative decisions for them, and it will, but not reliably in the direction the game needs.
An AI concept art pipeline replaces the time and cost of visual execution, not the creative thinking that decides what to execute. Every stage in this guide begins with a human decision and ends with AI generating the visual output of that decision. If you skip the decision and go straight to generation, you are asking the model to do the creative directing, and you will spend far more time sorting through results than you saved by generating quickly.
Before You Start, Setting Up Your AI Concept Art Pipeline
The most important tool in the pipeline is one that generates nothing, a plain text document where you write your game’s visual bible before opening any AI art platform. This does not need to be long. A single page covering the following five things is enough to give every subsequent AI generation a fighting chance. The game’s genre and setting, the intended emotional tone, three reference points from existing games or films, the color temperature, warm, cool, neutral, or high contrast, and the art style in one descriptive sentence. Write this first. Every prompt you write later should be consistent with it.
The tools used across this pipeline include Midjourney v7 for mood boards and environment key art, Krea AI for real time style exploration, Leonardo AI for character consistency and production assets, Stable Diffusion + ComfyUI for custom LoRA and batch pipeline work, Adobe Firefly for cleanup and upscaling within Photoshop, and Remove.bg or Photoshop’s AI selection for background removal. You do not need all of these simultaneously. The guide notes which tool fits each stage, and many stages can be completed with just one or two platforms depending on your setup.
Set up a dedicated folder structure before generating a single image. /concept art/01 moodboard /02 silhouettes /03 palette /04 characters /05 environments /06 style locked /07 props /08 cleaned /09 final assets /10 engine ready. Generating without this structure leads to hundreds of images with no clear provenance, and you will waste hours hunting for the right version of the right asset when production pressure hits.
The Ten Stage AI Concept Art Workflow
1 Stage 1, Mood Board Generation
Every concept art pipeline begins in the same place, establishing the emotional texture of the world before deciding what anything actually looks like. A mood board is not a design decision. It is a collection of images that all share a feeling, a light quality, and a color temperature. You are not designing your game here. You are defining what “correct” feels like so that every subsequent generation decision has a reference point.
Use Midjourney v7 for this stage. It is the best tool for loose, evocative imagery that communicates feeling rather than specific design. Generate 20 to 30 images using the prompt below, varying the descriptors freely. You are looking for 8 to 10 that feel unmistakably right. Save those to your /01 moodboard folder. Everything that does not feel immediately correct gets discarded. Do not keep images because they are impressive, only because they feel like the game you are making.
Why It Works. “No characters, no text, no UI” removes the variables that would make images hard to compare for pure mood. You are judging light and color here, not design. The --style raw flag tells Midjourney to apply less of its own aesthetic interpretation, which gives you cleaner mood data. What you are feeling is the concept, not Midjourney’s preferred visual style layered on top of it.
How to Adapt It. For a game with multiple distinct zones or biomes, run this stage separately for each zone, one mood board per environment type. The consistency of your visual language across zones is one of the things that makes a game feel cohesive rather than assembled, and starting with separate mood boards per zone forces that decision early.
2 Stage 2, Silhouette Exploration
Before color, before texture, before any design detail, there is silhouette. A character whose shape reads clearly as a filled black shape against a white background will read clearly at any size, at any resolution, and against any background your game throws at them. A character who relies on color or detail to communicate their identity will fail at small sprite sizes and confuse players at a distance. This is why professional character designers always start with silhouettes, and it is why your AI pipeline should too.
Use Krea AI for this stage. The real time generation lets you sketch rough shapes on the canvas and watch the model interpret them immediately, which is the fastest way to explore silhouette variety. You are generating black filled shapes on white backgrounds, nothing else. Ten variations for each major character type.
Why It Works. “No color, no texture, no shading, no outline, only fill” sounds repetitive, but each instruction blocks a different default behavior. “No outline” specifically prevents the model from generating linework that reads as silhouette but is actually a detailed drawing. “Each variant has a distinct shape read” pushes the model toward meaningful variation rather than slight pose differences on the same basic form.
How to Adapt It. For enemy designs specifically, generate one silhouette sheet at the same character height as your hero and one at 1.5x and 2x height. Comparing threat tiers at different scales makes readability problems tied to size visible before they become production problems.
3 Stage 3, Color Palette Development
Color is a language. Players read meaning from it without being told. Warm colors feel safe or threatening depending on context, cool colors read as distance or magic, high saturation signals importance, and desaturation signals age or death. A game’s color palette is not an aesthetic choice made in isolation. It is a communication system that runs across every asset, every environment, every character in the game. Establishing it at Stage 3, before any character or environment design is finalized, prevents the cascading inconsistencies that come from letting individual assets develop their own color logic.
Use Midjourney or Ideogram for this stage, specifically to generate palette reference cards rather than full scenes. Then lock those palette values in hex codes in your visual bible document before moving on. Every prompt from Stage 4 onward should reference those hex values or their closest descriptive equivalents.
Why It Works. Specifying the color theory relationship, analogous, complementary, or triadic, gives the model a structural constraint for the palette rather than just vibe descriptors. An analogous palette, colors adjacent on the wheel, reads as harmonious and unified. A complementary palette creates tension and visual energy. Deciding which you need based on your game’s emotional intent before generating the palette is the decision that makes the output actually useful.
How to Adapt It. Generate three competing palette options, one warm dominant, one cool dominant, one high contrast, and evaluate them against your mood board images. The palette that makes the mood board images feel most coherent is your palette. This comparison test is more reliable than choosing a palette in isolation.
4 Stage 4, Character Concept First Pass
You are finally designing characters, but now you are doing it with three constraints already established from the previous stages. A confirmed emotional tone from the mood board, approved silhouette directions, and a locked color palette. The prompt you write at this stage is not a character description from scratch. It is a translation of those three constraints into a character design specification, a very different and much more precise task than describing a character in the abstract.
Use Leonardo AI’s Phoenix v1 model for this stage. Feed your chosen mood board image as an Image Guidance reference at 0.3 strength, not to copy it, but to keep the color temperature and light quality consistent with the visual direction you established in Stage 1.
Why It Works. Referencing the specific silhouette variant by letter, “silhouette variant B,” forces a decision about which silhouette direction you are pursuing before generating the detailed character. “First pass exploration, not final design” is an instruction that gives the model permission to be slightly loose in interpretation, which produces better concept art than demanding a finished design at the first generation stage.
How to Adapt It. Generate three first pass concepts for each major character, one close to the silhouette reference, one with a more relaxed interpretation, and one that pushes the costume in a different direction. Select the direction, not the final image, you will refine in Stage 6.
5 Stage 5, Environment Key Art
Environment key art serves two purposes in a concept art pipeline. It establishes the spatial language of the game world, how big things are relative to each other, how much of the screen real estate background occupies versus playable foreground, and it gives artists a reference for the atmospheric qualities that all environment assets need to share. A key art image for your game’s first level is not a screenshot mockup. It is a single definitive image of what that space feels like at its best.
Midjourney v7 produces the best environment key art of any tool in this guide, and this is where it earns its place in the pipeline. The --cref flag can reference a character image from Stage 4 to place a silhouette in the environment, which helps establish scale relationships between character and world.
Why It Works. Explicitly separating the image into foreground, midground, and background layers forces depth plane separation, the single most important compositional quality for game environments, where the player needs to read instantly where they can move versus where they cannot. “Hero scale reference at center midground” establishes the spatial relationship between character and world that every subsequent environment asset needs to be consistent with.
How to Adapt It. For a top down or isometric game, change the composition instruction to “overhead view, isometric angle near 45 degrees, all depth planes visible simultaneously” and adjust the aspect ratio to 1 to 1. The foreground, midground, and background layer logic still applies, it just describes different spatial zones in isometric space.
6 Stage 6, Style Lock and Consistency Pass
Stage 6 is the most important stage in the entire pipeline, and it has nothing to do with generating new images. It is the stage where you stop, look at everything generated so far, and make a formal decision. Does this feel like one coherent visual world? If yes, extract the prompt language that produced the best results and lock it into a master style string. If no, identify which stage introduced the inconsistency and regenerate from there before continuing.
The master style string is a reusable text fragment, usually 40 to 60 words, that you paste into every subsequent prompt. It encodes your art style, palette, lighting direction, and any instructions specific to the model that have proven to produce consistent results. Once it is written, you never describe the visual style from scratch again. You describe the subject matter and append the style string.
Why It Works. The master style string solves the problem of style drift across a long production run. Without it, each new prompt description inevitably introduces slight variations in how the style is described, and those variations compound into visual inconsistency across 50 or 100 assets. The style string makes the art direction a stable variable instead of a drifting one. You are now only changing the subject matter of each prompt, not renegotiating the visual language.
How to Adapt It. For a game with two distinct visual zones, a bright overworld and a dark underworld for example, build two master style strings, one per zone. Every prompt for overworld assets gets the first string, and every underworld asset gets the second. The contrast between zones becomes intentional and consistent rather than accidental.
7 Stage 7, Prop and Item Design
Props are the forgotten middle tier of game art production. Characters get attention because players identify with them. Environments get attention because they establish world. Props, the chest at the end of the hallway, the sword on the character’s back, the potion bottle in the inventory, are what make a world feel inhabited rather than staged. They are also where style inconsistency shows up most clearly, because players examine them closely when they interact with them.
This stage uses Leonardo AI with the master style string from Stage 6 appended to every prompt. The goal is a complete prop library organized by category, weapons, interactables, inventory items, decorative objects, and environmental details. Each category gets a batch generation run producing 12 to 16 variants, from which you select 4 to 6 for the final game.
Why It Works. “Design language consistent with [character name]” is the instruction that ties prop design to character design. A sword should look like it belongs to the character who carries it, similar wear patterns, similar material treatment, consistent craftsmanship level. Without this instruction, props develop their own aesthetic logic that can feel detached from the character system.
How to Adapt It. For inventory items specifically, add “square format, centered, suitable for inventory grid display, no background” and set the aspect ratio to 1 to 1. This produces assets that are close to inventory ready without additional cropping. For environmental props that appear in the game world, use a 4 to 3 ratio and include “slight shadow beneath for grounding” to help artists visualize how the prop sits in space.
8 Stage 8, AI Assisted Cleanup and Background Removal
This stage is the bridge between AI generation and game ready assets. No AI generated image comes out of a generator as a finished production asset. Even the cleanest outputs on white backgrounds need background removal verification, edge cleanup, resolution confirmation, and format conversion. This stage is where those tasks happen, and where AI tools outside the generation pipeline do their best work.
The workflow here is not about regeneration. It is about using Adobe Firefly inside Photoshop, Remove.bg, and Photoshop’s AI powered selection tools to turn generated images into assets with clean edges, confirmed transparency, and correct resolution for the target game engine. Each tool has a specific job in this stage. None of them does all three tasks well.
Why It Works. Separating background removal into two tools, Remove.bg for simple cases and Photoshop’s AI selection for complex ones, is faster than using either tool exclusively. Remove.bg handles 80% of cases in seconds via batch API. The remaining 20%, characters with complex hair, transparent elements, and weapon edge cases, get the more precise Photoshop treatment. The Generative Fill step for problem areas is the one most developers skip, and it is the one that eliminates 90% of manual touch up time.
How to Adapt It. For a pixel art game where upscaling is counterproductive, replace Step 3 with a downsizing step, resizing at the target pixel dimensions using nearest neighbor interpolation rather than bicubic. Bicubic and bilinear resampling introduce anti aliasing that destroys pixel art’s hard edge aesthetic at small sizes.
9 Stage 9, Final Asset Validation
Most tutorials skip this part entirely, the validation pass before anything enters the engine. Generated assets have a specific failure mode that only becomes visible when you put them in context. They look correct in isolation and wrong in the game. A character that reads perfectly as a standalone image can disappear against a background with a similar color temperature. A prop that looked detailed at full resolution becomes unreadable at 64px. An environment key art that felt coherent as a flat image tiles with visible seams in the game world.
Validation means putting every asset into its actual game context before calling it complete. This is not a test environment. It is the real engine, with the real camera distance, the real lighting, and the real surrounding assets. Run this pass before you commit any asset to the final production folder. It is significantly easier to regenerate at Stage 4 than to fix a style problem after 40 assets have been built on top of it.
Why It Works. The “send back to the source stage, not manual fixing” rule is the most important structural decision in this validation pass. Manual fixing in the engine, adjusting scale, applying color correction filters, and using effects on the engine side to compensate for generation problems, creates brittle assets that break when the engine context changes. Fixing at the source stage produces an asset that is correct by design rather than correct by compensation.
How to Adapt It. For a mobile game with multiple device resolutions, test assets at the three most common screen densities, 1x for low DPI, 2x for Retina, and 3x for high DPI. Assets that pass at 2x sometimes fail at 1x because the compression artifacts that are invisible at higher density become visible at low resolution.
10 Stage 10, Engine Ready Asset Packaging
The final stage is not about generation or editing. It is about organization, metadata, and handoff. An asset that is visually perfect but named “midjourney_upscaled_v3_final_FINAL2.png” in an unsorted folder is a production liability. The developer who imports it in six months will not know what it is, where it came from, what resolution it should be displayed at, or whether it is the most recent version. Packaging means solving all of those problems before the asset enters version control.
This stage uses a master prompt, not for generation, but as a structured workflow that integrates the entire pipeline into a single documentation pass. Every asset that passes Stage 9 validation gets named, documented, and exported in this stage. The output of Stage 10 is not images. It is a game art package that any developer on the team can understand and use without asking questions.
Why It Works. The asset manifest is the component that transforms a folder of images into a production art system. It answers the questions that every new team member, every future version of yourself, and every patch after launch will ask. Where did this come from, how was it made, what version of the style was it generated under, and has it been validated? Without this documentation, every art update requires archaeology instead of iteration.
How to Adapt It. For a solo developer, the manifest can be a single sheet spreadsheet rather than JSON. The columns stay the same, the format simplifies. The critical columns are asset name, generation tool, style string version, and validation status. Those four pieces of data are what separate a professional asset library from a folder of files you will be confused by in six months.
Common Mistakes and How to Fix Them
The problem most developers run into is not making bad art. It is running the pipeline out of sequence. Skipping Stage 3, the palette lock, and designing characters before the color system is established produces characters that fight each other visually. Skipping Stage 6, the style string, means every new asset generation partially renegotiates the visual language. These are not taste problems. They are process problems, and they have process solutions.
| Mistake | Wrong Approach | Right Approach |
|---|---|---|
| Skipping the mood board | Opening Leonardo AI and generating a protagonist immediately because you have a clear picture in your head | Spend Stage 1 generating 20 to 30 atmospheric images before any character work. The mood board reveals assumptions about tone and color you did not know you had, and surfacing them early stops them from causing inconsistency across 40 assets |
| No master style string | Describing the art style from scratch in every new prompt, slightly differently each time, and wondering why assets feel inconsistent | Write and lock the master style string at Stage 6, then append it unchanged to every Stage 7 to 10 prompt. Style drift is a documentation problem, not a generation problem |
| Validating at generation resolution | Approving assets based on how they look in the browser at full resolution, importing them to the engine, and discovering readability problems at game scale | Every validation decision in Stage 9 happens at actual game display size. If you cannot test in engine, at minimum resize the image to the target display dimensions in Photoshop before approving |
| Fixing problems manually in the engine | Using color grading on the engine side, scale adjustments, or sprite offsets to compensate for assets that are slightly wrong | Send the asset back to the pipeline stage that introduced the problem. Compensating on the engine side creates fragile dependencies that break with every scene or lighting change |
| Mixing tools without a style bridge | Using Midjourney for environments and Leonardo AI for characters without establishing shared style language, then being surprised when they look like they belong to different games | The master style string is your style bridge. Write it from the best outputs of each tool and apply it consistently across both. Both tools can follow the same style constraints when the constraints are explicit |
“The pipeline is not where creativity goes to die. It is where creativity goes to survive contact with production. The developer who improvises every art decision is not being more creative. They are being more expensive.”
Art direction principle from the indie game development community
What AI Still Struggles With in the Concept Art Pipeline
Genuine style ownership is the gap no AI tool in 2026 has closed. Every AI image generator has a detectable aesthetic fingerprint, the way Midjourney composes light, the way Leonardo AI renders fabric folds, the way Stable Diffusion handles hair. When a player looks at a game made entirely with AI concept art, a trained eye can identify the tools used. That is not a problem for many games and many audiences, but it is a real limitation for studios whose visual identity is a core part of their product. The pipeline in this guide makes AI generated art more coherent and more game ready. It cannot make it original in the way that a skilled human artist’s work is original.
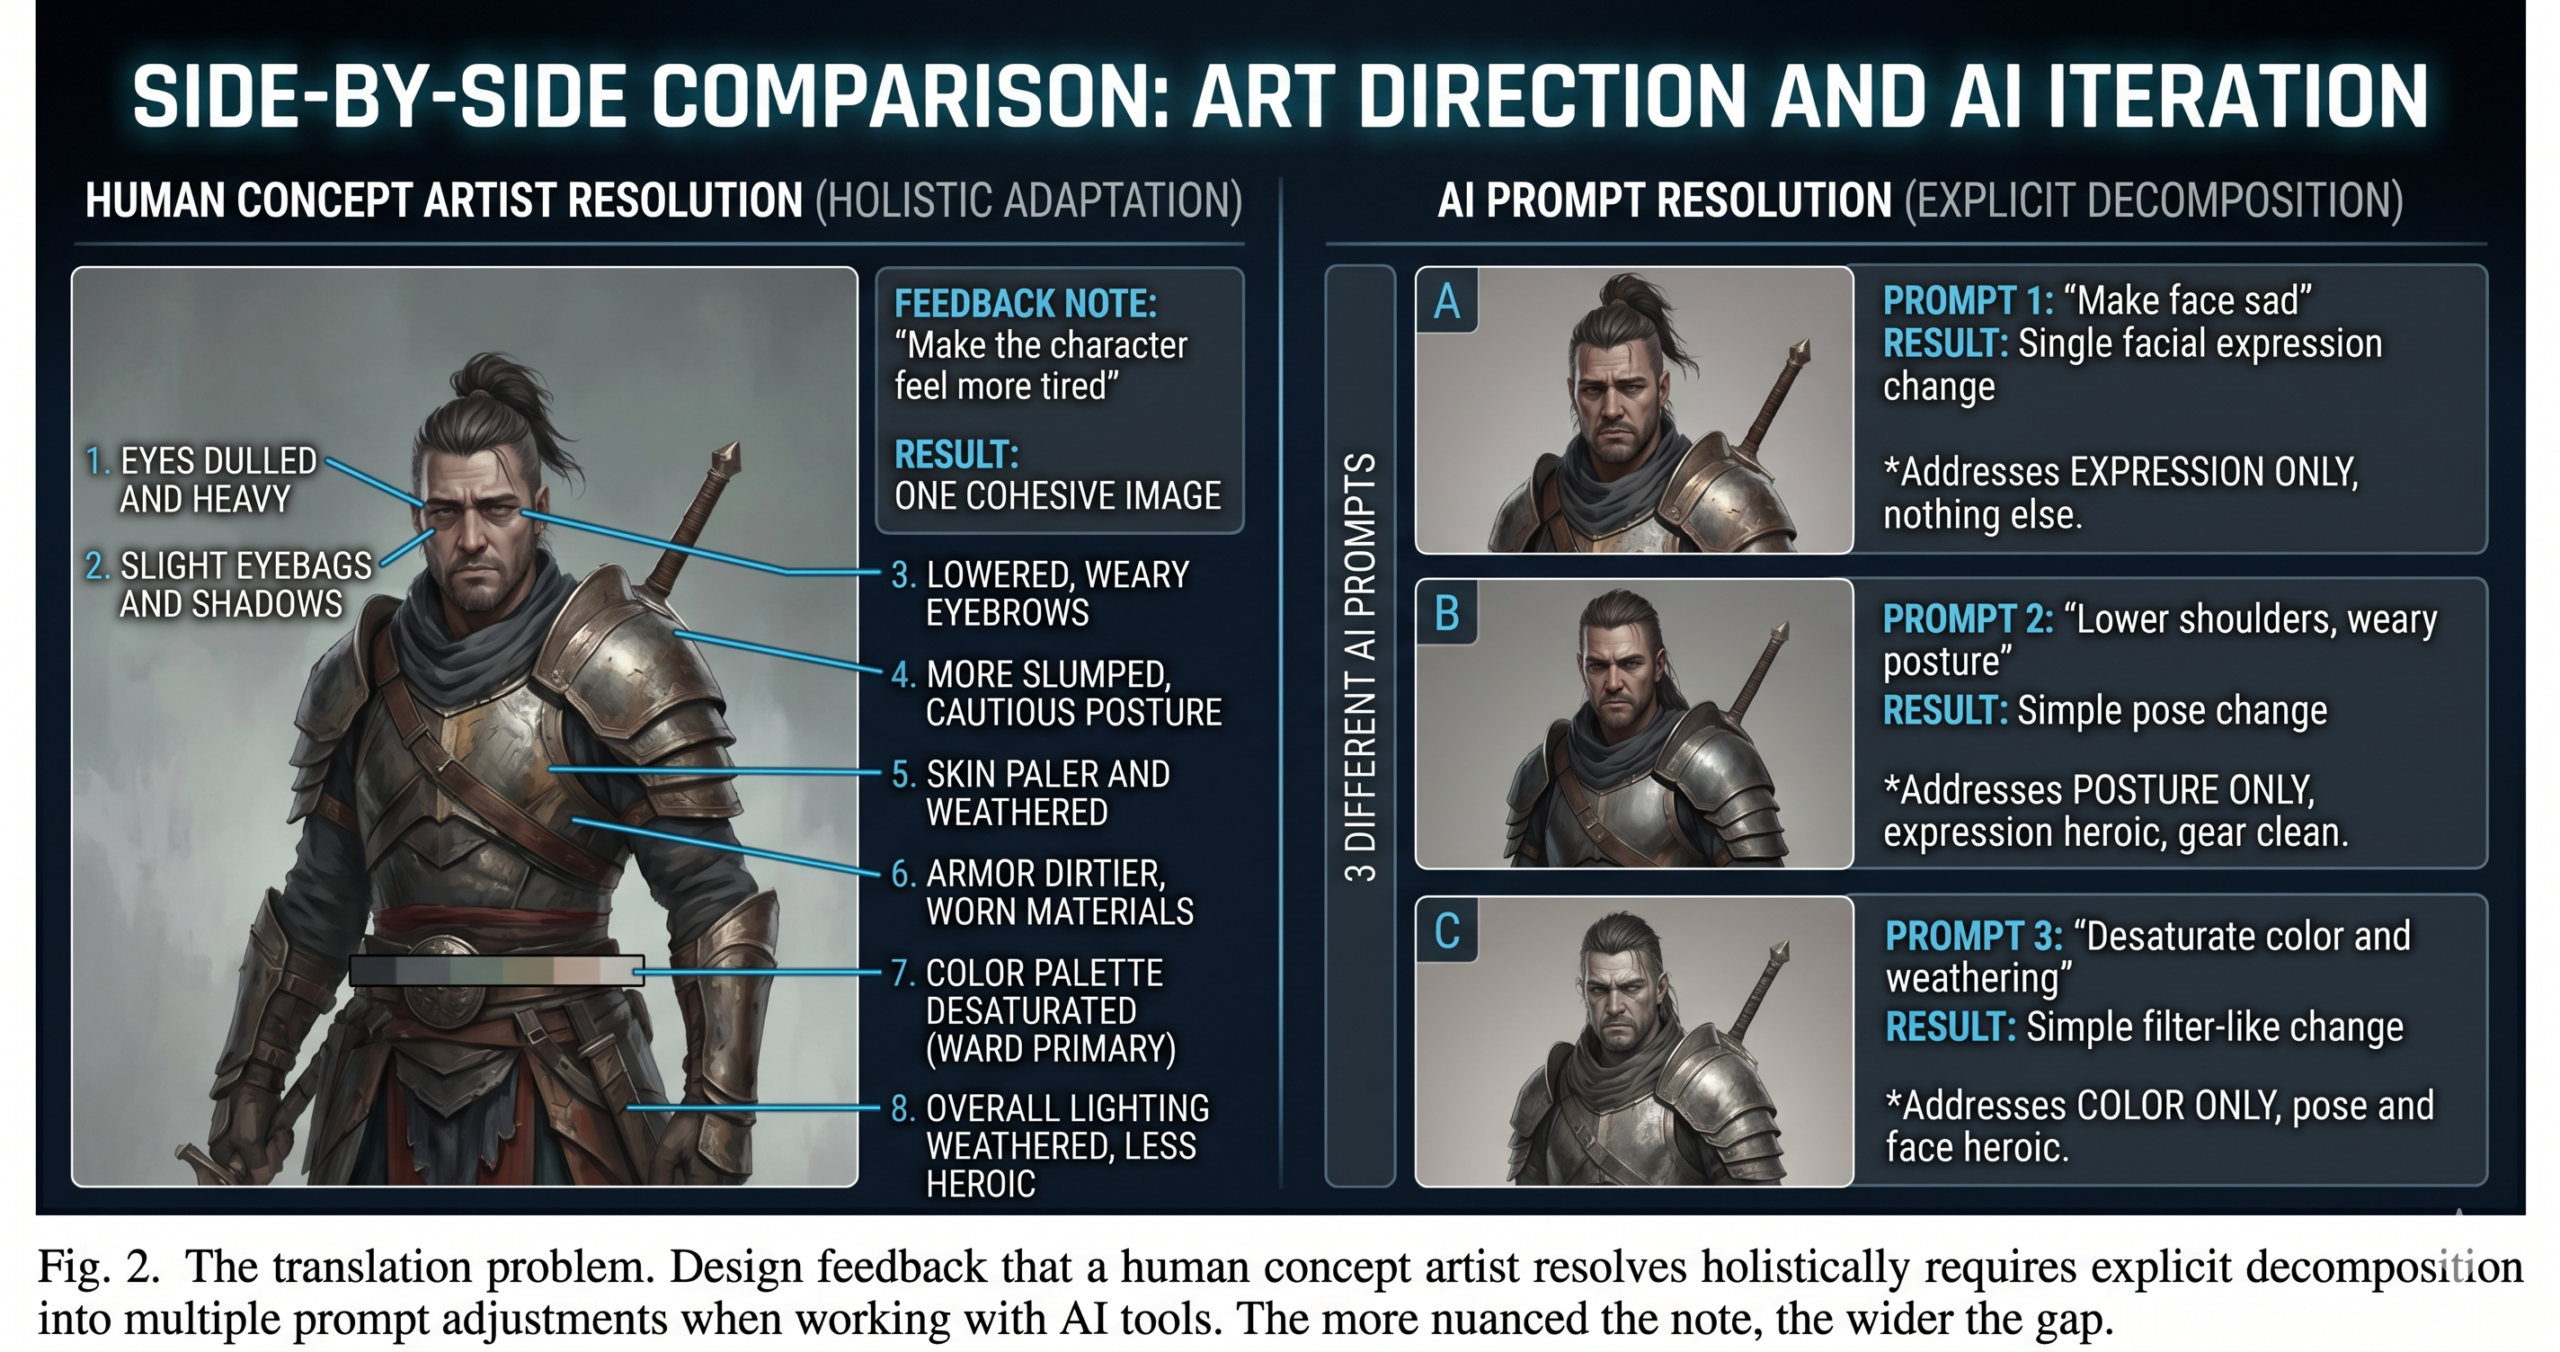
Iterative design feedback is the second genuine weakness. A human concept artist who gets the note “make the character feel more tired and less heroic” understands the dozen micro decisions that note implies, lowered shoulders, duller eyes, a less saturated palette, simpler costume detail. An AI art tool receives a modified text prompt and produces a new image that may or may not address any of those implicit decisions. The more nuanced the direction note, the more work falls on the developer to translate it into explicit prompt language, and some design notes resist translation entirely. The workaround is developing prompt vocabulary that maps to your specific game’s emotional language, which takes time to build and is not transferable between projects.
Long term character identity across a full game production cycle remains fragile. A character established in preproduction and generated consistently through Stages 4 to 6 can begin to drift in later production as the base models update, as new team members bring slightly different style interpretations, and as production pressure accelerates generation without the same care given to prompting in the early stages. The LoRA training workflow from the Leonardo AI prompts guide is the most durable solution to this problem, since a trained model does not drift with base model updates. For studios making games with long production cycles, LoRA training at Stage 6 rather than relying on Image Guidance is the professional choice, even though it costs more upfront.
What the Pipeline Actually Gives You
Working through these ten stages gives you something more valuable than a folder of game art. It gives you a documented, repeatable process for producing more game art in the same style whenever you need it. That is the real asset. Individual images decay in usefulness as your game evolves and design decisions change. A working pipeline with a locked style string and a validated asset manifest means that six months from now, when you need to add a new character, a new zone, or a new item category, you are starting from a known position rather than renegotiating the visual language from scratch.
The deeper principle behind this pipeline, and behind effective use of any AI tool, is that automation works best when the thinking is done before the automation runs. Every stage in this guide asks you to make a creative decision and then use AI to execute it. The mood board decides the emotional direction before Midjourney generates a single image. The palette lock decides the color language before any character is designed. The master style string decides the visual grammar before any production asset is built. AI handles the execution, and you own the decisions. That division of labor is what makes the output coherent rather than arbitrary.
There are things this pipeline cannot do. It cannot replace the intuitive visual judgment that comes from years of art training and production experience. It cannot guarantee that your game’s visual identity will be distinguishable from other AI assisted games in the same genre. It cannot make the creative decisions that require knowledge of your specific game’s story, mechanics, and player experience that no tool has access to. Those remain human responsibilities, and they are, frankly, the most interesting parts of making a game. The pipeline is there to make the production of the assets faster and more consistent, so you have more time and cognitive bandwidth for the decisions that actually require your creative intelligence.
In the next 12 to 18 months, native game engine integration will likely collapse Stages 8 through 10 significantly, since the gap between generation and an engine ready asset is shrinking with every tool update. When generation, cleanup, and import become a single step rather than three separate stages, the pipeline described here will compress in length. What will not compress is the upfront thinking, the mood board, the palette lock, the style string, because those are not production steps. They are creative decisions that need to be made regardless of how fast the tools execute them. The developers who are building the habit of making those decisions explicitly and early will benefit most from every tool improvement that follows.
Frequently Asked Questions
How long does the full ten stage AI concept art pipeline take?
It depends on team size and scope, but most solo developers move through Stages 1 to 6 in three to five days and spend ongoing time in Stages 7 to 10 as new assets are needed throughout production.
Do I need every tool listed in this guide?
No. Many stages can be completed with just Midjourney and Leonardo AI. The guide notes a recommended tool per stage, but the sequence matters more than using every platform mentioned.
What is a master style string and why does it matter?
It is a reusable block of text describing your art style, palette, and lighting that you append to every prompt after Stage 6. It prevents the visual drift that happens when each new prompt describes the style slightly differently.
Why does silhouette design come before color in this pipeline?
A character that only reads through color or detail fails at small sprite sizes and at a distance. Establishing a clear silhouette first guarantees the character reads correctly before any color or detail is added.
Can this pipeline work for a solo indie developer?
Yes. The pipeline scales down cleanly. A solo developer can use a single sheet spreadsheet instead of a JSON manifest at Stage 10 and still get the consistency benefits of following the sequence.
What is the most common reason AI concept art looks inconsistent across a game?
Skipping Stage 6, the style lock. Without a master style string, each new prompt re-describes the art style slightly differently, and those small variations compound into visible inconsistency across dozens of assets.
Try These Prompts Right Now
Start Stage 1 today. Open Midjourney, spend 30 minutes generating mood board images for your game, and pick the 8 that feel most right. That single hour of work will shape every art decision that follows.