

ML Pipelines
Claude Code for AI Engineering: Building and Testing ML Pipelines (2026 Guide)
Building machine learning pipelines is one of those engineering domains that looks deceptively simple from the outside and is ruthlessly unforgiving in practice. Data arrives malformed. Feature engineering transforms compound invisibly. Training loops fail silently on edge cases. And the testing conventions that software engineers take for granted — unit tests, integration tests, CI/CD — remain genuinely underused in most ML codebases as of 2026, not because engineers don’t care, but because writing them is slow and unglamorous work.
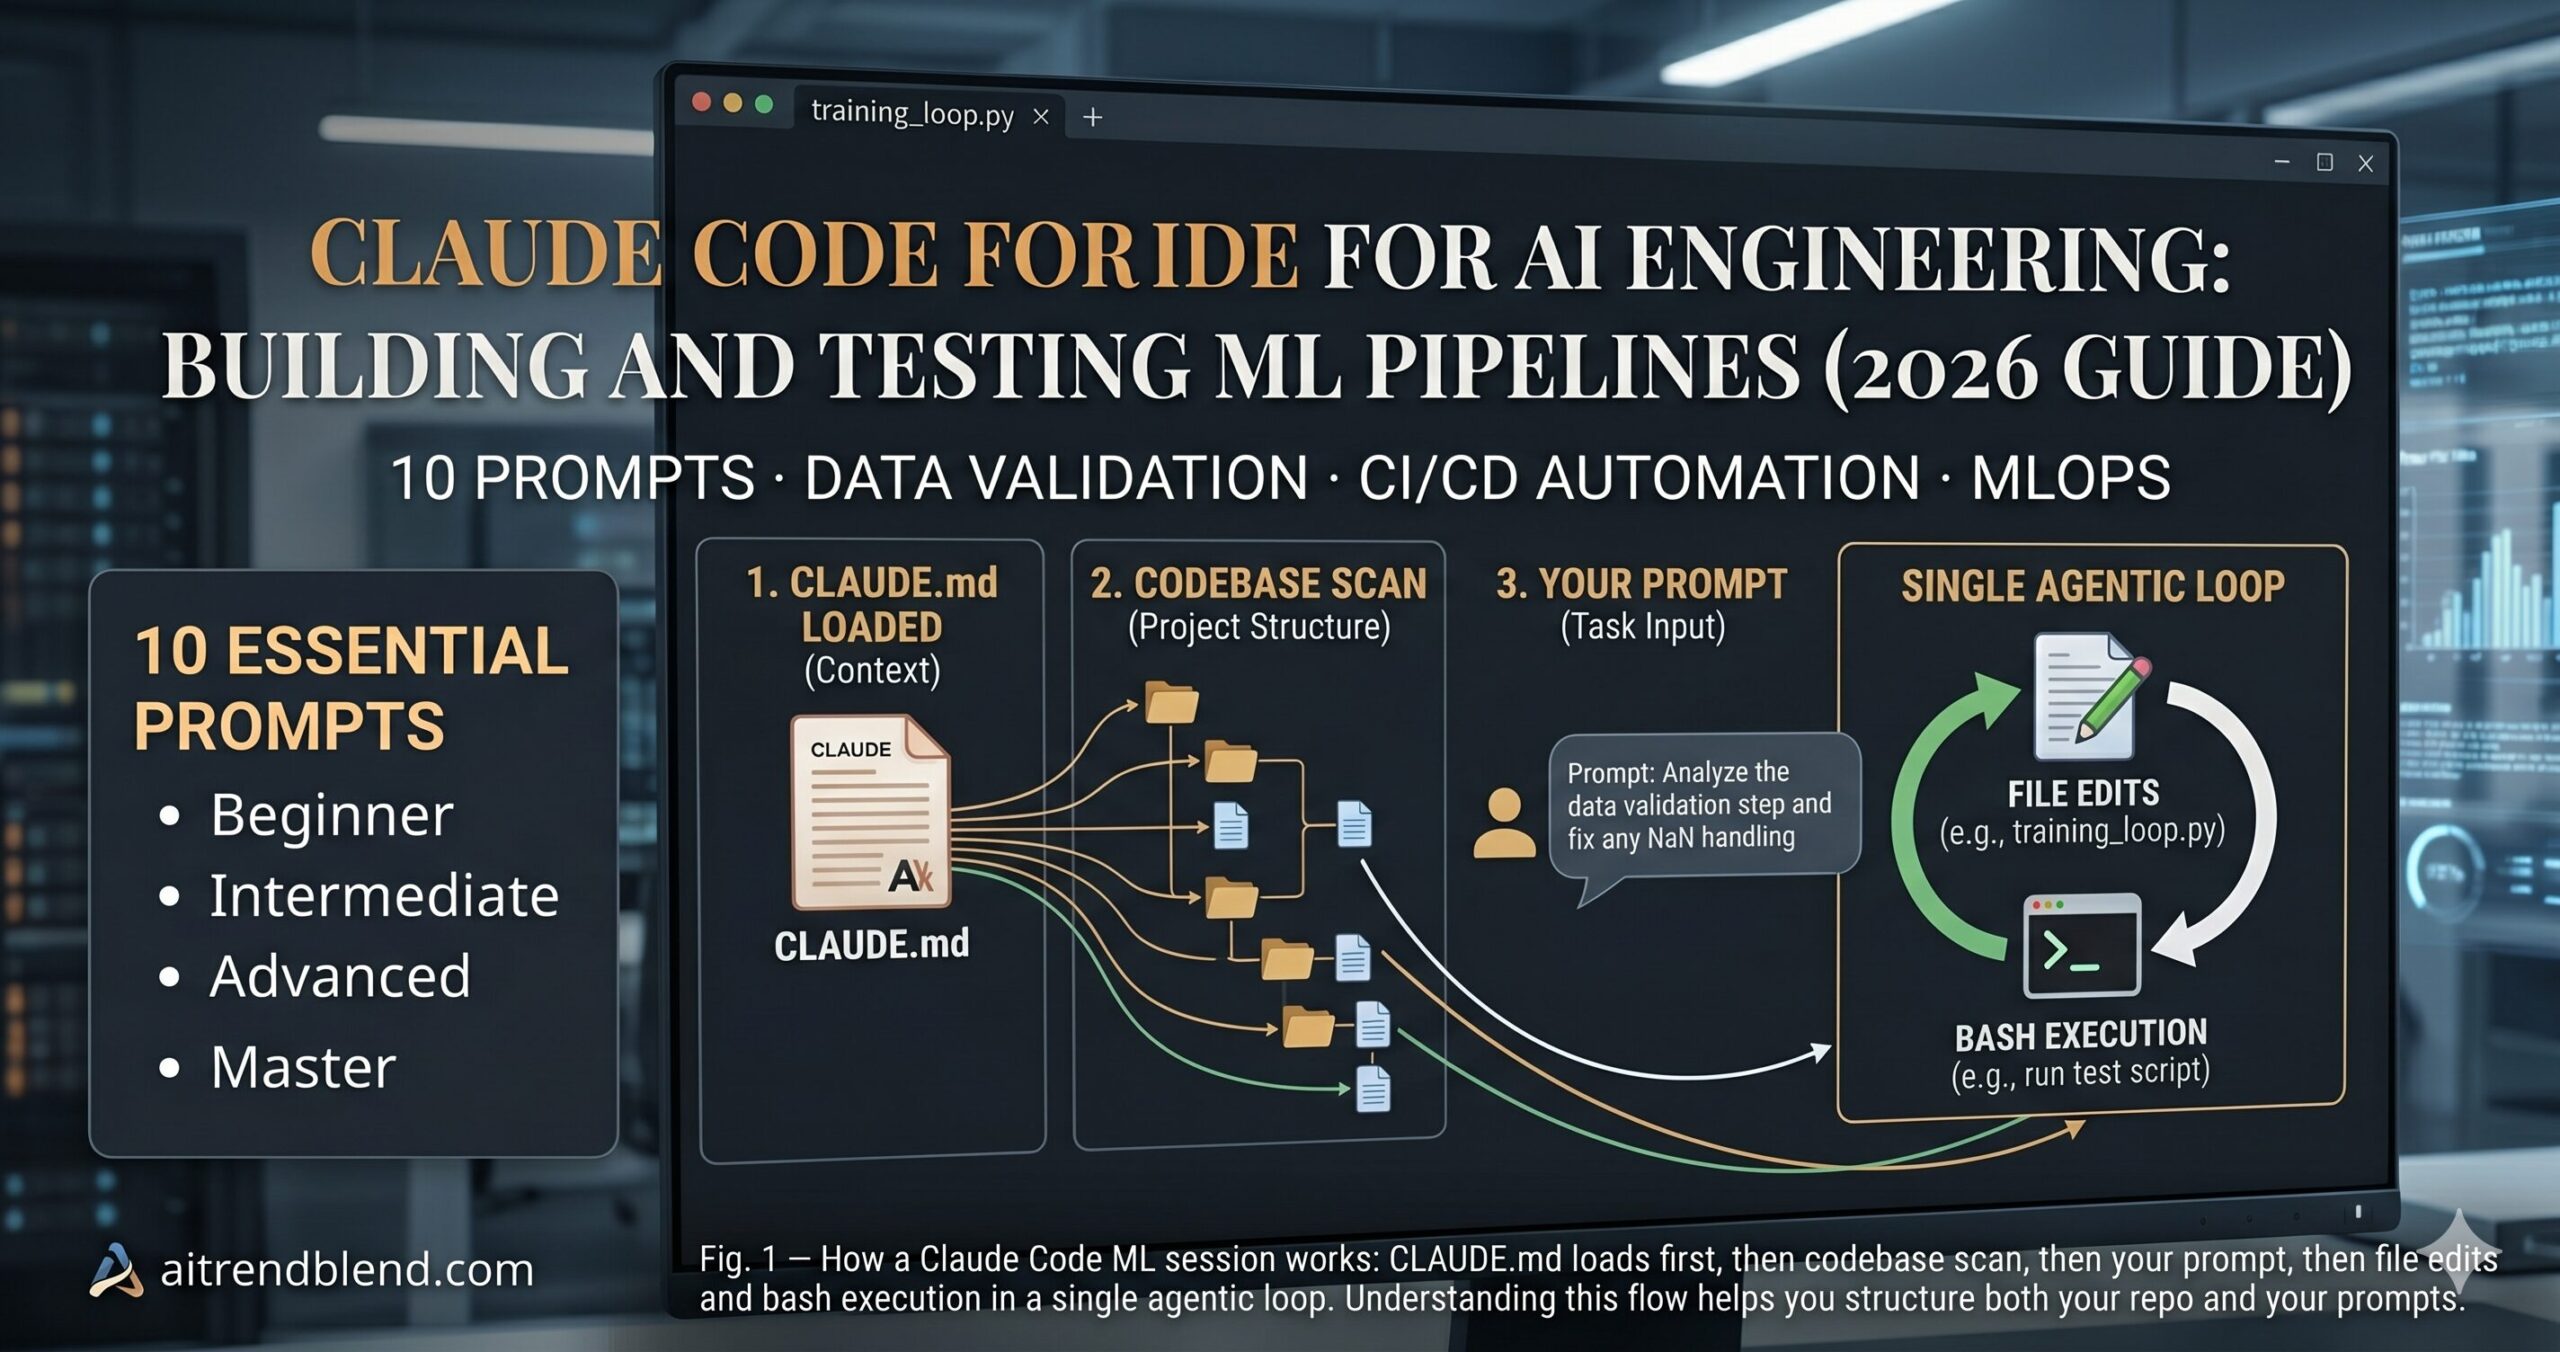
Claude Code changes that equation. As a CLI tool that reads your entire project structure, edits files directly, runs shell commands, and executes code in your own environment, it occupies a fundamentally different position than a chat interface. You’re not copy-pasting code from a browser window. You’re working with an AI that has full context of your repo — your existing utilities, your naming conventions, your import patterns — and can generate, test, and iterate within it without you leaving the terminal.
This guide covers 10 Claude Code prompts built specifically for AI engineering and ML pipeline work. Each one is grounded in how Claude Code actually behaves in a real project directory. By the end, you’ll have a complete toolkit — from dataset sanity checks to full CI/CD automation — that you can adapt and deploy today.
Why Claude Code Handles ML Pipeline Work Differently
The problem most ML engineers run into with general-purpose AI assistants is context collapse. You paste a snippet, the model generates something plausible, and you spend twenty minutes figuring out why it uses a different DataFrame column naming convention than the rest of your codebase, imports a library version you stopped using eight months ago, or misses an edge case that’s obvious if you’ve seen your data distribution. The model doesn’t know your project. It’s generating code for a hypothetical version of your problem.
Claude Code works differently because it operates inside your actual project. Run claude in your repo root and it reads your file structure, understands your existing utilities, and generates code that fits — using your real function names, your actual schema, your existing test patterns. For ML pipeline work specifically, that difference is not cosmetic. A data validation function generated with knowledge of your actual column types and distribution is usable immediately. One generated against a generic schema needs surgery before it runs.
Copilot and Cursor are strong for line-level and function-level completions — fast, low-friction, excellent for keeping your hands on the keyboard. Claude Code sits in a different lane: it handles multi-file, architectural-scale tasks that require reasoning about the whole project before touching a single line. Refactoring your entire feature engineering pipeline, generating a complete test suite from scratch, wiring experiment tracking into an existing training loop — these are the tasks where Claude Code’s codebase-wide context pays off most clearly.
Claude Code’s codebase context is its defining advantage for ML engineering. Every prompt you write is answered with knowledge of your actual project structure, existing utilities, and real data schema — not a generic approximation of your problem. That gap between generic and grounded code matters enormously in production ML.
Before You Start: How to Get the Best Results
A few project setup decisions will shape everything Claude Code does before you write a single ML-specific prompt. These are worth doing once, carefully, so you don’t fight them for the entire project.
Keep a CLAUDE.md file in your project root. Claude Code reads this automatically at the start of every session. Use it to document your ML framework choices (PyTorch vs. JAX vs. TensorFlow), your data pipeline architecture, the location of key modules, and any conventions Claude should follow — column naming patterns, logging standards, the test runner you use. This is not overhead. It’s the difference between Claude Code producing code that fits your project and code that technically works but reads like it came from a different team.
Grant Claude Code the shell permissions it needs for ML work upfront. Data inspection commands, pip install calls, pytest execution — add these to your allowed tools rather than approving each one interactively. In your .claude/settings.json, set bash permissions for the commands you’ll use repeatedly. The fewer approval interruptions in the middle of a multi-step pipeline task, the better Claude Code’s output quality — it can complete full loops rather than stopping mid-generation.
Structure your project with Claude Code’s context window in mind. If your data directory contains hundreds of large CSV files, keep them outside the repo root or add them to .claudeignore. Claude Code reads project structure to build context — a directory full of binary data files adds noise without value. What it needs to see are your Python modules, your config files, your tests, and your existing pipeline code. Keep those clean and well-organized and the context quality you get back will reflect it.
The 10 Best Claude Code Prompts for Building and Testing ML Pipelines
These prompts are designed to be run in a terminal with claude active in your project directory. Variable placeholders in amber are yours to fill before running. Complexity escalates from paste-and-use beginner patterns to master-level architectural frameworks.
Prompt 1: The Dataset Profiler
The first thing any ML engineer should do with a new dataset is understand it systematically — distributions, missing values, cardinality, outliers, type inconsistencies. Writing that profiling code manually is tedious. This prompt generates a complete, runnable dataset profiling script that goes well beyond a basic df.describe().
By pointing Claude Code at the actual file path, it reads the schema and generates a profiler tuned to your real column names and types — not a generic template you have to adapt. The “suspicious values” check with your specific column names is the part you couldn’t easily get from a generic prompt: it requires knowing what “positive-only” means in your domain.
Add “Also generate a distribution plot for each numerical column and save PNGs to [OUTPUT_DIR]/plots/” for a visual data audit. Claude Code will generate the matplotlib code and run it if you have bash permissions enabled.
Prompt 2: The Training Loop Scaffold
Every ML project needs a training loop. Writing a good one from scratch — with proper gradient accumulation, logging, checkpoint saving, early stopping, and device handling — takes longer than it should. This prompt generates a production-quality training loop that matches the framework and architecture already in your repo.
Telling Claude Code which files to read first means the generated training loop uses your actual model’s forward() signature and your DataLoader’s output format — no signature mismatches, no shape errors on the first run. The requirements.txt constraint prevents Claude from introducing dependency drift.
Add “Include mixed-precision training with torch.cuda.amp” for GPU efficiency, or “Support distributed training with torch.nn.parallel.DistributedDataParallel” for multi-GPU setups. Claude Code handles both without requiring you to write the boilerplate.
Prompt 3: The Pipeline Error Investigator
When an ML pipeline fails, the error is rarely where it appears. The stack trace points to where Python gave up — not where the data or logic went wrong three steps earlier. This prompt gives Claude Code a complete diagnostic mandate rather than just asking it to “fix the error.”
Step 3 — checking for the same bug elsewhere — is what separates a real debugging session from patching one manifestation and hitting the same issue two stages later. Claude Code can scan related files for similar patterns while it has the error context loaded, catching the full class of bug rather than just the current instance.
Add “After fixing, add an assertion at the point of failure that would have caught this error earlier” — Claude Code will instrument the code with a guard that makes future recurrences loud rather than silent.
Prompt 4: The Feature Engineering Architect
Most tutorials skip this part entirely. Feature engineering is where ML projects succeed or fail in practice, and it’s also where the code becomes hardest to maintain — a jungle of column transformations, fillna calls, encoding steps, and scaling operations scattered across multiple files. This prompt generates a clean, pipeline-style feature engineering module.
The fit-only-on-training constraint is the most important line in this prompt. Data leakage through feature engineering is one of the most common and least visible sources of inflated validation metrics in production ML. By making it an explicit requirement, you force Claude Code to generate code that handles train/val/test splits correctly rather than assuming you’ll remember to do it manually.
Add “Generate a feature importance report after the first training run using SHAP values, saved to [OUTPUT_DIR]/feature_importance.html” — Claude Code will wire in the SHAP library call and output visualization in the same pass.
Prompt 5: The Experiment Tracking Integration
Running model experiments without tracking them is the ML equivalent of running AB tests without logging results. You’ll repeat experiments you’ve already run, forget what hyperparameters produced your best checkpoint, and be unable to explain your results to anyone who wasn’t watching the terminal with you. This prompt wires MLflow or Weights & Biases into an existing training script without breaking anything.
The “handle unavailability gracefully” instruction is the part most developers forget the first time. Training runs that crash because the tracking server is down — or because MLflow isn’t configured in a new environment — are a real operational problem. Making it a hard requirement from the start prevents a class of annoying deployment failures.
Replace the tracking tool with “DVC” and add “track the dataset version alongside model artifacts” to get full data + model lineage tracking — essential for reproducibility in regulated industries or academic settings.
Prompt 6: The Data Validation Framework
This is not a small distinction. The difference between ML pipelines that catch bad data early and those that don’t is usually a data validation layer — and in 2026, that layer is still absent in most codebases that weren’t built by teams with a dedicated MLOps function. This prompt generates schema-based validation that runs at every pipeline stage boundary.
The STRICT vs. WARN mode flag is what makes this reusable across contexts. Development needs WARN mode — strict failures during experimentation are disruptive. Production needs STRICT mode — silent data quality issues cause exactly the kind of model degradation that’s hard to attribute after the fact.
Add “Integrate with Great Expectations and generate an expectation suite from the first valid batch of training data” if your team is standardizing on GE. Claude Code will wire the GE context, generate the suite, and save it to the project — a setup task that otherwise takes half a day.
Prompt 7: The End-to-End Pipeline Chain
Most tutorials skip this part entirely. The chained prompt sequence is where Claude Code’s codebase context pays off most dramatically — you run three sequential prompts, each building on what the previous one produced, and end up with a fully integrated pipeline that no single-shot prompt could generate reliably.
Phase 1 builds a shared understanding between you and Claude Code of what the pipeline actually does — not what it’s supposed to do. Reviewing that map before Phase 2 means you catch architecture problems before they’re baked into the runner. The three-phase approach is slower than a single prompt but produces a pipeline you can trust rather than one you have to audit from scratch.
Add a Phase 4: “Generate a pipeline diagram as a Mermaid flowchart from the map created in Phase 1 and embed it in the project README.” You get living documentation that updates as you update the pipeline.
Prompt 8: The ML Test Suite Generator
The difference between a mediocre ML codebase and a great one is often a comprehensive test suite. Writing ML tests is different from testing regular software — you’re not just testing logic, you’re testing data shapes, numerical stability, model output ranges, and pipeline reproducibility. This prompt generates the full suite.
The “same input → same output” test on the feature pipeline catches non-determinism that is invisible during single runs but catastrophic for reproducibility. Feature pipelines that produce different results on repeated runs — due to random seeds, unstable sort orders, or stateful preprocessing — are a silent source of experiment irreproducibility that this test surfaces immediately.
Add “Generate a conftest.py with a shared synthetic dataset fixture that all tests use — sized large enough to catch shape bugs but small enough for fast test runs” to ensure the whole suite shares a consistent test data contract.
Prompt 9: The CI/CD ML Pipeline Automator
Running tests manually before every commit is a habit that survives approximately two weeks before it starts getting skipped. Automating it with a CI/CD pipeline that understands ML-specific concerns — model artifact caching, test data versioning, training smoke tests — is the difference between a pipeline you trust and one you hope is fine. This prompt generates that automation.
Separating the pipeline smoke test from unit tests is intentional. Smoke tests are slower and can fail for infrastructure reasons unrelated to code quality — mixing them with unit tests turns every infrastructure glitch into a blocking CI failure. Running them as a separate job lets you gate PRs on fast tests while keeping the full pipeline check informative rather than blocking.
Add a performance-regression job that runs training for 5 epochs on a fixed dataset and compares the resulting validation metric against a stored baseline — failing if it drops more than [THRESHOLD] percent. This catches silent model quality regressions before they ship.
Prompt 10: The ML Pipeline Architect
This is the master framework — the prompt you use when you’re starting a new ML project from scratch or doing a serious architectural overhaul. It combines role assignment, full project context loading, explicit constraints, phased delivery, and a quality evaluation loop into a single structure. It’s slower to set up and worth every minute for high-stakes ML work.
The “confirm before writing code” instruction in the Format Block is the most important line here. Getting alignment on the architecture plan before implementation means you catch wrong assumptions at the planning stage — not after Claude Code has generated 2,000 lines that assume a different data flow than your system requires. The stage-by-stage test-and-fix loop means failures are caught and resolved in context, not discovered at the end as a pile of broken interdependencies.
For model serving work, add a deliverable: “FastAPI inference endpoint in serve/ with request schema validation, latency logging, and a /health endpoint” — Claude Code will wire the serving layer into the same pipeline context it just built, including correct input/output types from the training code.
Prompts 1 through 3 eliminate the most common sources of pipeline failures that are discovered late and manually. Prompts 7 through 10 produce architectural outputs that would take a senior engineer several days to write — and that continue paying dividends every time the pipeline runs cleanly in CI without anyone having to babysit it.
Common Mistakes and How to Fix Them
These are the specific patterns that consistently produce poor Claude Code output for ML pipeline work — not theoretical failure modes, but the habits we see most often in practice.
| Wrong Approach | Right Approach |
|---|---|
| Build me a complete ML pipeline for predicting customer churn. | Read src/ and data/schema.json. Build a churn prediction pipeline with stages: ingest → validate → feature_engineer → train → evaluate. Start with the data validation module only. Show the schema it expects before writing any code. |
| Fix my training code — it’s getting NaN loss. | Read train.py and the last 50 lines of logs/train.log. NaN loss appears at epoch [N]. Check for: missing gradient clipping, NaN in input features, exploding gradients, learning rate too high. Show me the root cause before changing any code. |
| Write tests for my ML pipeline. | Read src/pipeline/ and existing tests in tests/. Write pytest tests covering: feature transformer output shapes, pipeline determinism (same input → same output), schema validation, and a smoke test for 2-epoch training on synthetic data. Mark anything slow with @pytest.mark.slow. |
| Add MLflow to my training script. | Read train.py and requirements.txt. Integrate MLflow logging without changing training logic. Log all argparse hyperparameters at start. Log train/val loss and F1 each epoch. Save best checkpoint as artifact. Handle MLflow server unavailability gracefully — warn and continue, don’t crash. |
| Make my feature engineering better. | Read features.py and the data profile in reports/profile.json. Identify: columns with high skew (log-transform candidates), high-cardinality categoricals (target-encode), and columns with >10% nulls (imputation strategy). Propose changes as a numbered list before implementing any of them. |
Mistake 1: Not pointing Claude Code at specific files. The entire advantage of Claude Code over a chat interface is codebase context. A prompt that doesn’t reference specific file paths forces Claude Code to make assumptions about your project structure. Those assumptions are often wrong in ways that produce plausible-looking but broken code. Always point at the files that matter.
Mistake 2: Asking for the full pipeline in one shot. ML pipelines have too many interdependencies for a single-shot generation to get right. Data schema assumptions leak into feature code. Feature output shapes affect model input dimensions. Training assumptions affect evaluation logic. Break the work into stages and verify each one before proceeding. It feels slower. It is faster.
Mistake 3: Skipping the architecture review step. For anything beyond a single-file change, ask Claude Code to describe its intended approach before implementing it. A thirty-second review of the plan catches wrong assumptions before they’re baked into fifty files. This is the highest-value habit to build in Claude Code-assisted ML work.
Mistake 4: Ignoring the CLAUDE.md file. Teams that don’t maintain a CLAUDE.md spend time re-explaining the same project conventions every session. The file takes an hour to write properly and saves that hour every single week. It’s also the right place to document decisions that aren’t obvious from the code — why you chose one framework over another, what the known data quality issues are, which functions are stable contracts versus internals subject to change.
What Claude Code Still Struggles With in 2026
Claude Code’s limitations for ML work are real, and knowing them prevents you from discovering them at the worst moment — mid-experiment, under deadline.
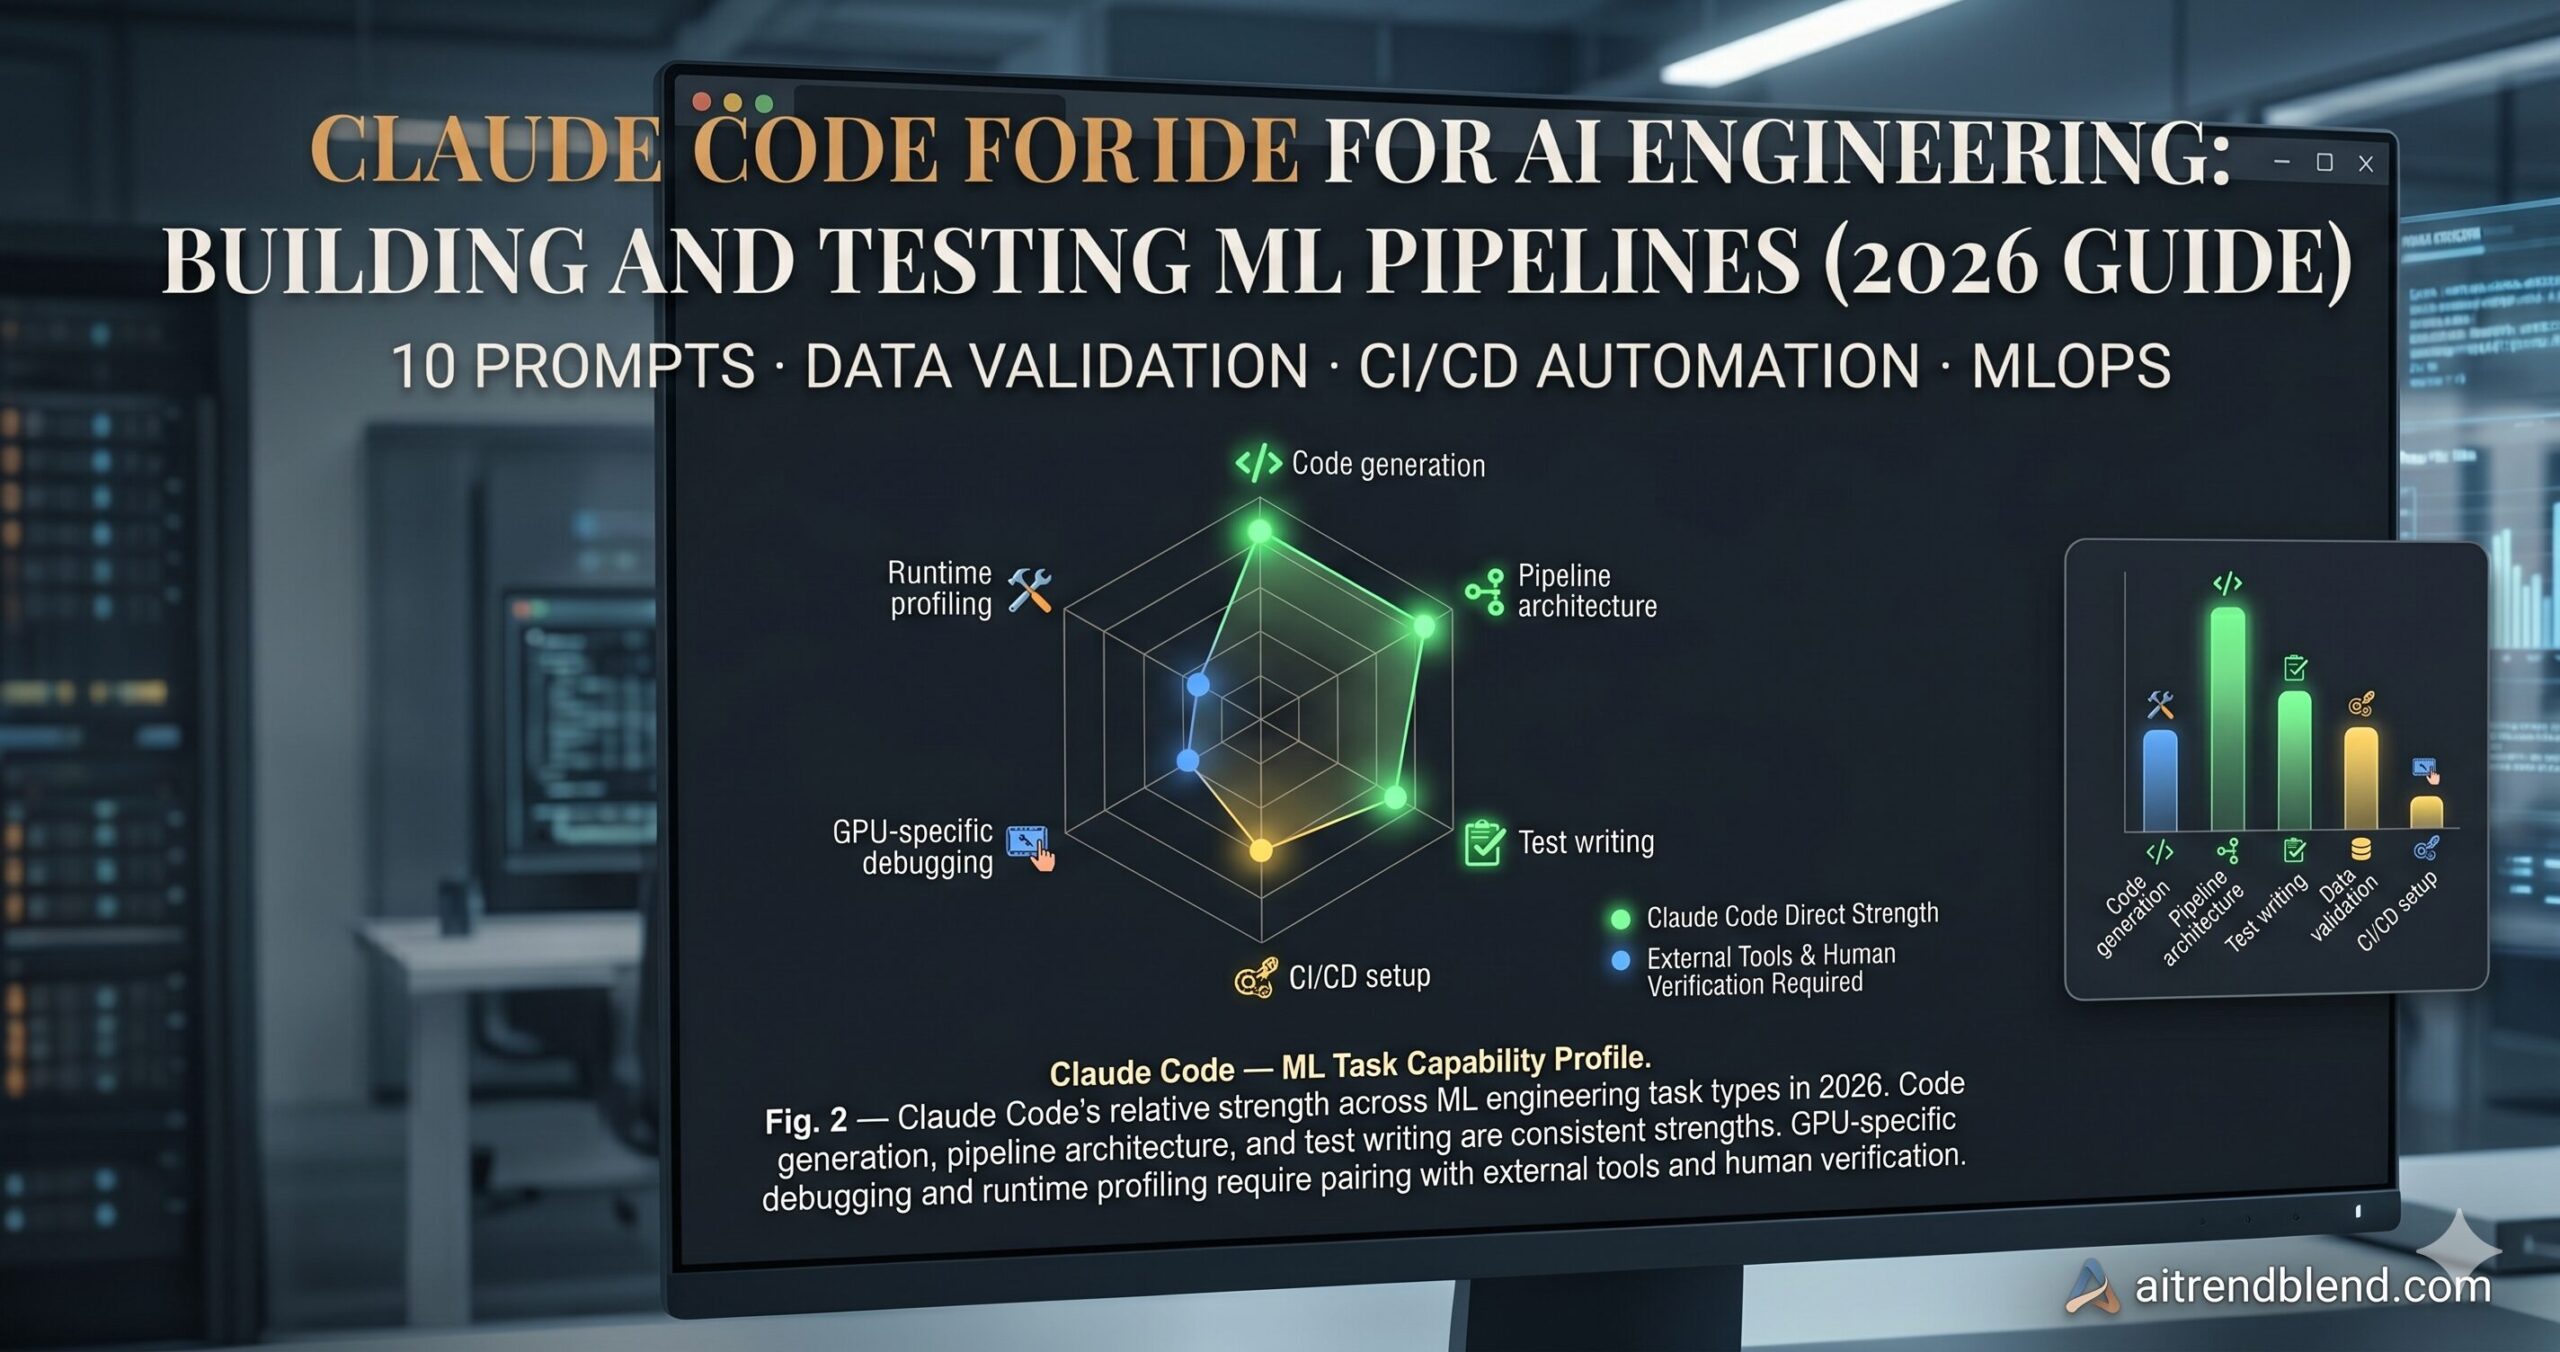
Claude Code cannot run GPU training. It can generate training code, fix training bugs, and modify training configuration — but the actual compute happens in your environment, not in the model. This is the correct design choice from a security standpoint, but it means Claude Code cannot verify that your training script actually converges, produces a useful model, or runs at the expected speed on your hardware. Generated training code needs to be run and validated by you. When Claude Code says “this should train in approximately N hours,” treat that as a rough estimate from a model that has never seen your GPU, your batch size, or your dataset size distribution.
Library API currency is an ongoing challenge. Claude Code’s training data has a cutoff, and ML libraries — PyTorch, Hugging Face Transformers, scikit-learn, JAX — evolve quickly. Occasionally the generated code will use a deprecated API or miss a more ergonomic pattern introduced in a recent version. The fix is straightforward: always run generated code against your actual environment and check the library version in your requirements.txt against the generated imports. For libraries where API stability matters most, add the version constraint to your prompt explicitly.
Debugging GPU memory errors is weak. Out-of-memory crashes, CUDA device assertions, and gradient checkpoint failures often require hardware-specific knowledge that Claude Code can reason about but not directly observe. It will generate plausible fixes — reduce batch size, use gradient checkpointing, switch to mixed precision — and those are usually the right moves. What it can’t do is profile your specific memory usage, see which tensors are consuming the most memory in a given run, or confirm that a fix resolved the issue without you running the training loop again. For serious GPU memory work, pair Claude Code with a profiling tool like PyTorch Profiler and give it the profiler output to work with.
“The fastest way to build a production ML pipeline in 2026 is Claude Code doing the architecture, you doing the verification — and neither one trying to do the other’s job.”
— aitrendblend.com Editorial Team, 2026
What You’ve Built — and Where This Goes Next
The skill this guide has transferred is not “how to use an AI to write Python.” It’s a structured approach to ML engineering that treats code generation as a collaborative process with clear role boundaries: Claude Code handles the scaffolding, the boilerplate, the test generation, and the architectural plumbing; you handle the domain decisions, the data understanding, the experiment interpretation, and the production verification. Neither role is reducible to the other, and the workflow breaks down when you try to collapse them into one.
Good prompt engineering for ML pipeline work reflects a deeper truth about working with code-generating AI: specificity is everything. The prompts that produce genuinely usable ML code are the ones that reference real file paths, real schema constraints, real framework versions, and real failure modes. Generic ML prompts produce generic ML code — technically correct for some hypothetical pipeline, useless for yours. The engineers who get the most out of Claude Code are the ones who’ve internalized that giving the model more context is almost always worth the extra thirty seconds it takes to write it.
There are still tasks in the ML engineering workflow that require human judgment that no prompt structure can substitute for. Deciding whether a 2% validation metric improvement justifies the added model complexity is a product and engineering judgment call. Determining whether a training curve suggests genuine learning or overfitting to a data artifact requires you to understand the domain. Choosing between two architectures that both pass all your tests but have different failure modes under distribution shift requires the kind of reasoning that’s grounded in experience, not code context. Claude Code supports those decisions — it doesn’t make them.
The trajectory for Claude Code in ML engineering points toward tighter integration with the tools you already use — experiment trackers, data versioning systems, model registries, deployment platforms. The prompts in this guide will remain relevant, but the manual wiring between Claude Code and those external systems will shrink. What won’t change is the fundamental dynamic: the engineers who get the most from this tool will be the ones who give it the most specific, grounded context to work with — and who stay engaged in the verification loop rather than treating generated code as a finished artifact.
Try These Prompts Right Now
Open a terminal in your ML project root, run claude, and paste in Prompt 1 with your actual dataset path. The first profile report takes about 90 seconds to generate and will almost certainly show you something you didn’t know about your data.
Disclaimer: aitrendblend.com is an independent editorial publication. We are not affiliated with Anthropic or any AI company. No sponsored content influenced the evaluations or recommendations in this article.