Building Computer Vision Pipelines with Claude Code
AITrendBlend Editorial||14 min read|Tutorials & How-To
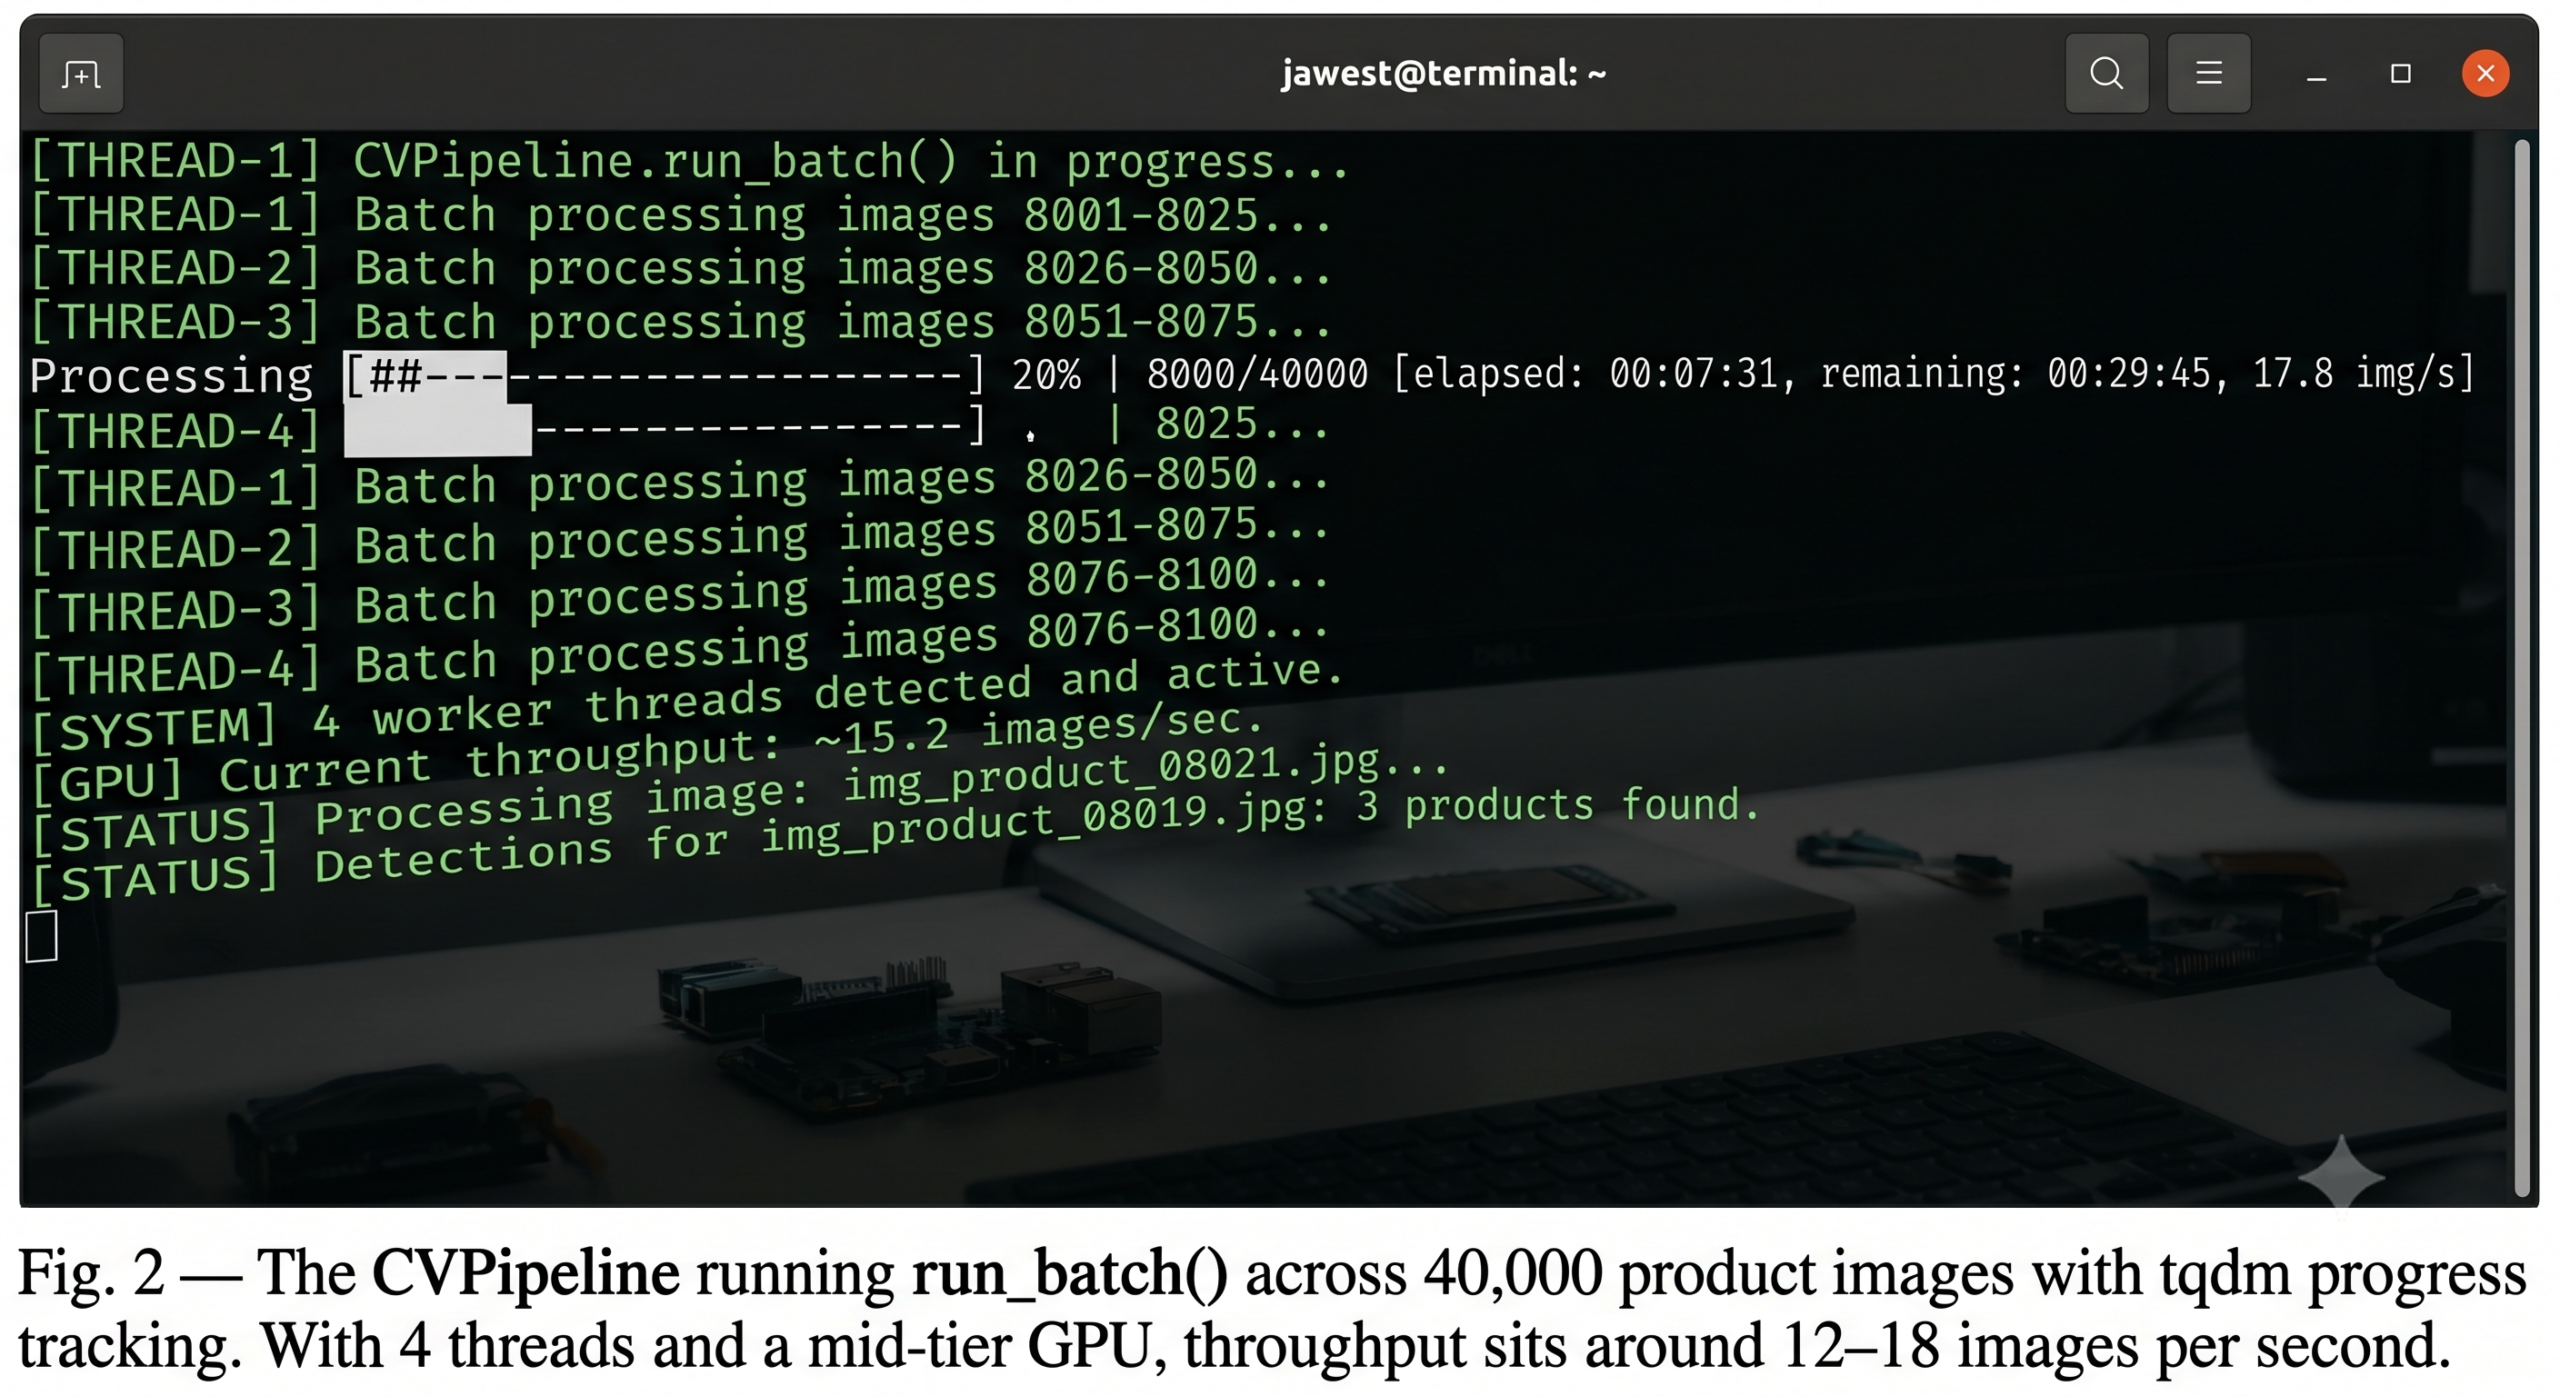
You get an image folder from a client — 40,000 product photos, all unlabeled. They need bounding boxes around every item, extracted text from every label, and a CSV of defect flags before Friday. A year ago this meant a week of boilerplate. With Claude Code in your terminal, you can scaffold a production-grade vision pipeline in an afternoon. This guide shows you exactly how.
What a Computer Vision Pipeline Actually Is
Strip away the buzzwords and a computer vision pipeline is a chain of functions: raw image in, structured data out. Each function transforms the image or extracts information from it. The hard part isn’t any single step — it’s connecting them reliably at scale without leaking memory, stalling on corrupt files, or producing silent garbage output.
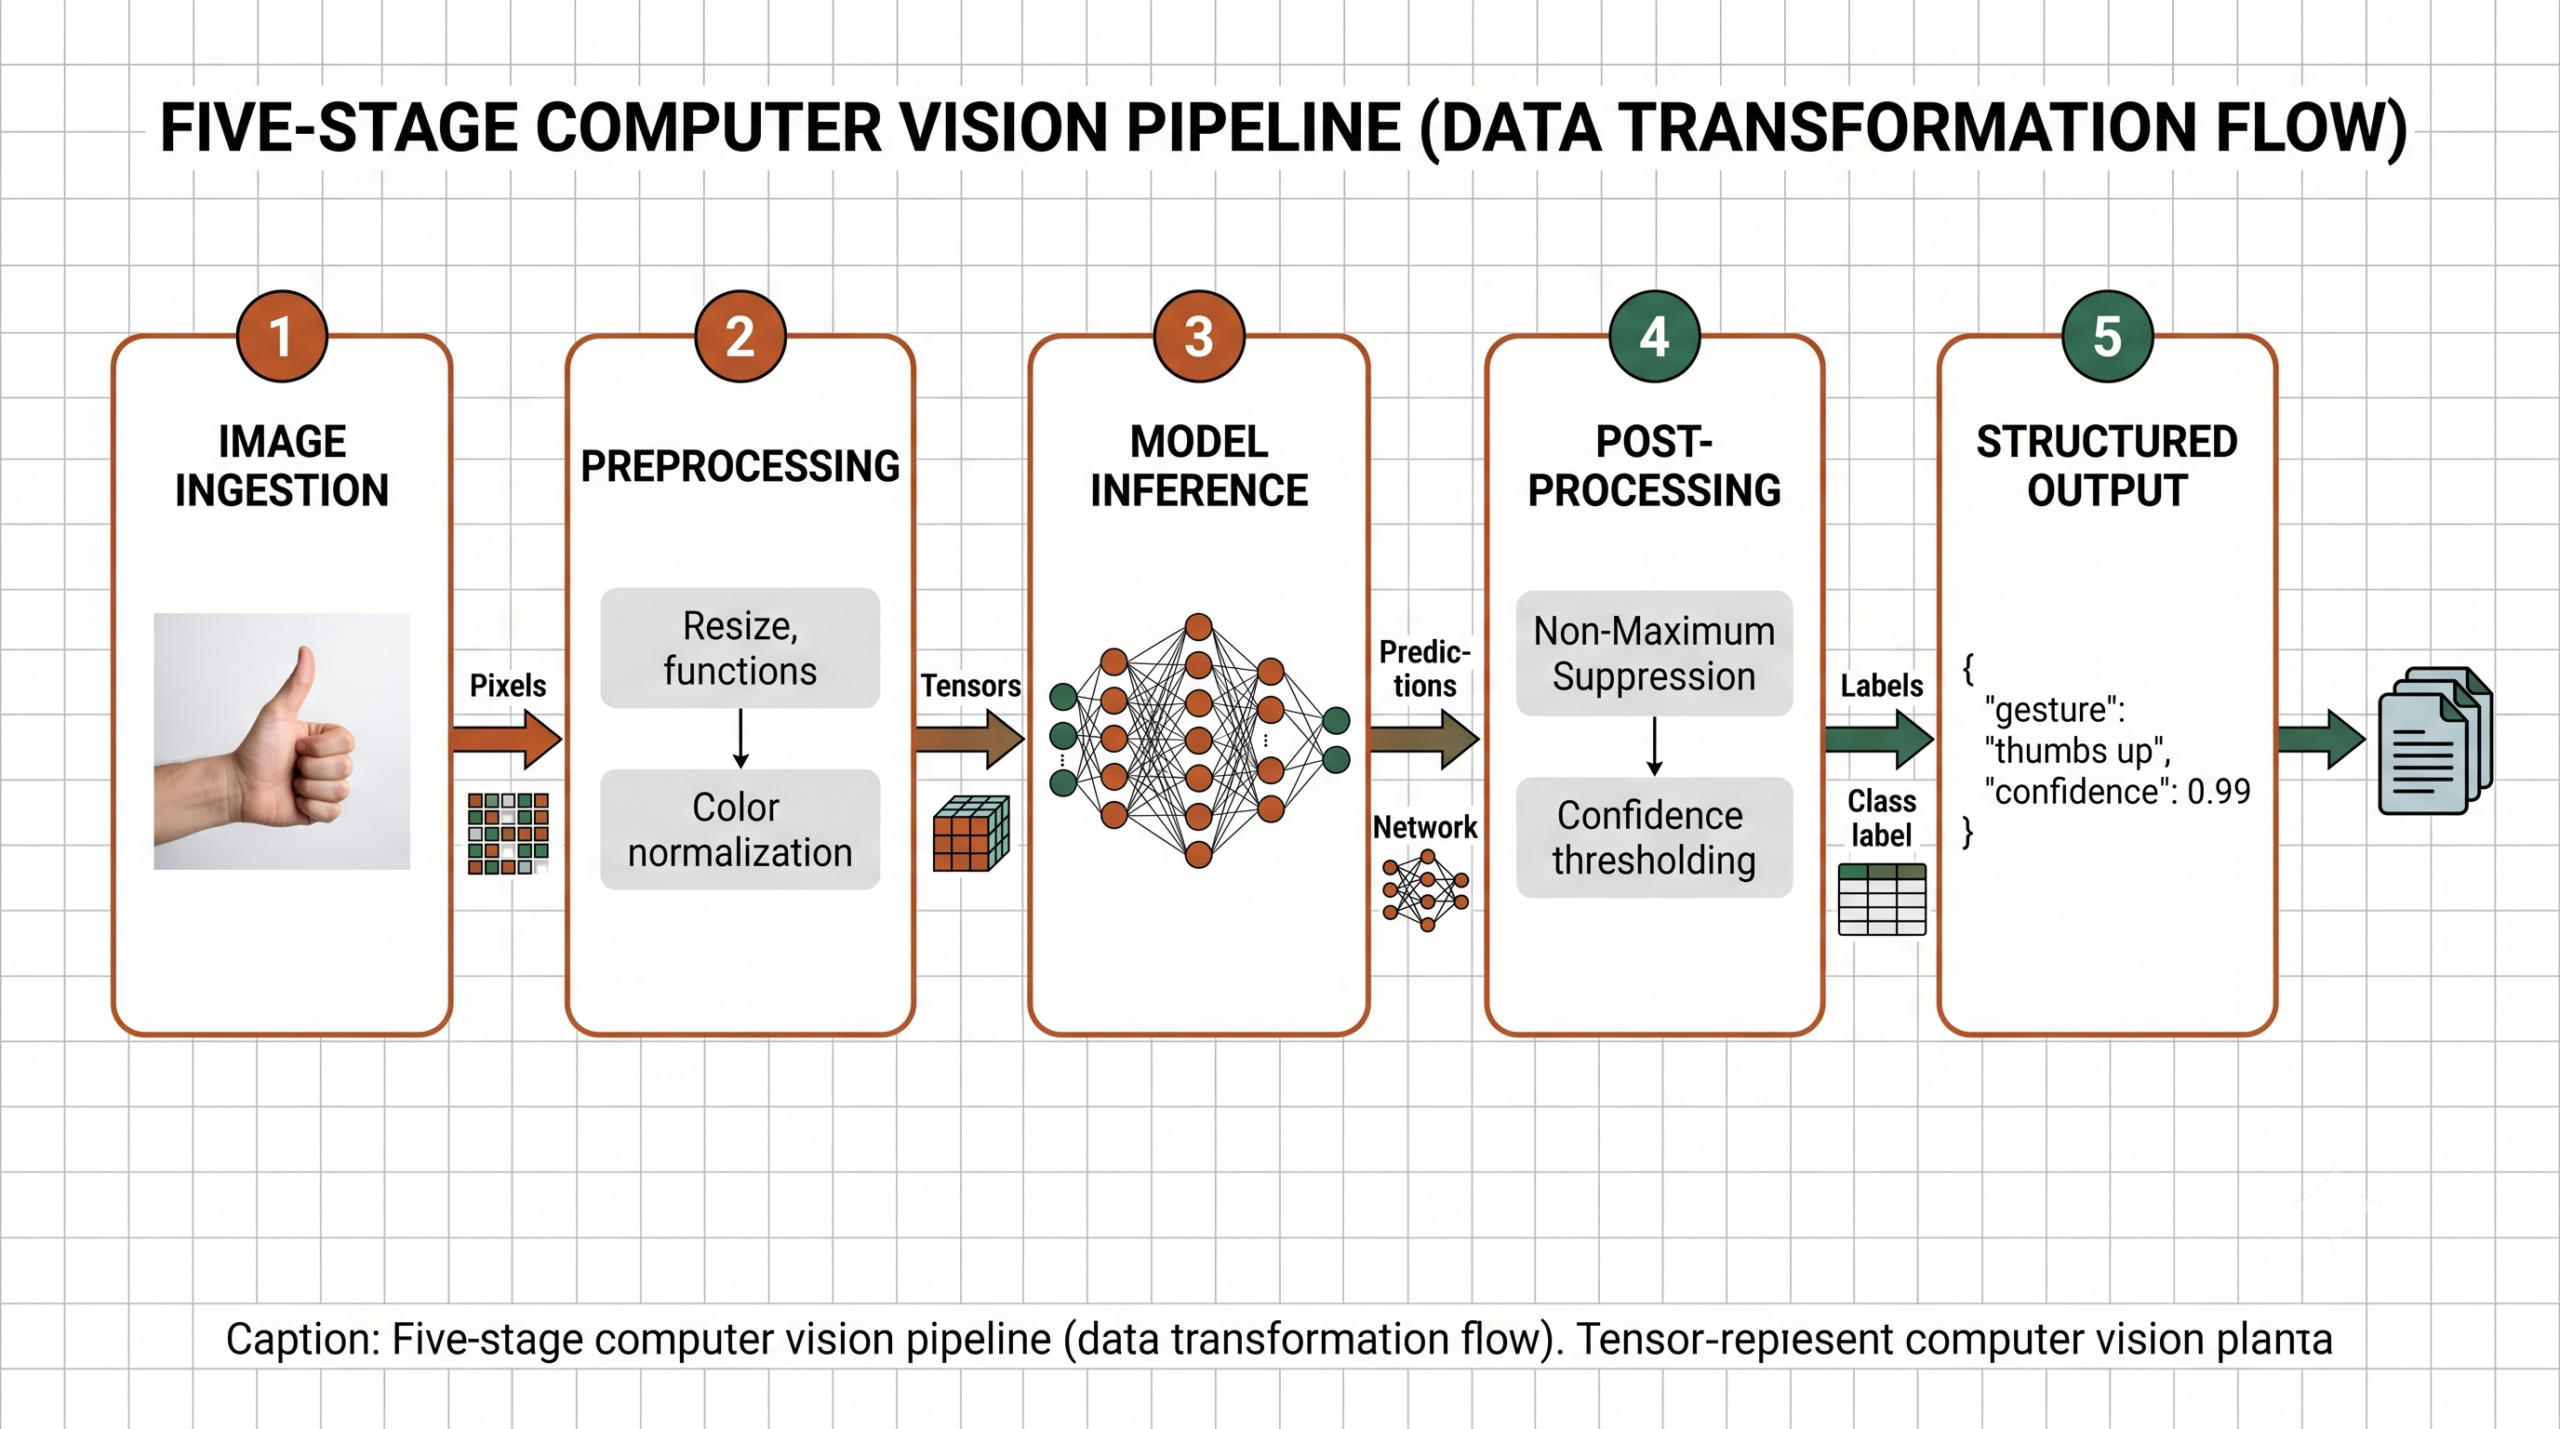
Most pipelines share a common skeleton, regardless of use case:
1
Ingestion
Load images from disk, URLs, S3 buckets, webcams, or RTSP streams. Normalize color spaces. Handle corrupt or missing files without crashing.
2
Preprocessing
Resize to model input dimensions, normalize pixel values, apply augmentations if training. Convert between BGR, RGB, and grayscale as required.
3
Inference
Run one or more models — detector, classifier, segmenter, OCR engine. Return raw predictions: logits, bounding boxes, mask tensors, text strings.
4
Post-processing
Apply NMS to filter duplicate boxes, threshold by confidence, map class indices to labels, aggregate across frames for video.
5
Output
Write to JSON, CSV, database, annotated image file, streaming API response, or a message queue for downstream consumers.
Claude Code’s role is not magic. It writes the tedious connective tissue between these stages — the error handling, the type coercion, the logging scaffolding — so you can focus on the parts that actually require your domain knowledge.
The Computer Vision Toolkit in 2026
Before diving into Claude Code workflows, it helps to know which libraries will appear in the generated code. Claude Code picks sensibly from this stack:
Image I/O
Pillow + OpenCV
Pillow for friendly image loading and format conversion. OpenCV (cv2) for speed-critical preprocessing and video capture.
Detection
Ultralytics YOLO
YOLOv11 is the 2026 default for real-time object detection. One-line inference, built-in NMS, ONNX export for edge deployment.
Vision Models
HuggingFace Transformers
DETR, ViT, CLIP, and Segment Anything via a unified pipeline API. Best for classification, segmentation, and zero-shot tasks.
OCR
EasyOCR + Tesseract
EasyOCR for 80+ languages with GPU acceleration. Tesseract via pytesseract for structured document layouts and form parsing.
Deep Learning
PyTorch + torchvision
Backbone for custom models and fine-tuning. torchvision’s transforms feed cleanly into any training loop.
Numerics
NumPy
The universal array type that every library in this stack speaks. Mastering its slicing and broadcasting syntax saves hours per project.
Fig. 1 — A five-stage computer vision pipeline. Each stage transforms the data type: pixels → tensors → predictions → labels → structured records.
Why Claude Code Accelerates CV Work
Claude Code is Anthropic’s CLI coding assistant. You run it in your terminal alongside your code editor. Ask it to write, explain, debug, or refactor — it reads your files, understands context, and generates code you can paste or apply directly. For computer vision work specifically, it removes three specific bottlenecks:
Boilerplate elimination
Every CV project starts the same: load images, handle edge cases, set up logging. Claude Code generates this scaffolding in seconds so you start on the actual problem immediately.
Debugging shape errors
Tensor shape mismatches are the leading cause of CV debugging sessions. Claude Code reads your stack trace, identifies the dimension mismatch, and proposes a fix with an explanation of why the shapes collided.
Library API recall
OpenCV’s API is sprawling and inconsistently documented. Claude Code knows cv2.VideoCapture, cv2.dnn.blobFromImage, and the exact flag names so you don’t have to keep a tab open.
Key Insight
Claude Code’s biggest productivity gain in CV work isn’t generating the inference code — that’s usually just a few lines. It’s generating the surrounding infrastructure: retry logic for failed downloads, batch progress bars, GPU memory cleanup between runs, and structured error logging. That infrastructure typically takes longer to write than the model call itself.
Setting Up Your Environment
Start with a clean virtual environment. Ask Claude Code to generate the full setup in one shot:
CLAUDE CODE — TERMINAL
$claude “Generate a requirements.txt and a setup script for a computer vision pipeline
that uses OpenCV, Pillow, ultralytics YOLOv11, EasyOCR, HuggingFace transformers,
and PyTorch with CUDA 12. Include a health-check function that verifies GPU
availability and prints library versions.”
bashrequirements.txt + setup
# requirements.txt — generated by Claude Code
opencv-python-headless==4.10.0.84
Pillow==10.4.0
ultralytics==8.3.0
easyocr==1.7.2
torch==2.4.0
torchvision==0.19.0
transformers==4.44.0
numpy==1.26.4
requests==2.32.3
tqdm==4.66.5
The preprocessor is the first thing that breaks in production. URLs time out. Files get corrupted. Images arrive in CMYK instead of RGB. Ask Claude Code to generate a robust ingestion class:
CLAUDE CODE — TERMINAL
$claude “Write an ImagePreprocessor class that loads images from file paths, URLs,
S3 URIs, and raw bytes. Resize to a configurable target size, convert to RGB,
normalize with ImageNet mean/std, and return a numpy array. Add retry logic
for HTTP sources and graceful error handling that logs failures without crashing.”
Notice what Claude Code does automatically: it adds exponential backoff for HTTP retries, handles S3 URIs via boto3 (imported lazily so it’s optional), converts BGR to RGB for OpenCV files, and returns None with a logged error instead of raising for downstream fault tolerance. That’s about 40 minutes of defensive coding you didn’t have to think through.
Stage 2 — Object Detection with YOLOv11
Object detection is where most CV pipelines spend their compute budget. YOLOv11 from Ultralytics is the practical default in 2026 — it’s fast, well-maintained, and exports cleanly to ONNX for edge deployment. Ask Claude Code to wrap it:
CLAUDE CODE — TERMINAL
$claude “Wrap YOLOv11 in an ObjectDetector class. Accept a model path or size string
(n/s/m/l/x), a confidence threshold, and an IOU threshold. The detect() method
should accept a file path, URL, numpy array, or PIL Image. Return a list of
Detection dataclasses with class_name, confidence, and bbox as xyxy ints.”
pythondetector.py
from dataclasses import dataclass
from ultralytics import YOLO
import numpy as np
from PIL import Image
@dataclassclassDetection:
class_name: str
confidence: float
bbox: tuple[int, int, int, int] # x1, y1, x2, y2classObjectDetector:
_SIZE_MAP = {“n”: “yolo11n.pt”, “s”: “yolo11s.pt”,
“m”: “yolo11m.pt”, “l”: “yolo11l.pt”, “x”: “yolo11x.pt”}
def__init__(self, model: str = “n”,
conf: float = 0.4, iou: float = 0.45):
model_path = self._SIZE_MAP.get(model, model)
self.model = YOLO(model_path)
self.conf = conf
self.iou = iou
defdetect(self, source) -> list[Detection]:
results = self.model(
source, conf=self.conf, iou=self.iou,
verbose=False
)
detections = []
for r in results:
names = r.names
for box in r.boxes:
x1, y1, x2, y2 = [int(v) for v in box.xyxy[0].tolist()]
detections.append(Detection(
class_name=names[int(box.cls)],
confidence=round(float(box.conf), 4),
bbox=(x1, y1, x2, y2)
))
return detections
“The bottleneck in most CV pipelines isn’t the model — it’s everything around it. Claude Code writes the scaffolding so engineers can spend time on the parts that actually require thinking.”
— Observed pattern across production CV deployments, 2025–2026
Stage 3 — OCR for Document and Label Images
Product labels, scanned invoices, street signs, whiteboards: OCR is one of the most common CV tasks outside pure object detection. EasyOCR handles 80+ languages and runs on GPU. Here’s the prompt and the resulting class:
CLAUDE CODE — TERMINAL
$claude “Write an OCRExtractor class using EasyOCR. Support multiple languages.
The extract() method takes a file path or numpy array and returns a list of
TextRegion dataclasses with text, confidence, and bbox. Add a read_paragraph()
helper that sorts regions top-to-bottom, left-to-right and joins them into a
single string. Lazy-initialize the Reader to avoid slow startup on import.”
pythonocr.py
from dataclasses import dataclass
from typing import Optional
import numpy as np
@dataclassclassTextRegion:
text: str
confidence: float
bbox: list# [[x1,y1],[x2,y1],[x2,y2],[x1,y2]]classOCRExtractor:
def__init__(self, languages: list[str] = None,
gpu: bool = True, min_confidence: float = 0.4):
self.languages = languages or [“en”]
self.gpu = gpu
self.min_confidence = min_confidence
self._reader = None# lazy init@propertydefreader(self):
if self._reader isNone:
import easyocr
self._reader = easyocr.Reader(self.languages, gpu=self.gpu)
return self._reader
defextract(self, source) -> list[TextRegion]:
raw = self.reader.readtext(source)
regions = []
for bbox, text, conf in raw:
if conf >= self.min_confidence and text.strip():
regions.append(TextRegion(
text=text.strip(),
confidence=round(conf, 4),
bbox=bbox
))
return regions
defread_paragraph(self, source) -> str:
regions = self.extract(source)
# Sort top-to-bottom, left-to-right by top-left corner
regions.sort(key=lambda r: (r.bbox[0][1], r.bbox[0][0]))
return” “.join(r.text for r in regions)
Stage 4 — The End-to-End Pipeline
Now connect all three components into a single pipeline class with batch processing. This is where Claude Code truly saves time — the parallel execution setup, thread-safe result collection, and progress reporting take real thought to get right:
CLAUDE CODE — TERMINAL
$claude “Compose ImagePreprocessor, ObjectDetector, and OCRExtractor into a CVPipeline
class. The run() method processes a single source and returns a PipelineResult
dataclass with detections, text regions, processing time, and error. The
run_batch() method uses ThreadPoolExecutor with configurable max_workers and
a tqdm progress bar. Add a save_results() method that writes JSON output.”
pythonpipeline.py
import time, json, logging
from dataclasses import dataclass, field, asdict
from concurrent.futures import ThreadPoolExecutor, as_completed
from pathlib import Path
from typing import Optional
from tqdm import tqdm
from preprocessor import ImagePreprocessor
from detector import ObjectDetector, Detection
from ocr import OCRExtractor, TextRegion
logger = logging.getLogger(__name__)
@dataclassclassPipelineResult:
source: str
detections: list[Detection] = field(default_factory=list)
text_regions: list[TextRegion] = field(default_factory=list)
processing_ms: float = 0.0
error: Optional[str] = NoneclassCVPipeline:
def__init__(self,
detector_size: str = “n”,
run_ocr: bool = True,
ocr_languages: list = None):
self.preprocessor = ImagePreprocessor()
self.detector = ObjectDetector(model=detector_size)
self.ocr = OCRExtractor(languages=ocr_languages) if run_ocr elseNonedefrun(self, source: str) -> PipelineResult:
t0 = time.perf_counter()
result = PipelineResult(source=source)
try:
result.detections = self.detector.detect(source)
if self.ocr:
result.text_regions = self.ocr.extract(source)
except Exception as e:
result.error = str(e)
logger.error(f”Pipeline error [{source}]: {e}”)
result.processing_ms = (time.perf_counter() – t0) * 1000return result
defrun_batch(self, sources: list[str],
max_workers: int = 4) -> list[PipelineResult]:
results = []
withThreadPoolExecutor(max_workers=max_workers) as exe:
futures = {exe.submit(self.run, s): s for s in sources}
for future intqdm(as_completed(futures),
total=len(sources), desc=“Processing”):
results.append(future.result())
return results
defsave_results(self, results: list[PipelineResult],
output_path: str) -> None:
data = [asdict(r) for r in results]
Path(output_path).write_text(json.dumps(data, indent=2))
logger.info(f”Saved {len(results)} results → {output_path}”)
Stage 5 — Video Frame Processing
Video adds two complications: you rarely need every frame, and you need to annotate the output without losing the audio stream. Claude Code handles both:
CLAUDE CODE — TERMINAL
$claude “Write a process_video() function that takes a video path and my CVPipeline,
skips every N frames for speed, draws detection boxes on sampled frames, and
writes an annotated output video. Return a summary dict with total frames,
sampled frames, unique classes found, and average processing time per frame.”
A pipeline that works on your machine and a pipeline that runs reliably in production are different things. Claude Code can help you address four categories of production concerns. Ask it directly with prompts like “add GPU memory cleanup between batches” or “add structured JSON logging with request IDs.”
GPU
Memory Management
Call torch.cuda.empty_cache() between large batches. For very large jobs, process in chunks of 500–1,000 images and explicitly delete tensor references. Claude Code will add this automatically when you describe the OOM error you’re seeing.
ONNX
Model Export for Edge
YOLO exports to ONNX with one line: model.export(format="onnx"). Ask Claude Code to wrap ONNX Runtime inference as a drop-in replacement for the Ultralytics model — same detect() interface, no torch dependency at inference time.
LOG
Structured Logging
Replace print() with structured JSON logs keyed by source, pipeline_version, and request_id. Ask Claude Code to instrument every pipeline stage with latency spans so you can identify which component is the bottleneck.
TEST
Test Fixtures
Ask Claude Code to generate a pytest fixture that creates a 640×640 synthetic image with known objects and verifies the detector returns the expected class names. This catches model-loading regressions without hitting real data.
Production Gotcha
EasyOCR’s Reader initialization takes 3–8 seconds the first time it runs because it loads model weights. In any long-running service, initialize it at startup — not on first request. The lazy-init pattern in the OCRExtractor above handles this, but only if you call extractor.reader (or run a warmup request) during application startup. Claude Code won’t know your deployment architecture, so this decision is yours to make explicit.
Claude Code vs Manual CV Development
Here’s an honest comparison across the tasks covered in this guide:
Task
Manual (Experienced Dev)
With Claude Code
Time Saved
Multi-source image loader with retry logic
45–90 min
8–12 min
~80%
YOLO wrapper with typed dataclass output
20–30 min
5 min
~75%
EasyOCR extractor with paragraph sorting
30–45 min
7 min
~80%
Batch processor with progress + error handling
60–120 min
10–15 min
~85%
Annotated video writer
40–60 min
8 min
~80%
Debugging a tensor shape mismatch
20–60 min
2–5 min
~90%
ONNX export + runtime wrapper
60–90 min
15 min
~80%
Custom loss function for fine-tuning
60–120 min
40–70 min — needs your domain knowledge
~40%
Data collection strategy and labeling criteria
Domain expertise required
Claude Code cannot replace this
0%
Where Claude Code Struggles
Claude Code is not a replacement for CV expertise. It generates plausible code quickly, but it can mislead you in three specific ways.
First, it doesn’t know your data. If your images are all 4:3 thermal scans in 16-bit grayscale, the generated code will assume 8-bit RGB and silently produce garbage. Always tell Claude Code about your data format explicitly in your prompt.
Second, it can’t evaluate model outputs. When a detector returns low-confidence results, Claude Code cannot tell you whether you need a lower threshold, more training data, or a different model architecture. That requires you to look at the actual predictions.
Third, hardware-specific tuning — optimal batch size for your GPU VRAM, pinned memory allocation for multi-GPU setups, TensorRT quantization settings — varies by machine in ways Claude Code can’t observe. It will give you reasonable defaults, but production-grade throughput optimization still needs benchmarking on your actual hardware.
Used with those limitations in mind, Claude Code is genuinely useful: it eliminates the parts of CV engineering that are repetitive and time-consuming, leaving more capacity for the parts that require your judgment.
Ready to Build Your Vision Pipeline?
Explore more Claude Code tutorials and multi-agent patterns on AITrendBlend. The full code for this pipeline is referenced in our agent building guides.