That specific wall is exactly what Kling AI exists to knock down. Not completely, not magically — but enough that a solo developer or a two-person studio can produce a 60–90 second game trailer that looks cinematic, feels intentional, and does its job on a Steam page without paying a video production team. The catch, and there is always a catch, is that getting usable clips from Kling AI requires structuring your video prompts in a way that accounts for how the model actually interprets motion instructions — which is significantly different from how you would describe a video to a human editor.
This guide is built around ten working video prompts for game trailers, organized by clip type and escalating in complexity from beginner shots you can generate in minutes to an advanced multi-clip sequencing workflow that produces a complete cut-ready trailer package. Each prompt comes with the specific Kling AI settings that produced reliable results, an honest explanation of why the structure works, and a note on where the model will still push back on you — because it will.
By the end, you will have enough material to assemble a complete game trailer without touching a camera, without hiring a studio, and — if you are efficient — in a single long working session. That is the realistic promise. What comes out of Kling AI is not polished without editing, but it is genuinely usable raw material in a way that most AI video tools released before 2025 were not.
Why Kling AI Handles Game Trailers Differently
The problem most people run into with other AI video tools is temporal consistency — characters whose faces shift between frames, environments that rearrange themselves mid-clip, and camera moves that wobble or stutter instead of holding the smooth arc that reads as intentional cinematography. Kling AI v1.6 is not perfect on any of these fronts, but it is measurably better than what was available 12 months ago, and better than competing tools at the specific things game trailers need most: maintaining character identity across a 5–10 second clip and executing recognizable camera movements like pans, zooms, and dollies without destroying the composition mid-shot.
The feature set that separates Kling from general AI video tools for game trailer work is the combination of image-to-video generation, camera control presets, and motion strength tuning. Image-to-video lets you start from a static piece of concept art — already generated using the workflows from earlier in this series — and animate it with a motion prompt. This matters because your character already has a defined visual identity from the art pipeline. Kling does not need to generate the character from scratch; it animates the one you already established. Camera control presets — horizontal pan, vertical tilt, zoom in, dolly forward, crane up — give you named, predictable camera movements rather than requiring you to describe camera physics in natural language, which is where most AI video prompts break down.
That said, Kling AI is not a game capture tool. It cannot record gameplay. Every clip it produces is a cinematic interpretation of a static reference image or a text description — the kind of shot you would see in a story trailer or a world-building cinematic, not a gameplay preview. For trailers that need to show actual game mechanics and player interaction, Kling is the wrong tool. For trailers that need to communicate a game’s world, characters, and emotional atmosphere — the kind of trailer that works for narrative games, RPGs, and atmospheric indie titles — it is one of the most practical options available to developers without video production infrastructure.
Kling AI produces cinematic story trailers, not gameplay capture trailers. If your game’s selling point is its mechanics — a fast-paced shooter, a puzzle game, a real-time strategy — you need actual gameplay footage edited by a human. If your game’s selling point is its world, characters, and emotional tone — an RPG, a narrative adventure, an atmospheric horror game — Kling AI can produce a trailer that communicates all three without gameplay footage at all.
Before You Start: Setting Up Kling AI for Game Trailer Production
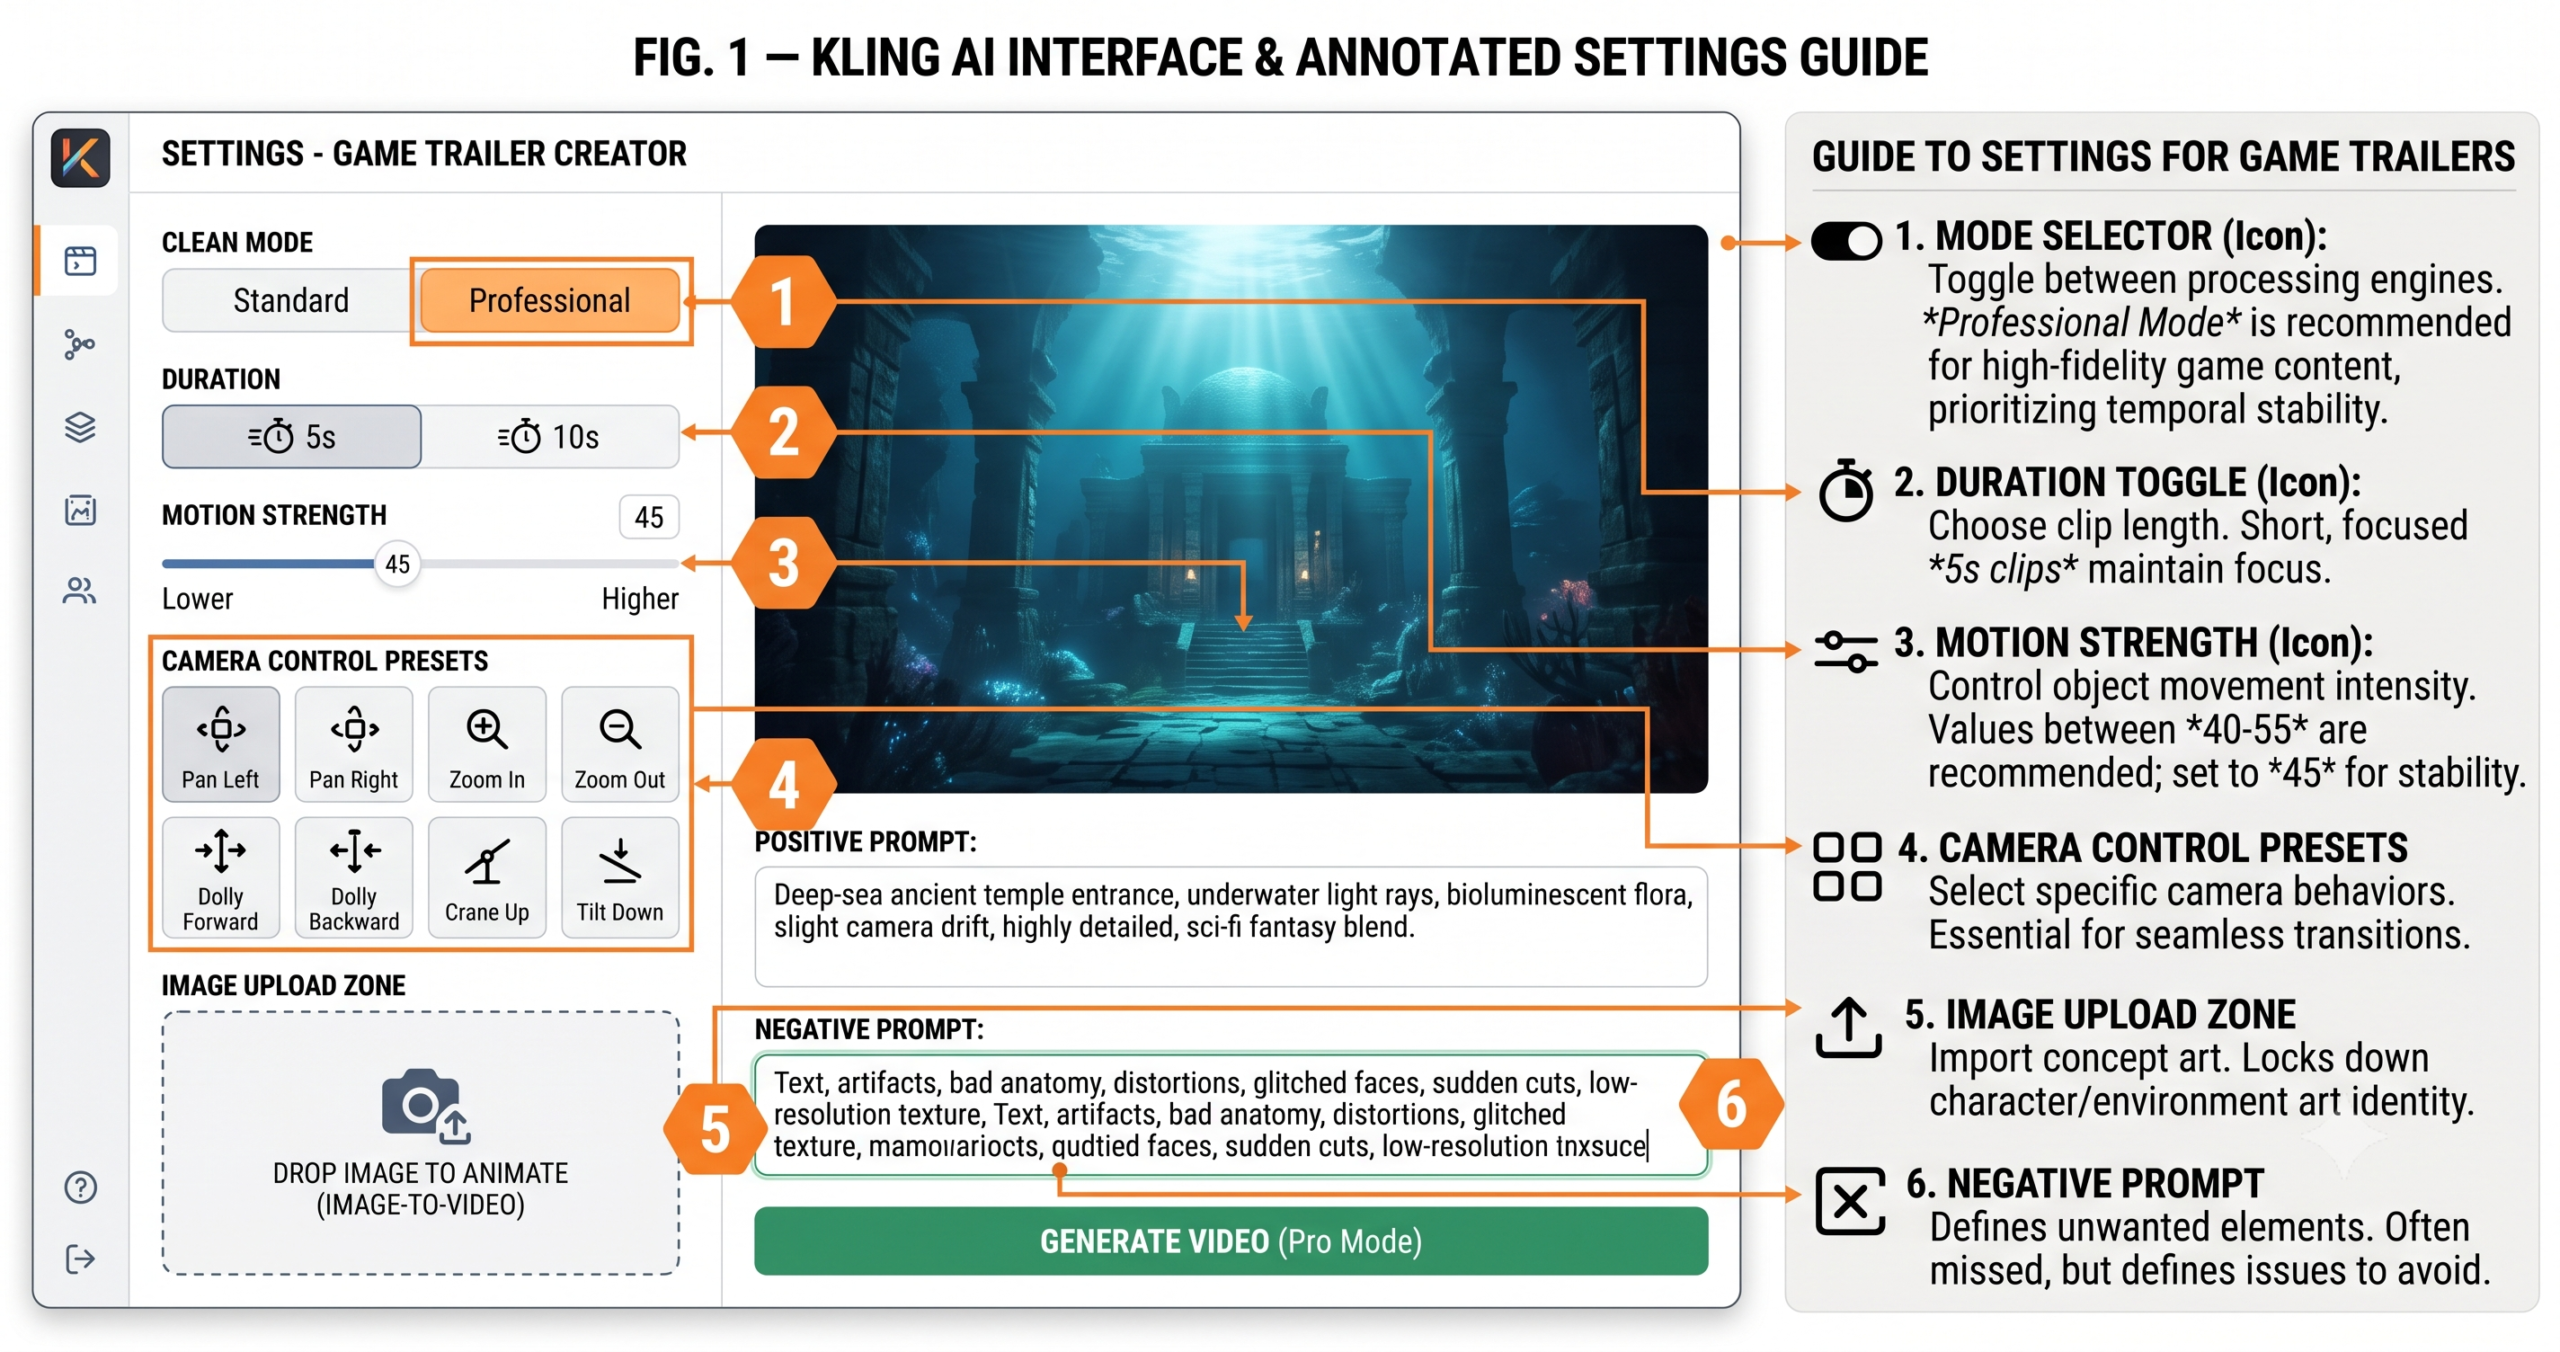
Three decisions before you generate a single frame. First: mode selection. Kling AI offers Standard and Professional modes. Standard is faster and cheaper — adequate for rough cuts and single clip tests. Professional mode produces significantly better temporal consistency, sharper motion, and more reliable camera behavior. For any clip you intend to use in a final trailer, use Professional mode. The cost difference is real but so is the quality difference, and a trailer made from Standard-mode clips will look noticeably rough in motion even when individual frames look acceptable.
Second: duration. Kling offers 5-second and 10-second clip lengths. The instinct is to choose 10 seconds for more content per generation — resist it for most shots. A 5-second clip with focused, controlled motion is almost always more usable in a trailer than a 10-second clip where the model runs out of motion direction and starts to drift or repeat. Use 10-second clips only for slow establishing shots where sustained held camera on a stable scene is exactly what you need. Action shots, character reveals, and anything with significant movement should be generated at 5 seconds.
Third: your source images. Every image-to-video prompt in this guide assumes you have already produced concept art for your game using the workflows from the AI Concept Art guide in this series. If you have not, the minimum viable source image for a Kling AI game trailer clip is: a high-resolution static image (1920×1080 or larger), a clear subject with a defined depth separation from the background, and consistent lighting direction. Images with complex, busy backgrounds produce clips where Kling struggles to decide what should move and what should stay still — which usually results in everything moving slightly, which looks wrong. Clean subject-background separation is the single most important quality of a source image for Kling generation.
Before generating any trailer clip: switch to Professional mode, set duration to 5 seconds unless you specifically need a slow held shot, and set Motion Strength to 45 as your starting point. These three defaults will eliminate the majority of first-generation failures — unstable shots, excessive drift, and motion artifacts — that make new Kling AI users think the tool does not work for game trailers.
The 10 Best Kling AI Prompts for Game Trailers
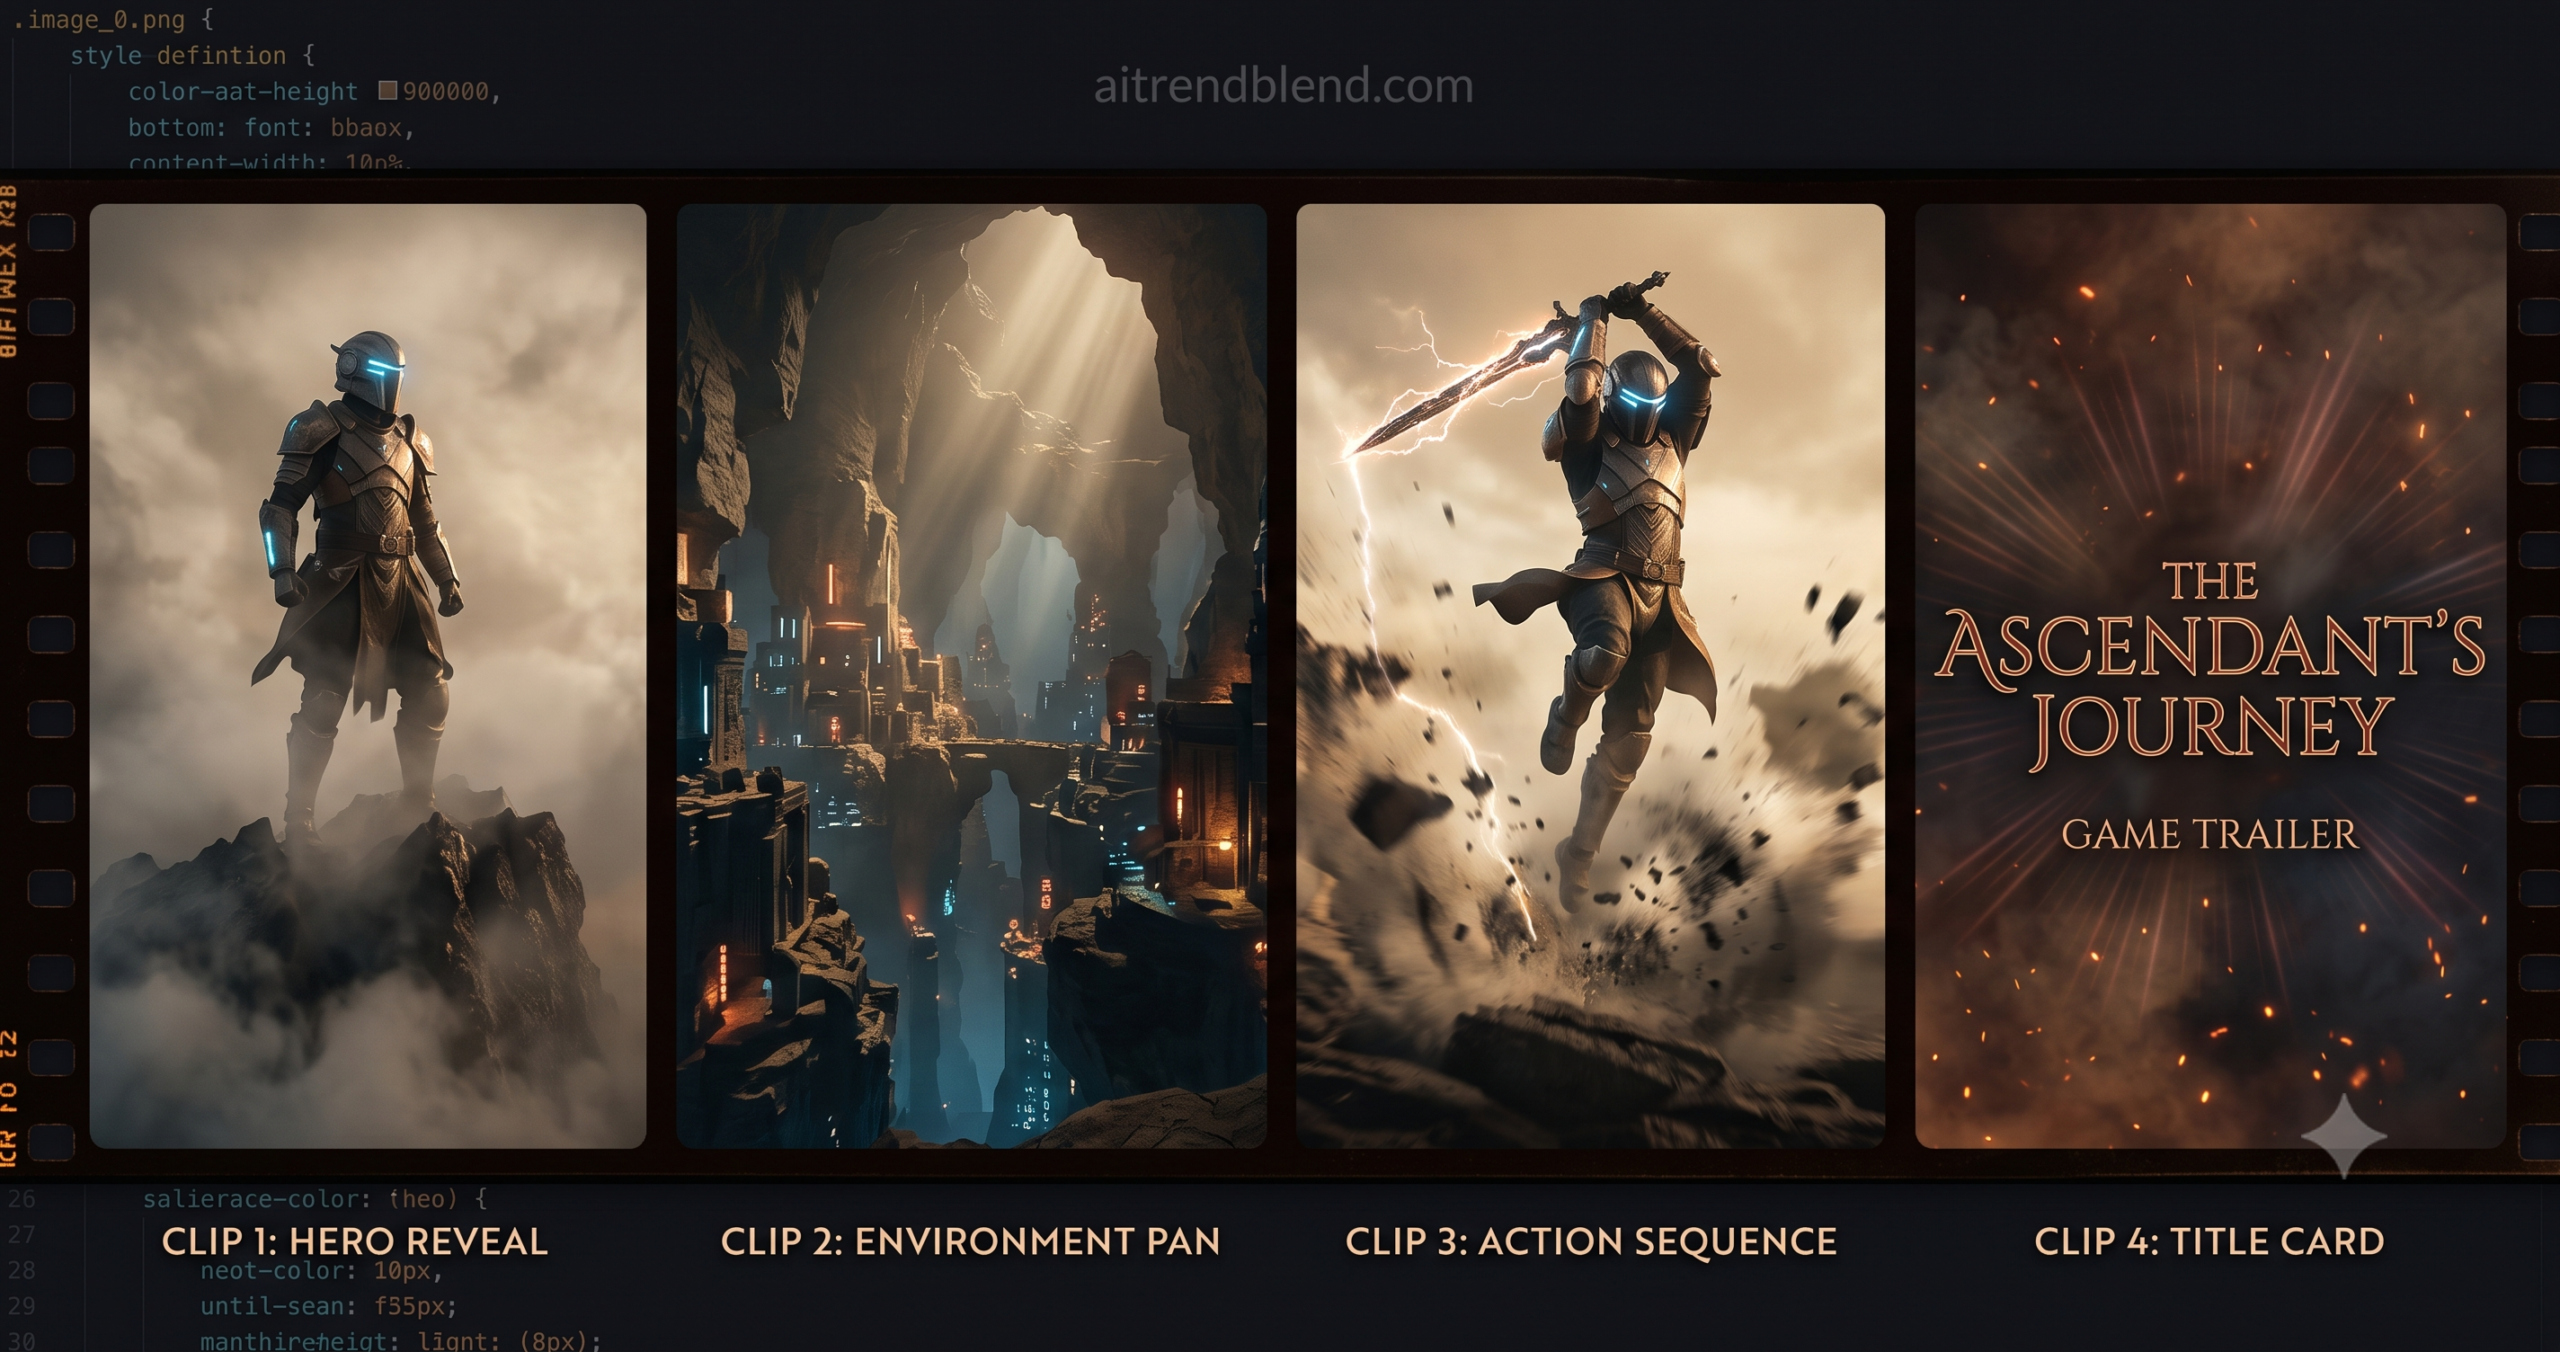
1 Prompt 1: The Hero Reveal Shot
Every game trailer needs a hero reveal — the shot where the player first understands who they are playing as. The mistake most developers make with this shot is asking for too much motion. A hero reveal is not an action shot; it is a presence shot. The character should feel powerful, composed, and alive — breathing, subtle cape or hair movement, environmental atmosphere drifting around them — without lunging or gesturing. Motion Strength 35 is lower than Kling’s default and is specific to this shot type: you want the character to feel present, not kinetic.
Use your best full-body character concept art as the source image. Front-facing or slight three-quarter turn works better than a direct profile — Kling maintains face identity better on near-frontal poses than strict side profiles, where the character’s facial features are less visible across frames.
Why It Works: “No other body movement” and the negative prompt together constrain Kling’s tendency to interpret any character-in-frame image as an invitation for dramatic action. The atmospheric particle elements — embers, leaves, dust — give the model legitimate motion targets that feel alive without requiring the character to move significantly. “Closing distance by 10%” is intentionally small — a subtle push-in reads as cinematic where an aggressive zoom reads as amateurish.
How to Adapt It: For a villain reveal rather than a hero, swap “heroic composure” for “composed menace, slight forward lean” and change the atmospheric elements to “dark smoke tendrils, red embers.” The structural prompt stays identical — the emotional signal changes entirely through those two substitutions.
2 Prompt 2: The World Establishing Pan
The world establishing shot is the clip that tells viewers where the game takes place before they meet any character. It needs to communicate scale, atmosphere, and visual tone in a single sustained camera move. This is the one shot type where 10 seconds is the right choice — a pan that rushes across a world feels cheap; one that breathes and lingers communicates confidence in the visual design.
You can use this prompt two ways: image-to-video with your environment key art from the concept art pipeline, or text-to-video if your environment art is not yet at the right resolution or composition for Kling. Text-to-video gives Kling more generative freedom but less control over your established visual style. Image-to-video locks the style but requires a well-composed source image. Both approaches are noted in the prompt below.
Why It Works: “World feels lived-in and vast” is a direction note that does real work — it prevents Kling from generating a sterile, empty-feeling environment by priming the model toward detail that implies history and scale. “Depth layers clearly separated” pulls from game art principles — foreground, midground, and background need to move at slightly different rates during a pan for the parallax to read as three-dimensional, and this instruction encourages that separation.
How to Adapt It: For a top-down or isometric game, replace the pan instruction with “slow crane shot pulling upward, revealing the map from above” and adjust the environmental description to read as overhead. Crane-up shots work particularly well for strategy games and top-down RPGs where the overhead perspective is the game’s native view.
3 Prompt 3: The Title Card Animation
The title card is the last clip in the trailer and the one viewers remember longest — it is the image they see right before clicking the Steam page link or sharing the trailer. A static logo image displayed for five seconds is fine. An animated title card that builds atmosphere around the game’s title is better. Kling AI can take a static game logo design — generated using the Ideogram workflow from the art generators guide — and add ambient animation that makes it feel like a living, breathing thing rather than a still image held on screen.
The key distinction here from other prompt types: you are not animating a character or a camera. You are adding environmental atmosphere around a static text or logo element. This requires explicitly instructing Kling to keep the text and logo elements static while moving only the surrounding environment — otherwise the model will attempt to animate the letterforms themselves, which distorts the logo.
Why It Works: “Logo remains completely static and sharp” followed by the negative prompt entry “text distortion, logo warping, letter morphing” creates redundant protection for the logo element from two directions. Kling’s diffusion process naturally wants to add motion to all elements in the frame — doubling down on the static instruction in both the positive and negative prompt gives the model a clearer signal to resist that impulse on the text specifically.
How to Adapt It: For a game with a tagline, generate the logo animation first, then use a separate 3-second clip where only the tagline text fades in against the animated background. Assemble them in your video editor as two separate clips rather than trying to animate both elements in one generation — split generation produces cleaner results for multi-element title cards.
4 Prompt 4: The Character Action Clip
Here is where it gets interesting. Action clips are the hardest shots to get right in Kling AI — and the most important for game trailers that need to communicate the game has energy and momentum. Motion Strength 60 is higher than most other prompt types in this guide, and intentionally so. At lower strength, action prompts produce characters who look like they are thinking about moving rather than actually moving. At 60, the clip has genuine kinetic energy — at the cost of slightly higher character consistency risk, which the prompt structure below compensates for.
The structural choice that makes action clips work is specifying the start and end state of the action rather than describing it as continuous motion. “Character raises sword overhead and swings forward” tells Kling where to begin and end, which constrains the motion arc into something legible. “Character attacks with sword” describes a concept and lets Kling interpret the physical motion freely — which usually produces a flickering, chaotic clip that does not cut well with surrounding material.
Why It Works: “Cinematic slow motion at peak of action” is a film language instruction that Kling interprets well — it concentrates the frame’s visual weight at the moment of maximum impact rather than rushing through the action evenly. “Motion blur on weapon only” is a compositing-aware instruction that produces a more visually sophisticated result than full-frame motion blur, which tends to obscure the character details that make the action readable.
How to Adapt It: For a magic-user rather than a physical attacker, replace the impact visual with “energy sphere forms between hands, expands and fires forward” and reduce Motion Strength to 50 — magic attacks read better at slightly lower motion strength because the energy effects do the visual work that weapon physics does for melee attacks.
5 Prompt 5: The Enemy Entrance Reveal
The enemy reveal is one of the highest-stakes shots in a game trailer. It has two jobs: establish threat level and create dread. Both of those things happen through scale communication and deliberate pacing — a shot that reveals the enemy too fast or at eye level loses both. The crane-down camera move — starting above the enemy and descending to face level — is the compositional choice that communicates size more effectively than any static shot, because the viewer’s relationship to the subject changes across the duration of the clip.
This prompt type works best with boss or elite enemy concept art rather than standard enemies. The scale difference between a minion-tier enemy and the camera needs to be much larger to achieve the same dread effect — and Kling AI handles large-scale subjects better than small ones when combined with a descending camera move.
Why It Works: “Enemy remains still and composed during camera reveal — not attacking” is counter-intuitive but structurally important. An enemy that stands perfectly still while a camera descends to meet its gaze is more threatening in a trailer than one that immediately attacks — stillness communicates that it does not need to hurry, which implies overwhelming confidence. The attack comes later in a different clip. This clip exists only to establish what the player is up against.
How to Adapt It: For a horror game antagonist rather than a fantasy boss, change the atmospheric elements to “shadow tendrils spreading across the floor, unnatural stillness, flickering nearby light source” and reduce Motion Strength to 35. Horror threat communicates through absence of motion more than presence — a slightly too-still enemy reads as deeply unsettling in a way that an energetic one does not.
6 Prompt 6: The Cinematic Environment Fly-Through
The fly-through shot — a camera moving forward through an environment, revealing depth and scale as it passes through space — is the clip that makes a game world feel genuinely navigable rather than set-dressed. It communicates that the world extends beyond the frame, which is one of the core promises a game trailer makes to a potential player. Text-to-video works better than image-to-video for this shot type because Kling can generate the spatial depth it needs to move through, rather than being constrained by the flat depth of a 2D concept art image.
The challenge with fly-throughs is maintaining visual consistency with your established art style when using text-to-video. Your master style string from the concept art workflow is the solution — append it to every text-to-video prompt to keep the generated environment within the visual language of the rest of your trailer.
Why It Works: “Foreground elements pass by on both sides as camera advances” is the parallax instruction that gives the fly-through its sense of genuine depth. Without it, Kling tends to produce a zoom-in effect on a flat image rather than a true forward camera move through a three-dimensional space. The “no acceleration or deceleration” instruction prevents the clip from feeling rushed at the start or dragging at the end — a consistent dolly speed cuts with surrounding clips more cleanly.
How to Adapt It: For an aerial fly-through — appropriate for open-world or strategy games — change the camera height to “high altitude, angled down 30 degrees” and swap the dolly for a combined forward-and-downward move. This produces the sweeping aerial reveal shot that communicates open-world scale more effectively than any ground-level camera move.
7 Prompt 7: The Battle Atmosphere Clip
This is not a small distinction: the battle atmosphere clip is different from the character action clip. Where the action clip focuses on a single character performing a defined move, the atmosphere clip communicates the feeling of combat through environmental chaos — explosions in the background, dust and debris in motion, the energy of multiple forces colliding — without necessarily showing the characters clearly. It is the clip that appears 45–60 seconds into a trailer, when the pace escalates and the viewer needs to feel the stakes before the climax.
Motion Strength 65 is the highest setting used in this guide and is appropriate specifically for this shot type, where controlled chaos is the goal rather than something to be avoided. The camera shake instruction is equally specific: not random shake, which reads as bad camera operation, but a single brief impact shake at a specific moment in the clip — like a shockwave passing through the frame.
Why It Works: “Steady for first 2 seconds, then single sharp impact shake at second 3, then steady again” is a film editing instruction written into the prompt — it describes a specific camera behavior that communicates a shockwave passing through the frame. Kling AI interprets timing instructions imprecisely, but the structure guides the model toward punctuated rather than continuous shake, which is the difference between “cinematic” and “broken stabilization.”
How to Adapt It: For a magic-focused game where physical explosions are wrong for the tone, replace all physical impact descriptors with energy-based equivalents: “arcane energy pulses expanding outward, runic patterns forming and dissolving in the air, reality distorting around the impact point.” The structural prompt — steady, impact, steady — stays identical.
8 Prompt 8: The Emotional Story Beat
The most underused shot in indie game trailers is the quiet one — the moment that communicates story and emotional weight rather than action and spectacle. A character standing alone in a ruined environment. Two characters facing each other across a distance. A figure looking out over a vast world they are about to enter or must save. These shots are what elevate a “cool game” trailer into one that makes a viewer feel something — and feeling something is what converts a viewer into a wishlist add.
Motion Strength 30 is the lowest setting in this guide, deliberate for this shot type. Emotional beats live in stillness. A character that breathes slowly, with minimal movement, against an environment that carries the weight of the world through light and atmosphere — that is a more emotionally effective clip than any amount of particle effects or camera movement. The restraint of this shot in a trailer makes the action clips hit harder by contrast.
Why It Works: “This is a quiet moment — let it breathe” is a meta-instruction that reads as unusual in a technical prompt but has a measurable effect: it reduces Kling’s tendency to insert unsolicited motion elements when Motion Strength is low. The model interprets low motion strength settings as an invitation to compensate with environmental drama — fog rolling in, background elements suddenly animating. This instruction directly counters that tendency. “Score-worthy atmosphere” primes the model toward the sustained, held quality that editorial music underscores well.
How to Adapt It: For a two-character scene, generate the clip from a composed image where both characters are already positioned correctly in the frame. Do not try to prompt Kling to place specific characters relative to each other — it will not produce consistent character placement. Compose the scene yourself in Photoshop first, then animate the composition.
9 Prompt 9: The Multi-Clip Chase Sequence
That third clip in a well-cut action sequence is doing something subtle that most first-time trailer editors miss. A chase or combat sequence in a trailer is not built from one long shot — it is assembled from three to five short clips that escalate in camera proximity and motion intensity. The first clip establishes geography. The second clip closes in. The third clip is close enough that the viewer is inside the action. Each clip uses the final frame of the previous clip’s motion direction as its starting context, which gives the sequence continuity without requiring Kling to maintain consistency across a single long generation.
This is the most technically demanding prompt in the guide — not because the individual prompts are complex, but because it requires planning the full sequence before generating any single clip. Write out the three-clip arc on paper first: what does the camera see at the start, where does it move, what state does it end in? Then generate each clip in sequence, using the last frame of each as the source image for the next.
Why It Works: Using the last frame of each clip as the source image for the next maintains motion direction continuity across the sequence — the camera is already moving in a specific direction when Kling begins generating the next clip, which prevents the jarring direction reversals that plague AI-generated action sequences. “Decreasing clip length creates pace acceleration” is an editing instruction written for the video editor, not the AI — it is the most important note in the prompt for making the sequence feel like it builds toward a climax.
How to Adapt It: For a stealth game where chasing is not the tone, replace the chase arc with a stalking arc: wide shot showing an enemy patrol, medium shot showing the player character in shadow at mid-distance, close shot showing the player’s eyes watching and waiting. Same three-clip structure, completely different emotional register.
10 Prompt 10: The Complete Trailer Assembly Pipeline
This is the master workflow — the one that integrates every clip type above into a structured, production-ready trailer assembly process. It is not a single prompt. It is a complete production pipeline that tells you which clips to generate in which order, how to structure them in a video editor, where to place music transitions, and what the final export settings should be for Steam, YouTube, and social media distribution. The output is a trailer that looks like it cost more than it did.
The difference between a developer who assembles twelve AI clips into a trailer and one who assembles them into something memorable is structure. A trailer has an arc — a beginning that hooks, a middle that builds, a climax that pays off, and an ending that converts. Every clip serves a function in that arc. Generating great clips randomly and assembling them in a pleasing order is not the same as deliberately producing clips for each function and assembling them in a structure that earns the viewer’s reaction.
Why It Works: The clip order encodes a specific emotional arc — wonder, scale, character, stakes, action, climax, resolution. Every professional film trailer follows a version of this arc because it mirrors how human emotional engagement actually builds during a short video. The music structure reinforces the arc by controlling energy independently from the visual cuts — music that peaks during the visual climax and resolves at the logo creates a compound emotional effect that neither element achieves alone.
How to Adapt It: For a shorter 30-second social media trailer, collapse the structure to four sections: hook (one clip, 4s), world-building (one clip, 6s), action climax (two clips cut fast, 10s), title card (10s). Every section drops to one clip each, and the music arc compresses to match. The structure principle — hook, build, climax, resolve — stays intact at any runtime.
Common Mistakes and How to Fix Them
The pattern most developers fall into is treating Kling AI like a one-shot machine: generate a clip, decide if it looks good, keep it or discard it, repeat. That produces random results and wastes significant generation credits on clips that would have been predictably better with a few structural adjustments. The mistakes below are the ones that show up repeatedly — and every one of them is a process decision, not a luck problem.
| Mistake | Wrong Approach | Right Approach |
|---|---|---|
| Wrong Motion Strength for shot type | Using Kling’s default Motion Strength (50) for every clip — hero reveals look frantic, emotional beats look jittery, action clips lack energy | Match Motion Strength to shot type: 30–35 for emotional beats, 40–45 for reveals, 55–60 for action, 65 for atmosphere/chaos. Each shot type has different motion requirements |
| Skipping the negative prompt | Writing a detailed positive prompt and leaving the negative prompt empty — then being confused when characters attack during a reveal shot or logos warp during a title card | Every prompt type has a specific negative prompt. The negative prompt directly blocks Kling’s strongest default behaviors — never skip it, especially for controlled shots like hero reveals and title cards |
| Using Standard mode for final clips | Generating all clips in Standard mode to save credits, then discovering temporal inconsistency in every clip when assembled in the editor | Use Standard mode only for rough tests and prompt validation. Switch to Professional mode for every clip intended for the final trailer — the quality difference is visible even in a 5-second clip at normal playback speed |
| Generating without a trailer structure | Generating impressive-looking clips at random and assembling them in whatever order feels good — producing a highlights reel rather than a trailer | Write the full clip plan from Prompt 10 before generating a single clip. Know what function each clip serves in the trailer arc before deciding what to generate |
| No music planning before clip timing | Generating clips, assembling them, then trying to find music that fits — usually resulting in a trailer where the visual climax and music peak are misaligned | Choose your music track first. Mark the music’s energy peaks, builds, and drops on a timeline. Then determine clip durations to align the visual climax with the music’s loudest moment — not the other way around |
“A trailer is not a best-of reel. It is an argument — a structured case that this game deserves the viewer’s time and money. AI can generate the evidence. The developer still has to build the argument.”
— Game marketing principle applied to AI-assisted trailer production
What Kling AI Still Struggles With
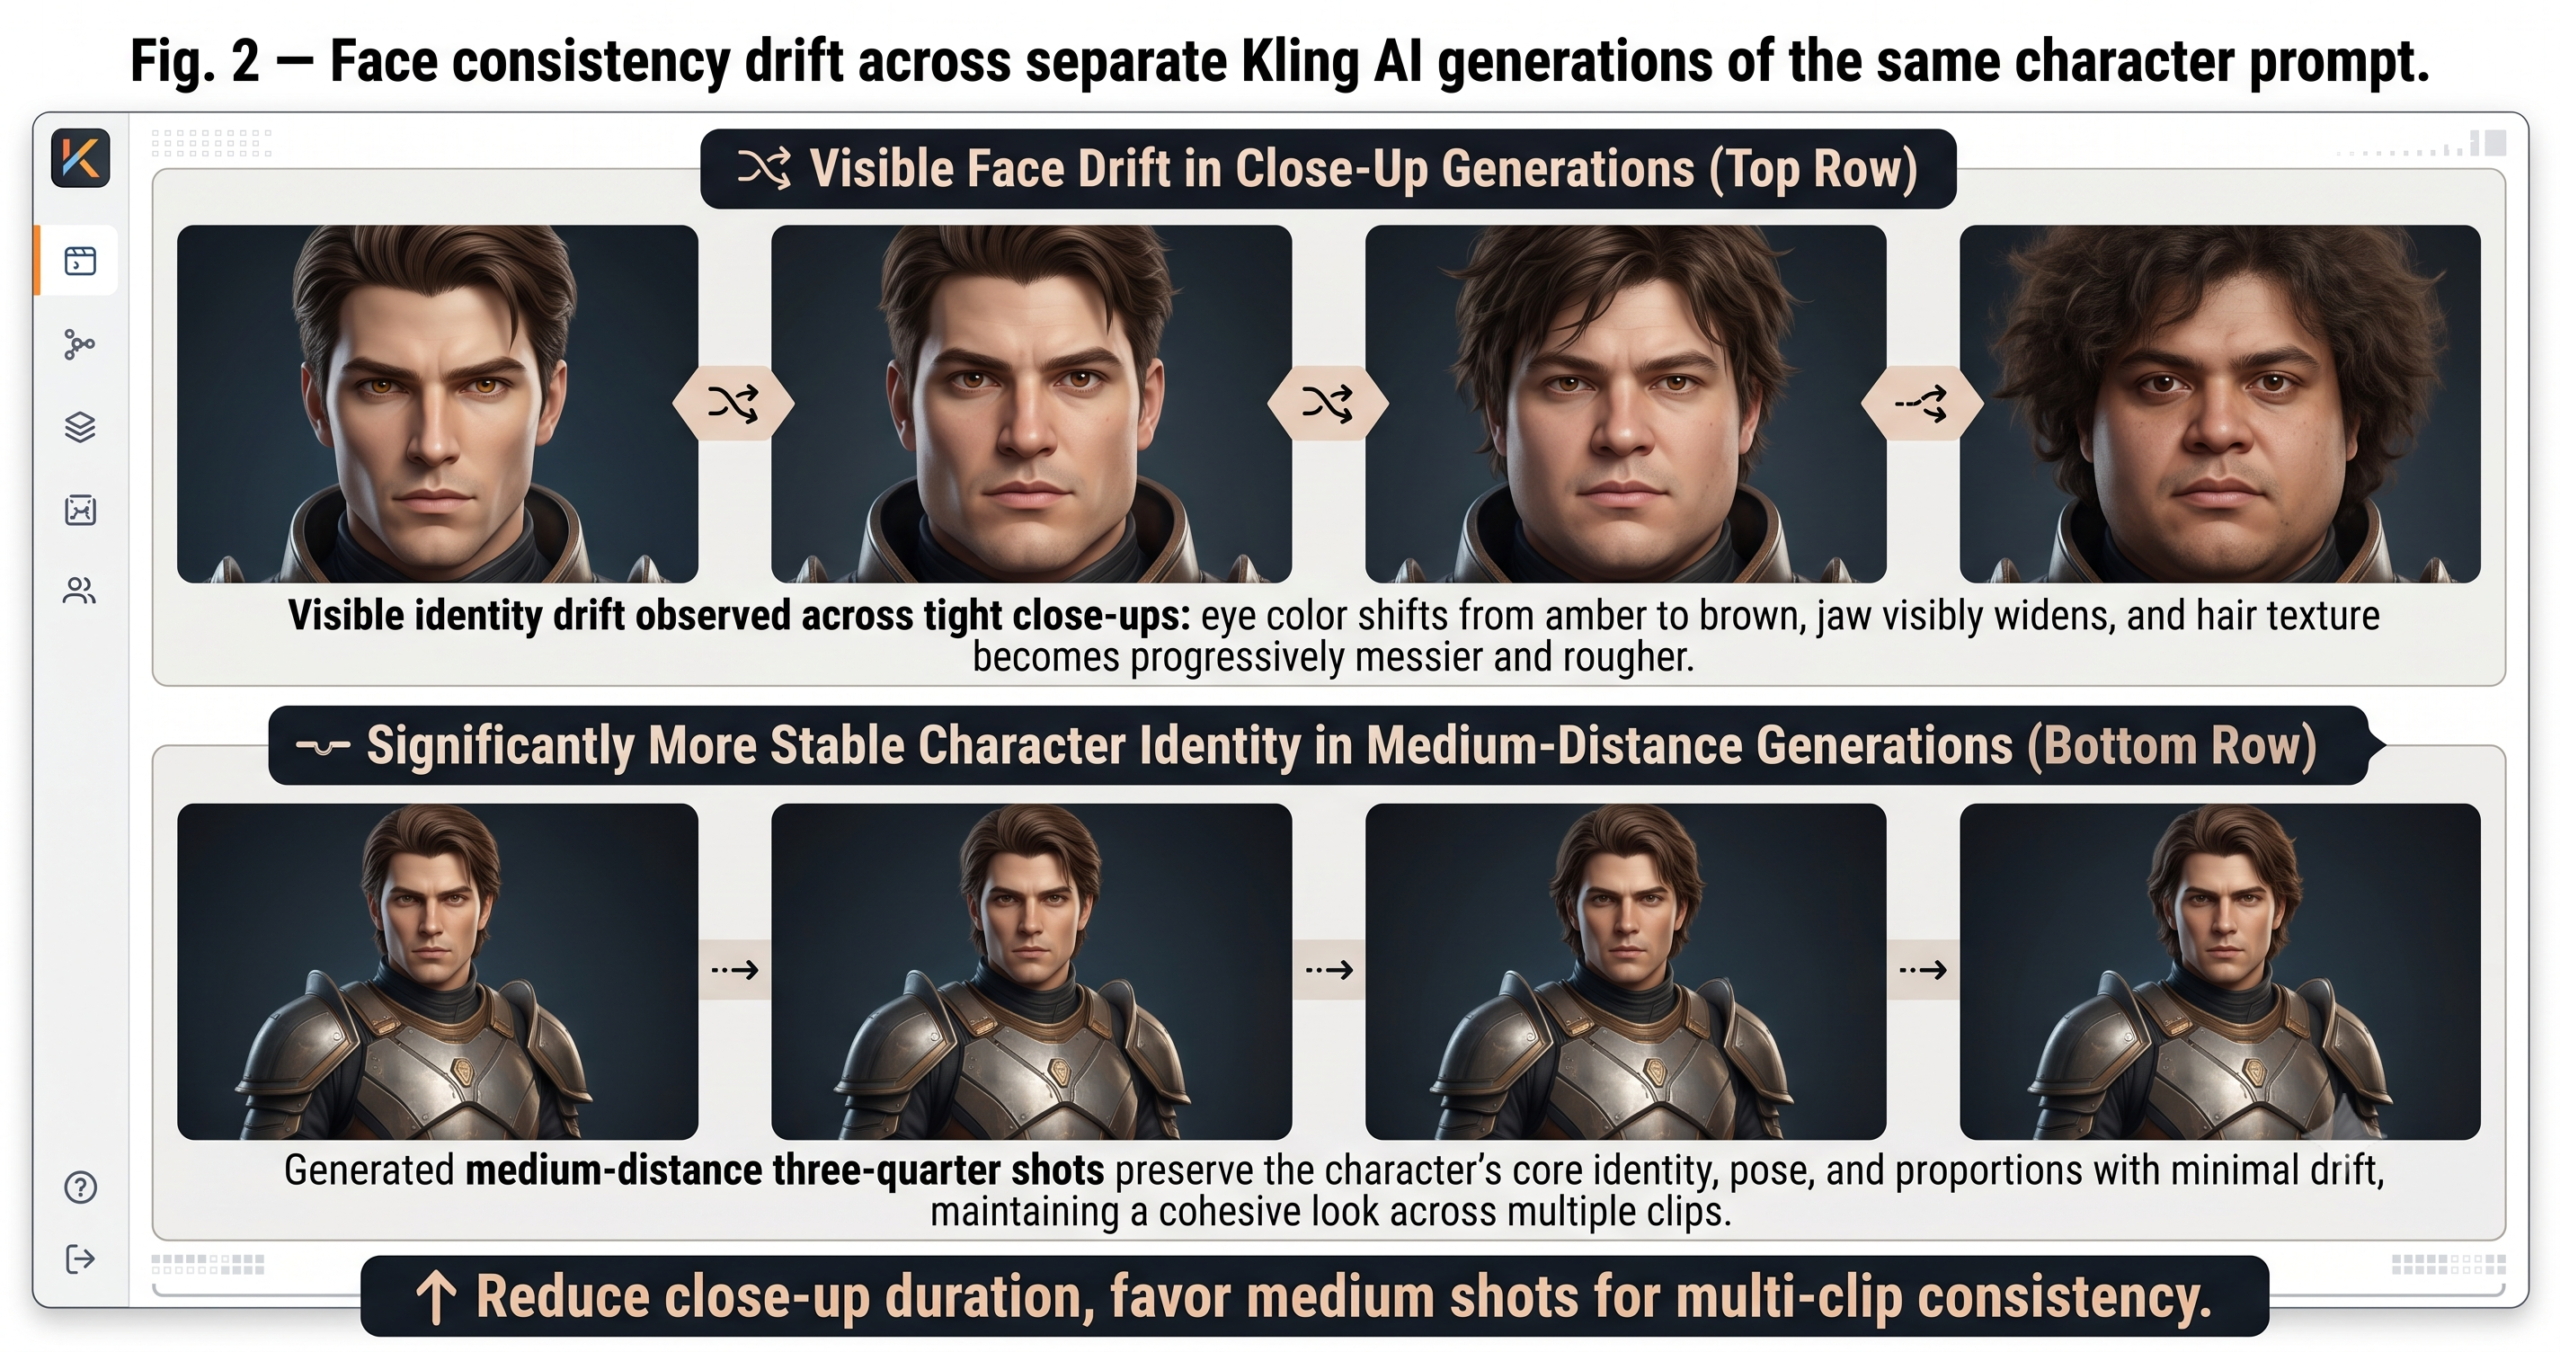
Face and identity consistency across clips is the most significant limitation for game trailer production in 2026. Within a single clip, Kling AI maintains a character’s face reasonably well — well enough to be usable in most shots. Across multiple clips of the same character, generated separately, the face will drift. Eyes change color. Jaw shape varies. Nose bridge shifts. In a finished trailer edited at pace, most viewers will not consciously notice this across 2–3 second clips. In a slow reveal shot held for 4–5 seconds, or in a side-by-side comparison, it is visible. The practical workaround is keeping character close-ups to a minimum and favoring medium shots, silhouettes, and three-quarter angles where face geometry is less immediately readable.
Complex multi-character interactions remain largely outside what Kling handles reliably. Two characters fighting, a character and companion running together, a crowd scene — these regularly produce spatial distortions where characters merge, pass through each other, or change relative positions mid-clip. The chase sequence workflow in Prompt 9 is specifically designed to avoid this problem by keeping each clip focused on a single character or a single viewpoint. If your game’s trailer genuinely requires two specific characters in the same shot, compose the scene in a static image first and use image-to-video with very low Motion Strength — the more you constrain the source material, the less Kling needs to generate the spatial relationship from scratch.
Clip-to-clip visual style coherence is the third persistent challenge. When you generate 15 clips across a two-hour session using the same style descriptors, approximately 2–3 of those clips will drift noticeably in color temperature, lighting quality, or texture detail — seemingly randomly. This is not a prompting failure; it is inherent variance in the generation process. The practical response is to generate more clips than you need — plan for 12 final clips, generate 18–20, and select the 12 that hold the style most consistently. Expecting perfect style coherence across every clip is the expectation that leads to frustration. Generating with redundancy and selecting for consistency is the expectation that leads to a finished trailer.
What Making This Trailer Actually Teaches You
The skill you develop building a game trailer with Kling AI is not a video production skill — it is a clarity skill. To write prompts that produce usable cinematic clips, you have to be able to describe your game’s visual world in precise, specific language: the light quality, the emotional temperature, the scale of environments relative to characters, the pacing of each moment in the game’s story. Developers who struggle with Kling AI almost always struggle because they have not yet developed that clarity about their own game’s visual identity. The tool forces the question. The answer, when you find it, makes every subsequent piece of marketing communication — social posts, press kit images, store page copy — significantly easier to produce.
There is a broader principle at work in this kind of AI-assisted production: the value of these tools is not in what they generate, but in the decisions they make you articulate before they will work correctly. A prompt that produces a great Kling clip is a design document. It describes the game’s world with enough specificity that a motion model can render it. That specificity — that clarity of vision — is the asset that compounds across everything you make for the game, not just the trailer.
That said, Kling AI cannot make editorial decisions for you. It cannot decide which clips should be shorter, which shot should follow which, where the silence should be, or when to hold on an image long enough for it to land emotionally. Those choices are yours, and they require the same taste and judgment that any form of video editing requires. The tool accelerates production. It does not replace the eye.
The trajectory for AI video generation over the next 12–18 months points toward longer clips with more stable character identity, better multi-character interaction handling, and native integration with editing platforms that reduces the export-import cycle between generation and assembly. When those improvements land, the workflow above will compress — fewer generation sessions, faster iteration, higher first-pass quality. The developers who are building their prompt vocabulary and trailer structure understanding now will be faster and more effective with every tool improvement that follows. Start with Prompt 1. Generate the hero reveal. Get one clip right. The rest follows.
Try These Prompts Right Now
Kling AI’s free tier gives you enough credits to test Prompts 1–3 today — the hero reveal, the world establishing pan, and the title card animation. Start there, then upgrade when you are ready for the full trailer workflow.
Related Articles
Explore More on aitrendblend.com
- Homepage — AI Tools, Prompts, and Trends
- Prompt Engineering Guide and Full Library
- Game Development AI Resource Hub
- Computer Vision and Image AI Explained
- Deep Learning for Beginners and Practitioners
- Natural Language Processing Tools and Guides
- About aitrendblend.com and the Editorial Team
- Contact Us and Article Submissions