
Stable Diffusion is that version. It is free, it is open source, it runs on your own hardware, and when it is set up correctly it produces game assets that stay more consistent, respond to more control, and sit closer to your specific project than any subscription tool will hand you. The trade is real. Setup takes longer, the learning curve is steeper, and you need a GPU that can carry the work. Once you are past that first investment the cost per asset drops to the price of electricity, and the creative control opens up in a way cloud tools cannot match.
This guide walks through the ten most useful Stable Diffusion workflows for game development. It starts with a first sprite you can generate twenty minutes after installation and ends with a full automated ComfyUI pipeline that batches out consistent assets in a fraction of the time any other tool would need. Every prompt carries the specific settings, model recommendations, and workflow steps that produced reliable results when we tested them for this guide. Where the tool struggles, and it does struggle with specific things, those limits are named plainly rather than smoothed over.
You will finish knowing which model suits which asset type, how ControlNet changes what is possible for game art, why LoRA training is the decision that separates a developer who owns an AI art tool from one who owns an AI art pipeline, and which common setup mistakes cost developers hours of bad generations that better configuration would remove.
Key points
- Local Stable Diffusion freezes your model version, so a prompt that works today still works six months from now, which matters for any game that needs a consistent run of assets.
- The open ecosystem of LoRA models, ControlNet adapters, and shared ComfyUI graphs is the real advantage over cloud tools, and most of it is free.
- Four settings decisions fix most bad output. Correct base model, a strong negative prompt, CFG in the 6 to 9 range for SDXL, and ADetailer running on faces and hands.
- ControlNet OpenPose and a trained LoRA are the two techniques that make the same character hold up across many separate generations.
- Three things stay genuinely hard in 2026. Legible text inside an image, character identity across sessions without a LoRA, and busy multi figure scenes.
- A ComfyUI graph fed by a CSV asset list turns manual generation into a production run that makes dozens of consistent assets while you work on something else.
Why Stable Diffusion Is Different for Game Development
The problem most people hit with subscription AI art tools is one they do not recognise as a problem at first. They are renting someone else’s model. Every time Midjourney or Leonardo AI updates a base model, your established prompts can start returning different results. Style descriptors you tuned carefully may behave differently next month than they did this month. For game development, where consistency across a run of a hundred assets or more matters enormously, that unpredictability is a real production risk.
Stable Diffusion answers this by being fully local. You choose the model version, you freeze it, and nothing changes unless you decide to update. A prompt that produces a specific result on a specific model checkpoint today will produce that same result six months from now on that same checkpoint. For a studio building on a long production cycle, that stability is not a minor convenience. It is the thing that makes an AI art pipeline actually viable instead of a constant source of rework.
The second structural advantage is the ecosystem. No other AI art platform has anything close to the community infrastructure that grew up around Stable Diffusion. Thousands of LoRA models trained on specific art styles. ControlNet adapters for pose control, depth mapping, edge detection, and line art. Custom checkpoints trained on pixel art, anime, painterly illustration, and 3D render styles. ComfyUI node graphs shared by developers who already solved the exact workflow you are trying to build. The tools are free. The community knowledge is deep. The specific problem of wanting clean pixel art sprites at a tiny resolution has already been solved by someone who published their workflow, and you mostly need to find it and adapt it.
The advantages of local Stable Diffusion over cloud tools for game development come down to four things. Frozen model versions for production consistency, unlimited local generation at no cost per image, full pipeline control through ComfyUI, and an open ecosystem of LoRAs, ControlNet adapters, and community workflows built for game asset types. The disadvantages are upfront setup time and GPU hardware. If you own a capable GPU and you are making a game that will need more than two or three hundred generated assets, local Stable Diffusion will save money and deliver steadier results than any subscription tool.
Setting Up Stable Diffusion Before Your First Asset
Two interface choices exist, and they serve different purposes. AUTOMATIC1111 is the classic web UI. It is simpler to install and excellent for single image generation, img2img work, and quick prompt testing. ComfyUI is the node based workflow builder. It is steeper to learn, and it is what serious game asset pipelines run on. It handles batch generation, chained workflows that generate then upscale then remove a background in one click, and custom pipeline logic that AUTOMATIC1111 cannot match. This guide uses both. A1111 carries the beginner and intermediate prompts, and ComfyUI carries the advanced and master workflows.
Model selection matters more than almost any other setting. For game art in 2026 the recommended base models are Juggernaut XL v9 for realistic characters and environment art, DreamShaper XL for painterly and stylised game art, SDXL Base 1.0 as the neutral foundation for LoRA training, and community checkpoints like PixelArt XL or Anything XL for pixel and anime styles. A CFG scale around 7 to 9 with the DPM++ 2M Karras sampler at 25 to 30 steps is the reliable starting configuration for game character art. Adjust from there, but start there.
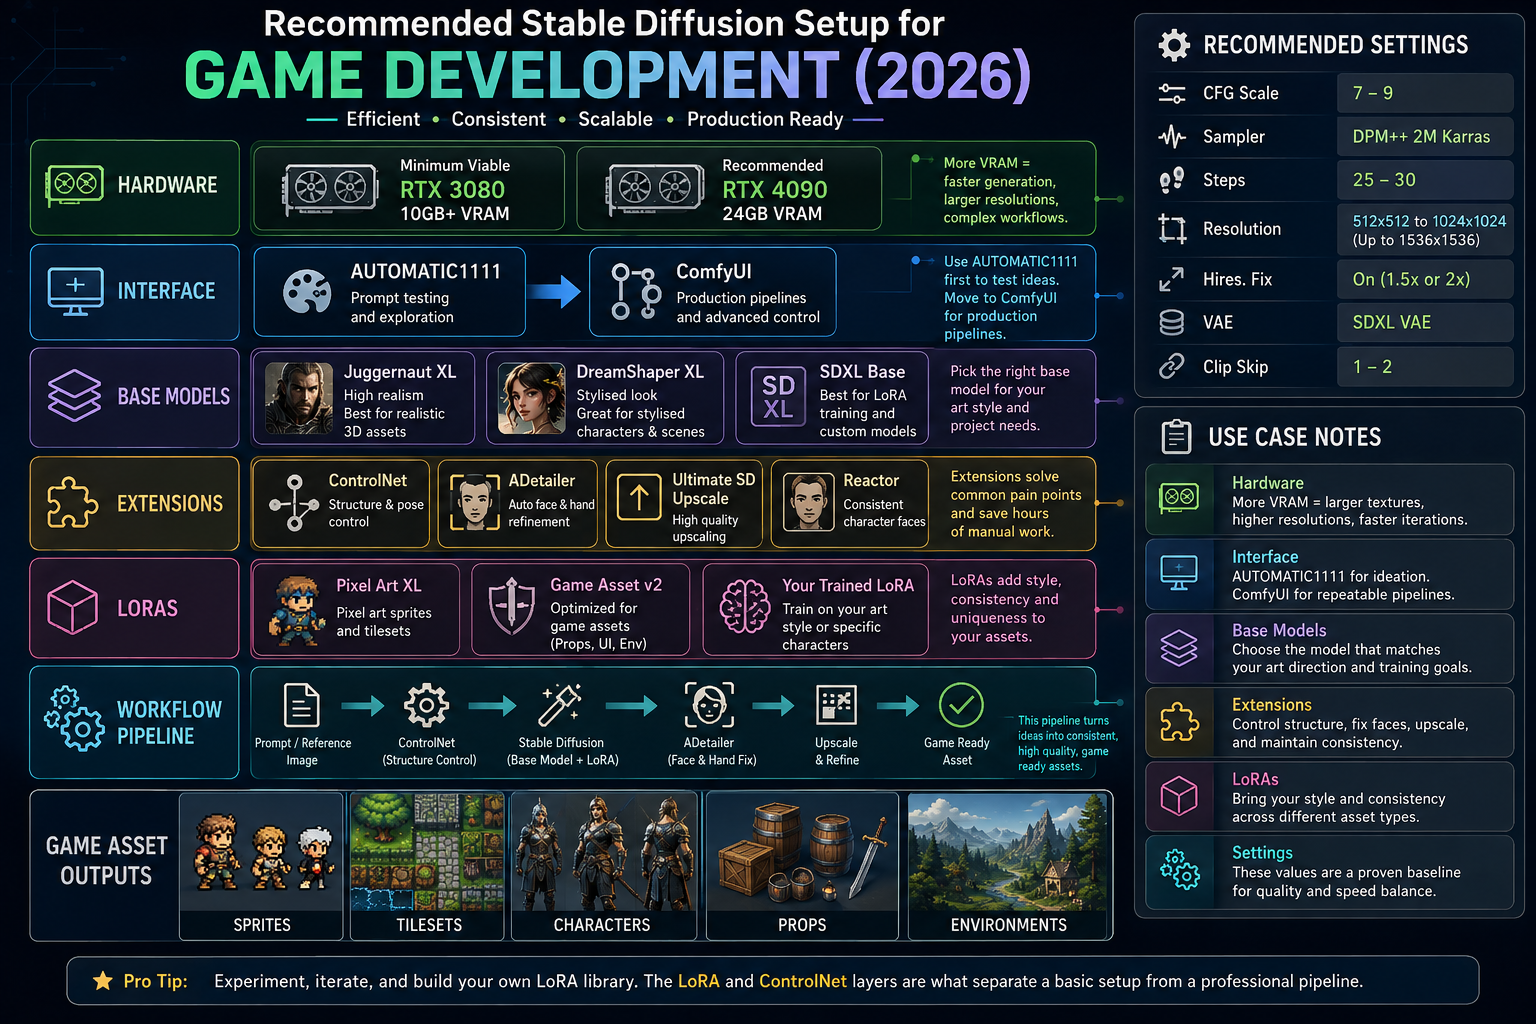
Three extensions change what is possible for game development in particular. ControlNet for pose control and composition locking. ADetailer for automatic face and hand refinement, which are the two body parts Stable Diffusion handles worst without help. And Ultimate SD Upscale for tiling upscaling that keeps pixel level detail instead of smoothing it away. Install these in AUTOMATIC1111 before any serious game asset work. They are not optional improvements. They are the difference between unusable and production ready output for a large share of your generations.
Before you generate a single game asset, install AUTOMATIC1111, download Juggernaut XL v9 and DreamShaper XL as your two base models, install the ControlNet and ADetailer extensions, and set your default sampler to DPM++ 2M Karras at 28 steps with CFG 7.5. These decisions resolve roughly 60 percent of the bad output problems that new users blame on Stable Diffusion being difficult. The tool is not difficult. The defaults are simply not tuned for game art without adjustment.
The 10 Best Stable Diffusion Prompts for Game Development
1 The Clean Game Character Sprite
Start here. This is the foundational game character prompt. It is structured to override the default pull inside DreamShaper XL toward dramatic compositions and busy backgrounds, and to produce a clean front facing character that suits a game sprite. Most first time users generate a character and get something that looks like a book cover illustration. It is beautiful, it is cinematic, and it is completely unusable in a game pipeline. This prompt structure prevents that before the generation starts.
The negative prompt here does equal or greater work than the positive prompt. Stable Diffusion models train on internet images, which skew overwhelmingly toward dramatic compositions, dynamic poses, and environmental context. That is the opposite of what a sprite sheet needs. The negative prompt blocks each of those defaults in turn.
Why It Works. The line about arms held slightly away from the body is the single most practical instruction for game sprites. It stops the arms from merging into the torso, which Stable Diffusion does by default when a character stands in a neutral pose. The negative entry for merged fingers targets the hand anatomy failure mode that still plagues Stable Diffusion output even after real model improvements. ADetailer, installed as an extension, then refines the face and hands automatically once the generation finishes.
How to Adapt It. For an enemy character, swap the role descriptor and add menacing posture, a slight forward lean, and a weapon shown clearly to the positive prompt, then add friendly, smiling, and heroic to the negative prompt. The background and format instructions stay identical. The emotional and role signals are the only things that need to change.
2 The Pixel Art Sprite with LoRA
Pixel art is where the LoRA ecosystem pays off fastest. The base SDXL model has limited pixel art ability. It understands the idea but produces output that is anti aliased, heavy on gradients, and photographically shaded in ways that break the visual grammar of pixel art. A pixel art LoRA trained on clean pixel work corrects all of that at the model level, instead of forcing you into prompt gymnastics to fight behaviour that keeps creeping back.
The CFG scale of 6, lower than the standard recommendation, is specific to LoRA assisted pixel art. Higher CFG values combined with a strong LoRA produce oversharpening artifacts that show up as jagged aliased edges that look broken rather than intentionally pixelated. The workflow below generates at a higher resolution than the final target and downsizes with nearest neighbor interpolation, which is the correct way to reach an authentic pixel scale.
Why It Works. The console era reference, NES, SNES, GBA, gives the LoRA a cultural anchor for palette depth and shading style that an abstract instruction like limited colors does not carry on its own. Hard pixel edges and no anti aliasing in the positive prompt, paired with anti aliasing and smooth shading in the negative prompt, form a redundant instruction pair that consistently yields cleaner pixel edges than either half alone.
How to Adapt It. For a full sprite sheet with walk cycle frames, generate four individual sprites using the same prompt and the same seed, changing only the perspective instruction across front, front right, side, and back. Holding the seed constant across all four gives you the highest degree of character consistency, because identical seeds with identical prompts produce near identical characters, which is what you want for the same character seen at different angles.
3 The Game Prop and Item Sheet
Props are the workhorses of game art production. Weapons, potions, keys, coins, tools, books. A game with 50 items in its inventory needs 50 icons, and generating them one at a time with inconsistent style is one of the most common production bottlenecks. This prompt generates multi item sheets in a single pass, six to twelve props arranged on a white background, which is far more efficient than individual generation and produces a more consistent style across the set because everything is made in the same pass.
The sheet format also makes batch background removal faster. One selection call on a well organised grid moves quicker than twelve individual calls on separately generated images. Small workflow decisions compound across hundreds of assets.
Why It Works. The instructions for a soft top left light source and a consistent level of detail across all items are what turn a group of individually generated items into an icon set that reads as designed rather than assembled. Inconsistent light direction across icons is the most common reason an AI generated item set looks unprofessional. Players notice it without being able to say what is wrong.
How to Adapt It. For rarity tiered items running from common to rare to legendary, generate three separate sheets with the same item types but different material quality signals. For common, use simple materials, muted colors, minimal decoration. For legendary, use ornate engraving, glowing accents, premium materials, maximum visual complexity. Players should read rarity at a glance, and the art has to do that work without text labels.
4 The Seamless Environment Tileset
The problem most people hit with generated environment tiles is that they tile with visible seams. A repeating line or a color shift appears at the edge of each tile and becomes obvious the moment the tile fills a large area of the screen. AUTOMATIC1111 has a built in tiling checkbox that applies a tiled diffusion process, producing images that wrap seamlessly at all four edges. This one checkbox changes tile generation from frustrating to genuinely productive.
Seamless tile generation works best with texture focused prompts rather than scene focused ones. You are not generating a scene of a forest. You are generating the visual texture of forest ground that can tile. That distinction in how you frame the prompt produces fundamentally different results.
Why It Works. Flat even lighting with no directional shadow is the most important instruction for a tileable texture. Directional shadows, even subtle ones, break the illusion of tileability at once, because the shadow direction reverses at the tile edge. Even distribution of detail across the image stops Stable Diffusion from placing a focal point near the center of the tile, which would create a grid of focal points once the tile repeats. Tiles should read as visually uniform across the whole surface.
How to Adapt It. For a transition tile between two terrain types, grass into dirt or stone into wood, generate the two base tiles first, then run img2img at strength 0.4 on a half and half composite of both tiles. The transition zone blends naturally while the edge tiles hold their original character. This is faster than prompting transition tiles from scratch and gives more coherent results.
5 The ControlNet Character Pose Sheet
ControlNet OpenPose is the single most transformative tool for game character production in Stable Diffusion. Without it, generating a character in a specific pose, a combat stance, a walk cycle frame, a casting animation reference, takes heavy prompt engineering and returns inconsistent results. With it, you draw or download a pose skeleton, upload it as a ControlNet reference, and the model generates a character in precisely that pose every time. The appearance changes with the prompt. The pose structure is locked by ControlNet.
For developers, this means you can download a library of standard game character poses, idle, walk, run, attack, jump, death, and apply your character design to each one consistently. This workflow produces the most reliable animation reference sheets of any method in this guide.
Why It Works. Holding the costume, colors, and art style constant, together with the same seed across all pose generations, is the consistency mechanism. ControlNet locks the pose. The seed and the character description lock the visual identity. Together they produce what no amount of text prompting alone achieves, the same character in genuinely different positions without the style drift that plagues multi generation character work.
How to Adapt It. For enemy animation references, run the same workflow but feed a pre established enemy image as the img2img reference at strength 0.35, combined with the OpenPose control. The img2img reference holds the visual character while ControlNet locks the pose structure, three constraints working together instead of one.
6 The Environment Key Art and Background Layer
Juggernaut XL produces environment key art with a painterly quality that reads convincingly as hand made concept art, which is exactly how a game’s background layers should feel. The trick for usable environment art is generating with explicit layer separation in mind. The foreground, midground, and background elements need to stay compositionally distinct so they can be split in Photoshop for parallax scrolling or depth of field effects in the engine.
Most environment prompts fail at this level because the developer describes the scene rather than the composition. A dark forest with a stone path leading to a distant castle describes content. Stone path in the foreground, a dense tree canopy at mid height, and a distant castle silhouette on the horizon against a twilight sky describes a composition with three distinct depth planes, which is what you actually need for a game background layer set.
Why It Works. Reserving a flat navigable midground at 40 percent of the image height is a compositional instruction that most environment prompts omit, and its absence is why so many generated environments look beautiful yet cannot serve as game levels. There is nowhere for the player character to stand. Explicitly holding 40 percent of the image for a flat walkable midground is the instruction that makes environment art usable in a game rather than only usable in a gallery.
How to Adapt It. For a 2.5D game that needs parallax layers exported separately, generate the environment once, then use img2img with ControlNet Depth to inpaint individual layers. Generate the background only, sky and horizon, first, then the midground, then the foreground as separate images at the same overall composition. The Depth ControlNet keeps each layer respecting the spatial relationships set by the full composition.
7 The LoRA Training Workflow for a Custom Art Style
Here is where it gets genuinely interesting. Training a custom LoRA on your game’s art style is the decision that separates a developer using AI as a production tool from one using it as a generation toy. A well trained LoRA on your existing game art means every later generation, characters, enemies, props, environments, comes out in the same visual language as your existing assets, with no need to force style consistency through prompt language that will never be as reliable as a trained model.
The training process sounds intimidating and has become far more accessible. Kohya_ss provides a GUI that handles the technical parameters. The dataset requirement is modest. Fifteen to twenty five high quality images of your established style are enough to train a functional LoRA. The workflow below outlines the key decisions rather than a detailed install walkthrough, which the Kohya_ss documentation already covers.
Why It Works. The dataset diversity ratio, weighted around 40 percent characters, 30 percent environments, and 30 percent props, stops the LoRA from over indexing on any single asset type. A LoRA trained only on character art will push character like qualities into environments and props, which is not what you want. The trigger word approach isolates the style to intentional activations rather than bleeding into every generation on that checkpoint.
How to Adapt It. For a pixel art game specifically, train your LoRA on clean manual pixel art from your game rather than on AI generated pixel art. A LoRA trained on human made pixel art captures the intentional constraints of the medium, a limited palette, deliberate dithering, specific tile patterns, in a way that training on AI pixel art does not, because AI pixel art already represents a diffuse interpretation of the style.
8 The Game Ready Texture Map Generator
3D game development needs texture maps, and not only the diffuse color texture. It needs normal maps for surface depth, roughness maps for material response, and ambient occlusion maps for shadowing. Stable Diffusion can generate the base diffuse texture with the tiling workflow from Prompt 4, and a second ControlNet Tile pass can derive approximations of the normal and roughness maps from that base texture. The results do not replace a professional PBR texturing tool, yet they are functional placeholders that you can refine and that come out far faster than painting from scratch.
This prompt type is especially valuable for environment props, 3D character clothing, and architectural surfaces in games that use 3D rendering. For 2D games the diffuse texture alone is enough and the multi pass approach is not needed.
Why It Works. The instruction for flat diffuse color information only with no baked lighting is what makes the diffuse texture usable in a 3D pipeline. A texture with baked directional shadows cannot be relit by the engine. The engine’s lighting system fights the baked lighting and produces double shadow artifacts. Generating a flat evenly lit diffuse texture hands the engine full control over surface lighting, which is the correct approach for any 3D game asset.
How to Adapt It. For stylised 3D games in the vein of Borderlands cel shading, generate the diffuse texture with hand painted, visible brushstroke, flat cell shaded look, cartoon game texture added to the positive prompt. The PBR pass structure stays identical. Only the visual style of the diffuse changes, and the normal map pass still adds genuine surface depth to what reads as a flat painted texture.
9 The Inpainting Repair and Iteration Workflow
Most tutorials skip this part entirely, the workflow that fixes generated assets rather than discarding them. When Stable Diffusion produces a character with a good costume and a broken hand, the reflex is to generate again and hope for better. That approach wastes generations and rarely produces the same quality costume on the next try. Inpainting is the correct tool. You mask the problem area, generate a fix for only that region while preserving everything else, and end up with a better asset than starting over would have produced.
Inpainting is also the workflow for iterating on an established asset. Adding a weapon to a character generated without one, changing a costume element without regenerating the face, or extending an environment image to a wider aspect ratio through outpainting. These operations turn individual generations into evolving assets rather than fixed outputs.
Why It Works. The instructions for the same lighting direction and the same skin tone in the hand repair prompt decide whether the repaired area blends seamlessly or reads as a patch. Stable Diffusion will match the general style of an inpainting prompt, but without explicit lighting and color continuity it generates a hand that is correctly formed yet lit from a different angle, which is visible even at game resolution. A denoising strength around 0.6 to 0.75 is the range that allows meaningful correction without destroying the surrounding asset.
How to Adapt It. For adding environmental detail to an existing background, a torch on a wall, a door in an archway, a barrel in a corner, inpainting at denoising 0.55 to 0.65 produces additions that integrate naturally with the original generation. A lower denoising strength preserves more of the original image context around the masked area, which yields more coherent additions than higher strength values.
10 The ComfyUI Batch Asset Production Pipeline
This is the master workflow, the ComfyUI node graph that takes a CSV file of asset descriptions, generates each one at production resolution, applies ADetailer refinement, upscales with the 4x-UltraSharp model, removes the background, and exports named PNG files into an organised folder structure. A single run can produce 50 consistent game assets while you work on something else. This is what AI in the game art pipeline looks like at the professional level. Not a developer manually generating and reviewing images one by one, but an automated run producing batches that a human then reviews and selects from.
Building this workflow needs ComfyUI familiarity, so it is not a beginner task. Every individual node in it, though, corresponds to something you have already done by hand in the prompts above. The master workflow automates those steps rather than introducing new concepts.
Why It Works. The CSV loader is what turns ComfyUI from an image generator into an asset production system. Instead of typing each asset’s prompt by hand, you keep a spreadsheet of every asset the game needs, the same spreadsheet that serves as your asset manifest from the concept art pipeline. The pipeline reads from that document and produces the assets. Your production tracking and your generation input become the same file, which closes the gap between what you planned to generate and what you actually generated.
How to Adapt It. For a pixel art game, swap DreamShaper XL for SDXL Base 1.0 with your pixel art LoRA at weight 0.8, change the resolution to 512×512, remove the 4x upscale node, and add a nearest neighbor downscale node targeting your final sprite resolution. The graph structure, load then generate then refine then export, stays identical across art styles. Only the model, LoRA, and resolution nodes change.
Common Mistakes and How to Fix Them
The pattern most new Stable Diffusion users fall into is treating setup problems as prompt problems. A bad generation in a misconfigured setup will not be fixed by a better prompt. It just fails in a slightly different way. Every mistake below is a configuration or workflow decision rather than a creative one.
| Mistake | Wrong Approach | Right Approach |
|---|---|---|
| Using a fine tuned checkpoint for LoRA training | Training a custom style LoRA on DreamShaper XL or Juggernaut XL because those are already installed and produce good output | Always train LoRAs on SDXL Base 1.0. Training on fine tuned checkpoints bakes the checkpoint’s style into the LoRA, which makes it less transferable and harder to control at different weights |
| Skipping the negative prompt entirely | Writing detailed positive prompts, leaving the negative prompt blank, then generating 20 images hoping one has correct hands | A well written negative prompt resolves 40 to 60 percent of anatomy and background problems before the generation starts. It is not optional for game asset work where consistency is required |
| Wrong CFG scale for the model | Using CFG 15 or higher because higher guidance feels closer to the prompt, which causes oversaturation, burning, and artifact heavy output in SDXL models | SDXL models are calibrated for CFG 6 to 9. Above 10 SDXL degrades instead of improving. SD 1.5 models tolerate higher CFG, and SDXL does not. Match CFG to the model architecture rather than to your intuition about guidance strength |
| Generating at final resolution | Generating directly at 64×64 or 32×32 for pixel art sprites, which gives too few pixels for diffusion to work with and produces noise rather than content | Always generate at 512×512 or larger and downscale. The diffusion process needs resolution to work correctly. Generate large, then scale down with nearest neighbor for pixel art or lanczos for painterly art |
| Not using ADetailer for faces and hands | Accepting bad hand anatomy as just how AI works and spending hours fixing it by hand in Photoshop | Install ADetailer in AUTOMATIC1111 and enable the face and hand models on every character generation. It runs automatically after generation and resolves the majority of anatomy issues without manual work. It is the single highest value extension for game character art |
“Stable Diffusion is not difficult. It is misconfigured. Every complaint that AI is bad at hands from a Stable Diffusion user is, nine times out of ten, a complaint about a setup that is not running ADetailer.”
Common diagnosis from the Stable Diffusion game development community
What Stable Diffusion Still Struggles With
Text rendering inside images stays genuinely broken in 2026. Signs, books, in game notices, scroll text, and any asset where legible text needs to sit inside the generated image. Stable Diffusion produces garbled pseudo alphabetic nonsense for all of them, no matter how explicitly the text is specified in the prompt. The workaround is universal and not up for debate. Generate the asset without text, then add the text as a separate layer in Photoshop or your image editor. This is not a workflow inconvenience. It is the correct approach even when human artists produce assets, because rasterised text inside an illustration cannot be edited without redrawing. Keep text on separate layers. Treat the inability to render text as a reminder of good practice rather than a limit to fight.
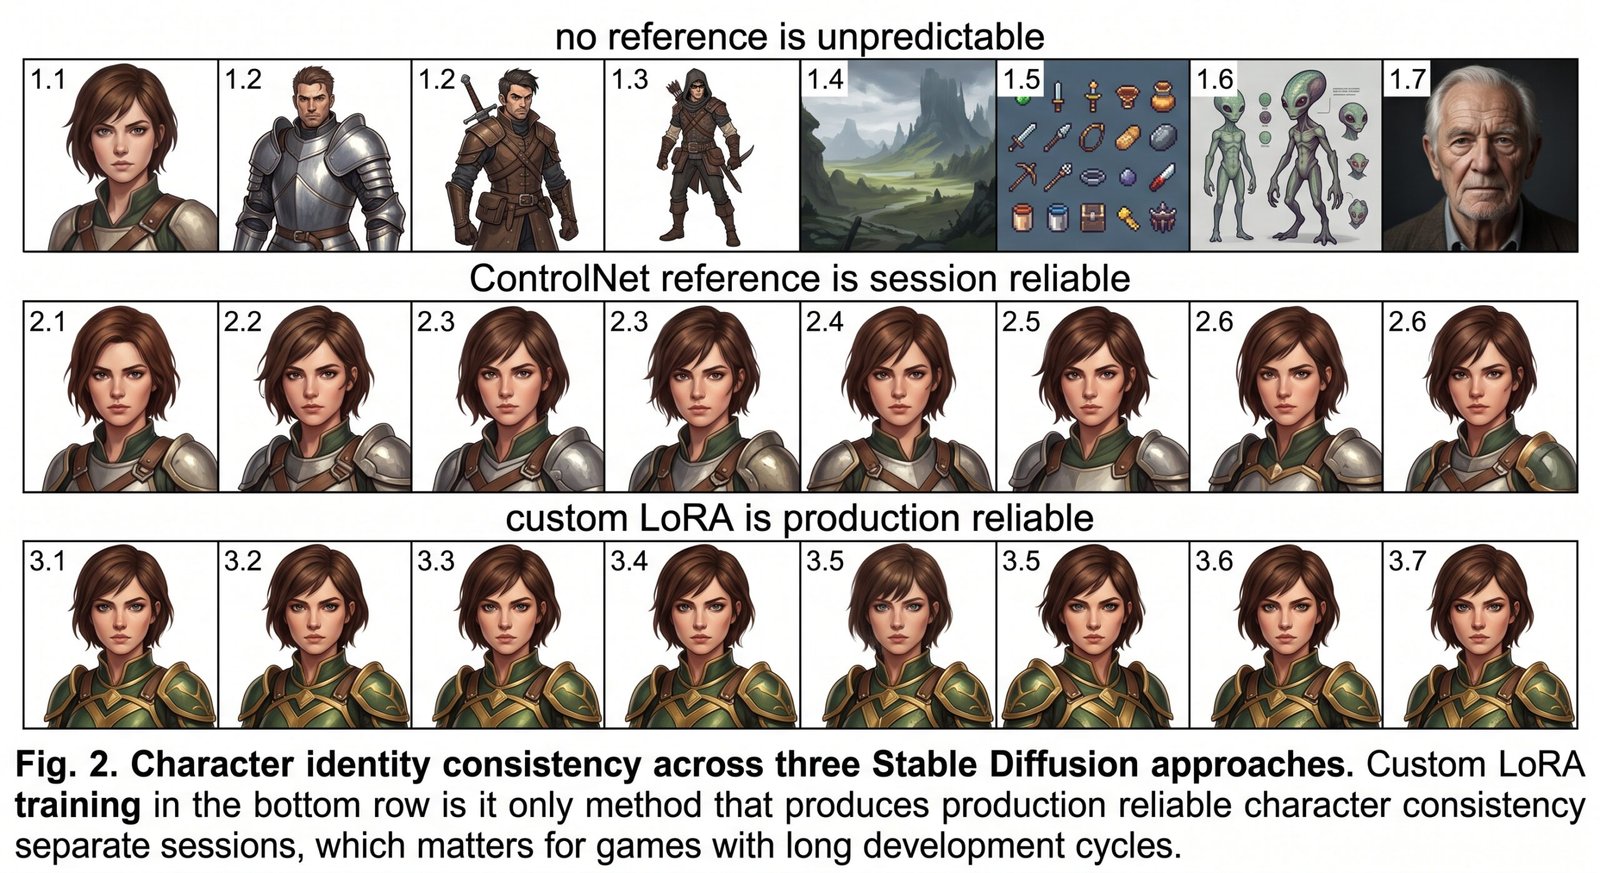
Cross session character identity without a trained LoRA is the second real limit. The image guidance workflows that Leonardo AI and Scenario.gg offer, feed a reference image and hold identity across new generations, have approximate equivalents in Stable Diffusion through img2img and ControlNet Reference adapters, and they are less reliable than trained solutions. If you need the same character across 50 sessions over six months, a custom LoRA is the only approach that holds. The ControlNet Reference adapter works well within a session, and it degrades in reliability as the gap between sessions widens and configurations drift.
Busy multi figure compositions are where Stable Diffusion is most likely to produce unusable output no matter how good the prompt is. Two characters interacting, a group scene, or any asset that needs specific spatial relationships between multiple subjects. The model struggles to hold individual character identity while it also manages spatial composition and interaction. The practical workaround most studios use is generating characters separately and compositing them in Photoshop rather than prompting for the composed scene directly. This adds a compositing step and produces far more reliable and consistent results than hoping the model will place multiple specific characters correctly in one generation.
What Running This Locally Actually Changes
Getting Stable Diffusion running locally for your game is a threshold decision rather than an incremental one. On the near side of that threshold you are renting access to a black box that limits your generations, updates without your input, and cannot be tuned to your project’s specific visual language. On the far side you have a model that stays frozen while you build on top of it, unlimited generation capacity constrained only by your hardware, and the whole open ecosystem of tools built to make game asset production more tractable. The setup cost, a few hours the first time and a few minutes on later projects, is real but finite. The production benefit compounds across every asset the game needs.
The deeper skill Stable Diffusion builds, more than any cloud tool, is an understanding of what a diffusion model is actually doing when you hand it a prompt. Because the interface exposes CFG scale, sampler choice, denoising strength, ControlNet weights, and LoRA activation rather than hiding them behind a simplified experience, you develop an intuition for how each parameter shapes output quality. That intuition transfers. It makes you more effective with every AI tool you touch afterward, because you understand the mechanism rather than only the interface.
The limits are real and belong in your production planning. Stable Diffusion will not render text. Character identity across sessions without a LoRA is unreliable enough to plan around rather than rely on. Multi character scenes call for compositing rather than direct generation. None of these are deal breakers for a game development workflow. They are constraints that inform process design, and they have documented workarounds that experienced developers already account for. The tool does not do everything. It does the specific things it does well, and for game asset production those things cover a large share of what a game’s art pipeline actually needs.
Over the next 12 to 18 months, SDXL successor models will improve character consistency, text rendering, and multi figure composition, which are the three current weak points, and ComfyUI workflows will keep standardising around shared game asset patterns. The developers running this setup now, building their custom LoRAs and tuning their ComfyUI graphs, will have a head start when those improvements land. Model updates drop into an existing working pipeline. Starting from scratch when better models arrive is a much slower path than having the infrastructure already in place.
So the honest summary is this. Local Stable Diffusion asks for patience up front and repays it in control, cost, and consistency for the whole life of a project. If your game needs a handful of images, a subscription tool is fine. If it needs a coherent library of hundreds of assets that all belong to the same world, the workflows in this guide are the closest thing to a real production pipeline that the current open tools allow, and they only get stronger as the models behind them improve.
Frequently Asked Questions
What GPU do I need to run Stable Diffusion for game assets
For SDXL based game work a card with 10GB of VRAM or more, such as an RTX 3080, is the practical minimum, and an RTX 4090 with 24GB is comfortable for batch generation and LoRA training. Less VRAM can still run smaller models, but you will trade speed and resolution, and some ControlNet and training workflows will not fit.
Is Stable Diffusion actually free for commercial game development
The software and most community models are free to run locally, and there is no cost per image. Individual checkpoints and LoRAs carry their own licences, so before you ship a commercial game you should read the licence on every model and LoRA you used and confirm it allows commercial output. The base tools do not charge you, but licence terms on specific models still apply.
Which is better for game art, AUTOMATIC1111 or ComfyUI
They serve different stages rather than competing. AUTOMATIC1111 is faster to install and better for testing prompts and single images, so it suits the early beginner and intermediate work. ComfyUI is the node based builder that handles batch runs and chained pipelines, so it suits production once you know what you want to make. Most developers use both.
How do I keep the same character consistent across many generations
Within a single session you can hold a fixed seed, reuse the character description, and add ControlNet OpenPose to lock poses. Across many sessions over months the only reliable method is training a custom LoRA on your character, because a trained model holds identity in a way that seeds and reference adapters cannot once configurations drift.
Why does Stable Diffusion produce broken text on signs and items
Diffusion models learn the general shape of letters rather than a real alphabet, so text inside a generated image comes out as garbled pseudo lettering. The fix is to generate the asset with no text and add the words as a separate editable layer in Photoshop or your image editor, which is also better practice because layered text can be changed later without redrawing the art.
How many images do I need to train a usable style LoRA
Fifteen to twenty five high quality images of your established art style are enough to train a functional style LoRA in Kohya_ss. Spread them across characters, environments, and props so the model does not over index on one asset type, and caption each with a consistent trigger word so the style activates only when you call it.
Try These Prompts Right Now
AUTOMATIC1111 is free and takes about 30 minutes to install on a capable GPU. Start with Prompt 1, the clean character sprite, and get one usable asset before you move on to the more advanced workflows. The setup investment pays back on the second asset you generate.